Football/Soccer Session (Academy Sessions): switching the point of attack

FAW Coach Ed
Tawanda Kaseke
Description
Organisation (Practice Layout & Transition)
See the guidance at the top of this page to understand why you are not seeing interactive Football/Soccer images.
See the guidance at the top of this page to understand why you are not seeing interactive Football/Soccer images.
10 mins
Objective
To improve the team’s ability to:
Recognise when to press switch
Stay compact and block opposition depth
Exploit weak-side space
Change tempo in press after switching play
Organisation
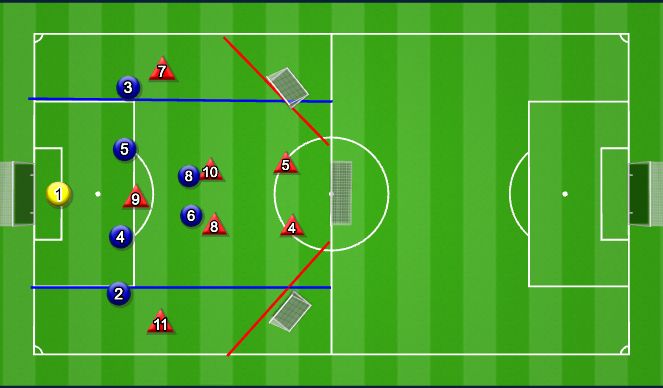
Area: 2/3 pitch (full width, approx. 70x50)
Players: 7v17 + 2 GKs
Time: 3 x 8–10 minute blocks
Wide channels marked (optional but recommended).
Both Teams
Back 4
3 midfielders
3 forwards (2 wide + 1 central)
Detail
Play starts from GK (realistic build-up).
Normal match rules apply (offside active).
Teams encouraged to build through thirds.
Scoring System
Normal goal = 1 point
Goal scored within 10 seconds of a switch of play = 3 points
Successful switch followed by penetration (cross, through pass, shot) = bonus point
Switch Definition:
Ball travels from one wide channel to the opposite side and leads to forward attack.
Match Conditions
Both wide players must stay high and wide in build-up phase.
At least one central midfielder must offer support underneath.
Switch must travel through central zone (not just direct long diagonal every time).
Coaching Points
- Leave opposite winger wide and stay compact
Full-backs support underneath
Narrow defensive block horizontally
Immediate forward run from weak-side winger
Overlap/underlap support
CM's to press high up
Circulate calmly to move block
Press at speed once space is exposed
Is attacker isolated? 1v1
Is back line shifting early? no room and have to switch
Is central gap open? Block the paths through
Transition Moment
If possession is lost during switch:
Immediate 5-second counter-press.
If defending team breaks press, they counter to opposite goal.
Encourages:
Good rest defence positioning
Balance when switching
Awareness of counter threat
Progressions
- Allow defensive - side full-back to advance freely (creates natural 2v1).

 Play animation
 Play step-by-step
 Repeat (toggle)
 Full Screen
 Pause
Pause Stop
Stop
10 mins
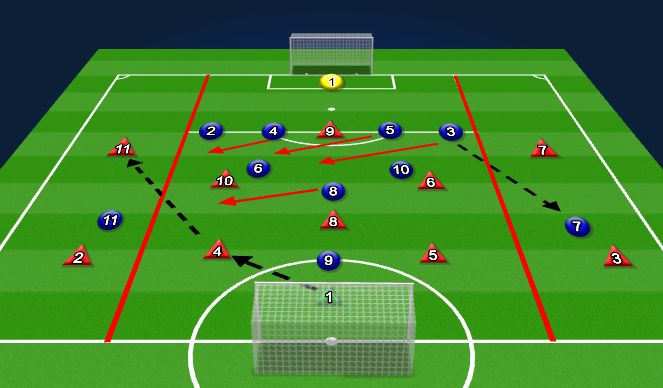
Specific Practice (10 mins)
Theme: Switching Play
Working with: Red Team
Duration: 10 minutes
Set-Up:
Use half a full-sized pitch.
Place a full-size goal either end with extra mini goals on tapered edges.
Set up two wide zones (5 yards wide) on each touchline, marked with cones.
14 players on the pitch.
Red Team (Attacking):
7 players: 2 CBs (#4, #5), 2 CMs (#8, #10), 2 Wingers (#7, #11), ST (#9)
Blue Team (Defending):
7 players: GK, 2 CBs (#4, #5), 2 FBs (#2, #3), 2 CMs (#6, #8)
How It Works:
Play starts from Red GK.
Red build up from the back, aiming to switch play via central midfielders or centre backs.
Goal is to move the ball from one winger (#7 or #11) to the opposite side, encouraging width and disorganising the defensive block.
Once switched, the wide player attacks the box.
Blue defend in a compact block, aiming to block the central lanes and force play wide.
Key Conditions:
The ball must enter both wide zones at least once before a shot is allowed.
Midfielders are encouraged to drop deep to receive and switch the ball.
Progressions:
Pressing Trigger: If the ball enters a wide zone, Blue can press aggressively.
Central Trap: Allow Blue to score in mini-goals if they win possession - encourages Red to protect central areas during the switch.
Coaching Points:
Body Shape & Scanning: Midfielders must scan and open up to switch first time if possible.
Tempo & Timing: Switch early to exploit space before the opposition shift across.
Support Play: Off-the-ball movement from full-backs and CMs to create options for the switch.
Weight & Accuracy of Pass: Firm, driven passes to switch quickly – avoid lofted or slow passes.
Communication: Players should give early cues (e.g., “Switch!” or “Set!”) to help decision-making.