


Football/Soccer Session (Academy Sessions): U14 Session 11: Creating Space for FB/RMF/LMF on the Wing (Start Time: 2016-03-02 20:50:00)

Premier Users' Club
Paul Inns
Profile Summary

| Name: | Paul Inns |
|---|---|
| City: | Newtown |
| Country: | United Kingdom |
| Membership: | Adult Member |
| Sport: | Football/Soccer |
See the guidance at the top of this page to understand why you are not seeing interactive Football/Soccer images.
See the guidance at the top of this page to understand why you are not seeing interactive Football/Soccer images.
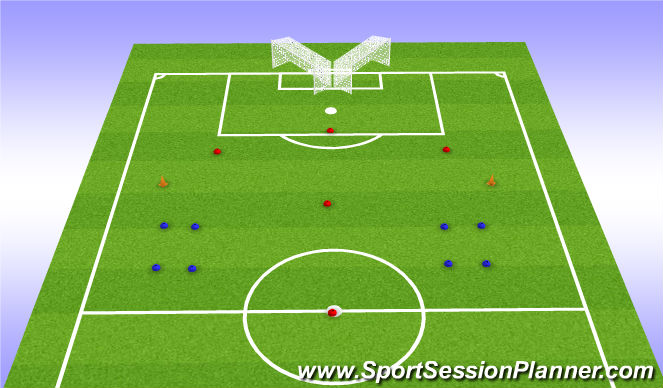
Function - Set Up
Organisation
Set up half a pitch with cones and goals as above.
Split players into 2 groups, 7 players in each group, including a GK.
Introduce players as overleaf.
See the guidance at the top of this page to understand why you are not seeing interactive Football/Soccer images.
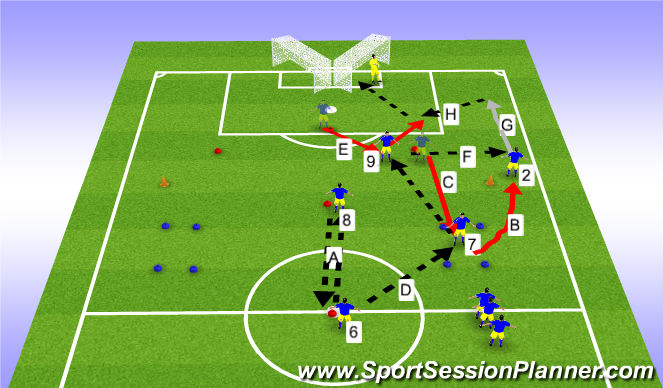
Function - Passing Sequence 1 (15 mins)
Organisation
Players are introduced into the set up, as above.
Run the two groups of players at the same time, using identical passing combinations on each end with a shot on goal - aim being to create space on the wings for the FB's to attack.
Instructions
A. No.6 starts by passing the ball forward to No.8 and receiving the pass back.
B. Trigger - as the ball is passed back to No.6, the RB No.2 makes his run from the blue box, around the cone.
C. Trigger - as soon as the RB No.2 begins his run, the RMF No.7 drops back to take advantage of the space created, ending in the blue box.
D. Trigger - as RMF No.7 enters the blue box, No.6 passes the ball to him.
E. Trigger - as RMF No.7 receives the ball, CF No.9 moves to create a passing line - on an angle, and RMF No.7 passes the ball to him.
F. Trigger - as the ball is passed into CF No.9, RB No.2 maintains his run down the wing and CF No.9 passes the ball to him.
G. RB No.2 runs with the ball into an attacking position
H. RB No.2 hits a low cross for CF No.9 to score - CF No.9 having commenced his movement just before RB No.2 crosses the ball.
NOTE - After the sequence concludes, a new FB enters the blue square. The RB No.2 become the RMF No.7, and the player who had been RMF No.7, moves out of the area of play and rejoins the queue of waiting RB's. Swap No. 6 & 8 and change No.9 as necessary according to numbers within the group.
Coaching Points
1. The rhythm and timing of the runs with the pass is key to good attacking combinations.
2. The players need to use the correct body shape and timing so that they can use just 1 touch when possible to speed up play.
3. What if the ball slows down during the passing sequence - what should the LB do? His initial quick run is important to generate the spacer into which the LMF can drop. He should remain high and wide and look to restart his run as soon as the pass into No.8 is made.
Progressions
1. Restrict players to 2 touch - or use 1 touch when they feel comfortable to do so.
See the guidance at the top of this page to understand why you are not seeing interactive Football/Soccer images.
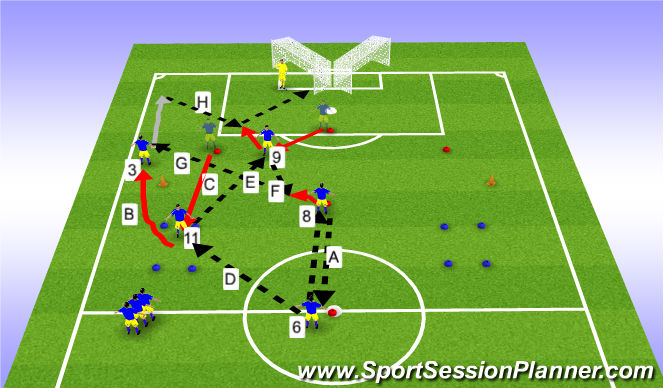
Function - Passing Sequence 2 (15 mins)
Organisation
Players are introduced into the set up, as above.
Run the two groups of players at the same time, using identical passing combinations on each end with a shot on goal - aim being to create space on the wings for the FB's to attack.
Instructions
A. No.6 starts by passing the ball forward to No.8 and receiving the pass back.
B. Trigger - as the ball is passed back to No.6, the LB No.3 makes his run from the blue box, around the cone.
C. Trigger - as soon as the LB No.3 begins his run, the LMF No.11 drops back to take advantage of the space created, ending in the blue box.
D. Trigger - as LMF No.11 enters the blue box, No.6 passes the ball to him.
E. Trigger - as LMF No.11 receives the ball, CF No.9 moves to create a passing line - on an angle, and LMF No. 11 passes the ball to him.
F. Trigger - as the ball is passed into CF No.9, No.8 mmoves to create a passing line to receive the ball from CF No.9.
G. The ball is then passed from No.8 into LB No.3, who runs with the ball into an attacking position
H. LB No.3 hits a low cross for CF No.9 to score - CF No.9 having commenced his movement just before LB No.3 crosses the ball.
NOTE - After the sequence concludes, a new FB enters the blue square. The LB No.3 become the LMF No.11, and the player who had been LMF No.11, moves out of the area of play and rejoins the queue of waiting LB's. Swap No. 6 & 8 and change No.9 as necessary according to numbers within the group.
Coaching Points
1. The rhythm and timing of the runs with the pass is key to good attacking combinations.
2. The players need to use the correct body shape and timing so that they can use just 1 touch when possible to speed up play.
3. What if the ball slows down during the passing sequence - what should the LB do? His initial quick run is important to generate the spacer into which the LMF can drop. He should remain high and wide and look to restart his run as soon as the pass into No.8 is made.
Progressions
1. Restrict players to 2 touch - or use 1 touch when they feel comfortable to do so.
2. Challenge the players to come up with their own sequence of passing subject to the following conditions:
a. Play must always commence with No.6 with a pass into No.8.
b. As soon as that pass is played, FB must sprint around the cone.
c. Ball must eventually end up with FB to cross/pass the ball in to CF No.9
See the guidance at the top of this page to understand why you are not seeing interactive Football/Soccer images.
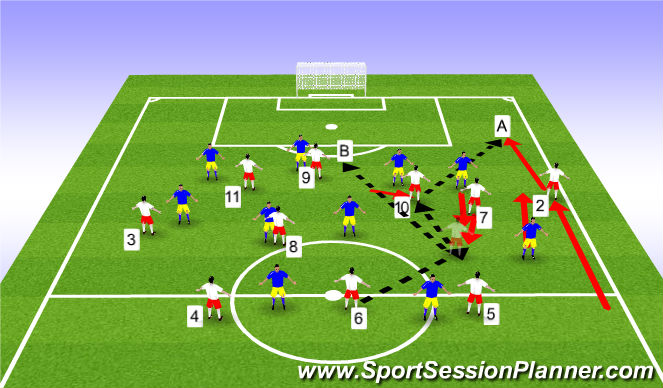
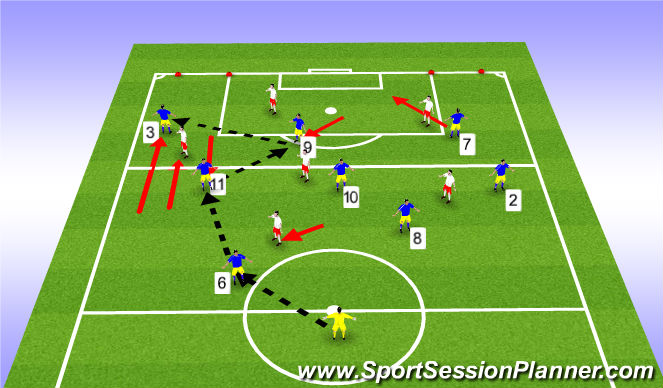
SSG - Creating Space for FB's in a Dynamic 2 Zone SSG (20 mins)
Organisation
Split players into 2 teams - Blue x 8 and White x 6 with a Yellow server representing a CB.
Blue team to be coached.
Blue team play 2-2-3-1 formation - (2&3);(6&8);(11,10&7) and No.9.
White team play 2-3-1 formation.
Create a half way line.
Place two mini goals as above.
Instructions
The Blue team aim to move the ball to the high zone and score in one of the two mini goals.
When the LB or RB decides to move into the high zone, the LMF or RMF should drop back into the low zone in a synchronised movement.
When the white teams wide MF follows the FB's movement, space will be created inside the low zone. If the white teams wide MF does not follow the FB's movement, an overload will be achieved in the high zone - which must then be exploited.
Conditions
Only the Blue FB's and the White 2 wide MF can move from area to area.
Blue 11 & 7 can enter the low zone and can move back into the high zone to create a 4 v 3 overload.
If the White team wins possession, they have 10 seconds to try to pass the ball to the server AND any player on either team can play in any zone. However, if the ball goes out of play, the game restarts with the server passing to the blue team again.
Progressions
1. If the White team gain possession, they can only play the ball back to the server from the low zone. This will allow the Blue team an opportunity to transit from attack to defence - receovery runs of LB/RB and cover by RMF & LMF.
Coaching Points
1. The Synchronised movement of the FB forwards and the LMF/RMF dropping back is the focus.
2. The timing of the LMF/RMF run should be at the right moment (free in space and able to turn).
3. The players should be aware to retain balance at the back at all times.
4. Recovery runs of FB's and cover by LMF/RMF should possession be lost.
See the guidance at the top of this page to understand why you are not seeing interactive Football/Soccer images.
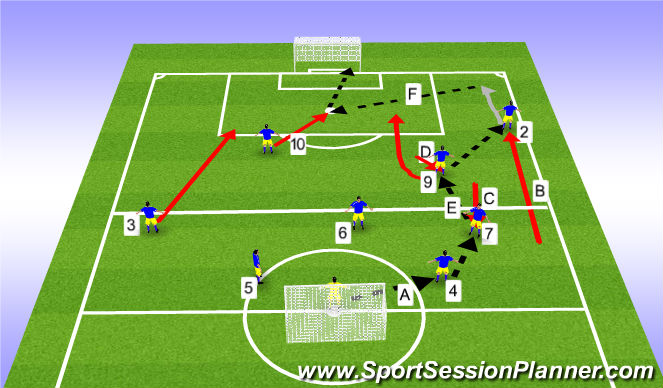
SSG - Creating Space on the Wing in a High & Low Zone Game (20 mins)
Organisation
Use half a pitch and mark a line half way between the half way line and the edge of the penalty area.
Split players into two teams - 9 x White (4-3-1 and 9 x Blue (4-1-2-1).
Blue team to be coached.
Instructions
Prior to introducing the White team, set out the Blue team and walk through the following passing/movement to illustrate the focus of the SSG.
A. GK passes to CB
B. TRIGGER - as ball is passed to CB No.4, RB No.2 makes his run up the wing - thereby creating space for RMF No.7 to drop back.
C. TRIGGER - as RB No.2 makes his run, RMF No.7 makes his run to receive the ball from CB No.4.
D. TRIGGER - as the Ball is passed to RMF No.7, CF No.9 moves to create a passing line.
E. RMF No.7 passes the ball to CF No.9, who in turn passes the ball to the RB.
F. RB runs with the ball - TRIGGER - CF No.9 moves into position to receive a cross from RB as does No.10.
At what point does the LB attack the space down the opposite wing? As No.7 passes the ball to No.9, he commences and maintains his run.

See the guidance at the top of this page to understand why you are not seeing interactive Football/Soccer images.
SSG Cont.'d (20 mins)
Organisation
Introduce opposing white team.
Instructions
The blue team aims to create space in the low zone for the LMF/RMF to drop back and receive the ball unmarked. So, when a FB enters the high zone, the respective LMF/RMF drops back in a synchronised movement.
Conditions
While the White team are in defensive mode, only the White LMF and White RMF can move from zone to zone - the 4 White Defenders must remain within the low zone and the White CMF and CF must remain in the high zone.
Blue Team players can play in either zone at any time - but - should always try to retain the team's balance.
If the White team win the ball, there are no limitations - all players on both teams can move from area to area - BUT the White team have only 10 seconds in which time to score.
Coaching Points
1. Correct body shape (open up on the half turn) and positioning is important to view where the next pass goes.
2. The synchronised movement of the FB forwards and the LMF/RMF dropping back is the key to creating space on the wing.
3. The players should be aware to retain balance at the back at all times.
'%3E%3Cpath id='path4169' d='M 11.4375,70.25 C 11.457031,38.394531 37.277344,13.242188 68.253906,13.050781 99.78125,12.855469 125.73047,38.351563 125.8125,70.078125 125.89844,101.62109 100.43359,127.14063 69.148438,127.42188 37.582031,127.70703 11.464844,102.23438 11.4375,70.25 m 6.425781,-0.08984 c 0.03516,28.421871 23.027344,50.69922 50.519532,50.82031 C 96.433594,121.10156 119.30469,98.367188 119.38281,70.359375 119.45313,42.878906 97.382813,19.714844 69.015625,19.496094 40.75,19.277344 17.964844,42.035156 17.863281,70.160156' style='clip-rule:nonzero;fill:%23333f48;fill-opacity:1;fill-rule:nonzero;stroke:none' /%3E%3Cpath style='fill:%23333f48;fill-opacity:1;fill-rule:nonzero;stroke:none' d='m 39.789063,108.62109 c 0.28125,0.14454 0.550781,0.32032 0.839843,0.4336 2.734375,1.05469 5.554688,1.78125 8.453125,2.23047 2.734375,0.42578 5.484375,0.64453 8.25,0.54297 3.988282,-0.15625 7.832032,-0.94922 11.445313,-2.69532 1.683594,-0.8164 3.246094,-1.82422 4.640625,-3.07422 3.265625,-2.92578 5.171875,-6.582027 5.796875,-10.906246 0.546875,-3.761719 0.04687,-7.425781 -1.09375,-11.019531 -1.4375,-4.523438 -3.730469,-8.582032 -6.703125,-12.265625 -1.03125,-1.277344 -2.082031,-2.535157 -3.113281,-3.808594 C 66.789063,66.1875 65.332031,64.269531 64.0625,62.21875 c -1.601562,-2.582031 -2.835937,-5.316406 -3.613281,-8.261719 -0.683594,-2.574218 -0.902344,-5.1875 -0.6875,-7.828125 0.214844,-2.617187 0.910156,-5.117187 2.152344,-7.441406 2.164062,-4.050781 5.503906,-6.710937 9.816406,-8.179687 1.890625,-0.640625 3.835937,-1.058594 5.832031,-1.195313 1.121094,-0.07813 2.242188,-0.152344 3.363281,-0.164062 4.28125,-0.02734 8.4375,0.734375 12.453125,2.175781 1.871094,0.671875 3.6875,1.496094 5.523438,2.257812 0.226562,0.09375 0.4375,0.230469 0.664062,0.351563 -0.164062,0.25 -0.371093,0.160156 -0.539062,0.164062 -2.824219,0.101563 -5.535156,0.703125 -8.132813,1.804688 -1.335937,0.570312 -2.570312,1.316406 -3.648437,2.296875 -2.527344,2.296875 -3.605469,5.15625 -3.34375,8.550781 0.140625,1.855469 0.722656,3.574219 1.550781,5.222656 0.648438,1.296875 1.414063,2.523438 2.292969,3.675782 0.953125,1.25 1.929687,2.484375 2.929687,3.699218 2.085938,2.523438 4.164063,5.054688 6.050782,7.738282 2.203125,3.136718 4.140627,6.417968 5.589847,9.980468 1.16406,2.867188 2.01562,5.820313 2.39843,8.894532 0.25,2.011718 0.30079,4.03125 0.11719,6.058593 -0.24219,2.640625 -0.79297,5.195313 -1.74609,7.667969 -1.29688,3.36328 -3.300784,6.22656 -5.972659,8.63281 -2.429687,2.19141 -5.171875,3.90625 -8.109375,5.3125 -2.695312,1.29297 -5.464843,2.40235 -8.34375,3.20313 -1.953125,0.54687 -3.945312,0.8789 -5.949218,1.15625 -3.035157,0.41797 -6.085938,0.48828 -9.132813,0.3125 -5.328125,-0.3125 -10.476562,-1.46094 -15.410156,-3.52344 -3.449219,-1.44141 -6.691406,-3.25781 -9.757813,-5.39453 -0.183593,-0.12891 -0.378906,-0.25 -0.53125,-0.41016 -0.07031,-0.0703 -0.05859,-0.22656 -0.08203,-0.34375 z m 0,0' id='path4175' /%3E%3Cpath style='fill:%23333f48;fill-opacity:1;fill-rule:nonzero;stroke:none' d='M 94.699219,29.390625 C 94.089844,29.21875 93.476563,29.054688 92.867188,28.875 90.183594,28.085938 87.46875,27.441406 84.703125,27.046875 c -3.976562,-0.566406 -7.945312,-0.59375 -11.863281,0.402344 -7.535156,1.914062 -12.386719,6.71875 -14.878906,13.996094 -0.894532,2.617187 -1.179688,5.328125 -0.953125,8.078125 0.203125,2.484375 0.867187,4.859375 1.816406,7.160156 0.933594,2.261719 2.117187,4.390625 3.4375,6.449219 1.4375,2.25 3.050781,4.371093 4.640625,6.511718 1.4375,1.933594 2.867187,3.871094 4.261719,5.835938 1.230468,1.730469 2.316406,3.546875 3.273437,5.445312 1.324219,2.625 2.265625,5.378907 2.703125,8.292969 0.433594,2.902344 0.292969,5.765625 -0.660156,8.5625 -0.9375,2.74609 -2.574219,5.00781 -4.777344,6.875 -2.417969,2.04688 -5.203125,3.39844 -8.246094,4.22266 -1.835937,0.5 -3.703125,0.75781 -5.609375,0.82031 -3.886718,0.13281 -7.679687,-0.47266 -11.421875,-1.46094 -2.261718,-0.59765 -4.488281,-1.33203 -6.695312,-2.11328 -0.207031,-0.0742 -0.40625,-0.16797 -0.597656,-0.25 -0.02344,-0.24609 0.148437,-0.19141 0.25,-0.20703 1.96875,-0.30469 3.921875,-0.67969 5.804687,-1.34766 1.367188,-0.48437 2.671875,-1.10156 3.855469,-1.94922 2.25,-1.61328 3.65625,-3.765621 4.0625,-6.515621 0.273437,-1.867188 0.09375,-3.710938 -0.429688,-5.527344 -0.472656,-1.648437 -1.171875,-3.199219 -2.109375,-4.628906 -0.792968,-1.207031 -1.636718,-2.382813 -2.523437,-3.519531 -0.921875,-1.195313 -1.921875,-2.328125 -2.890625,-3.484375 -2.753906,-3.273438 -5.351563,-6.660157 -7.523438,-10.355469 -2.042968,-3.480469 -3.667968,-7.136719 -4.597656,-11.078125 -0.640625,-2.699219 -0.980469,-5.4375 -0.832031,-8.214844 0.238281,-4.53125 1.476562,-8.78125 3.824219,-12.6875 1.082031,-1.800781 2.445312,-3.375 3.988281,-4.800781 2.742187,-2.527344 5.863281,-4.480469 9.257812,-5.992188 3.746094,-1.667968 7.652344,-2.769531 11.707032,-3.394531 3.152343,-0.488281 6.324218,-0.671875 9.507812,-0.519531 8.632813,0.410156 16.671875,2.792969 24,7.433594 0.08203,0.05078 0.152344,0.109375 0.230469,0.167968 -0.0039,0.04297 -0.0078,0.08984 -0.01563,0.136719' id='path4177' /%3E%3Cpath style='fill:%23333f48;fill-opacity:1;fill-rule:nonzero;stroke:none' d='m 31.699219,38.75 c -0.07813,0.238281 -0.152344,0.476563 -0.238281,0.710938 -1.460938,4.074218 -2.066407,8.28125 -1.808594,12.59375 0.4375,7.304687 2.808594,13.925781 7.277344,19.753906 3.714843,4.84375 7.441406,9.671875 11.167968,14.503906 1.113282,1.441406 1.953125,3.007813 2.414063,4.777344 0.332031,1.257812 0.425781,2.539062 0.273437,3.820312 -0.214843,1.832032 -1.070312,3.34375 -2.464843,4.546875 -0.984375,0.851559 -2.113282,1.449219 -3.316407,1.925779 -1.378906,0.54297 -2.8125,0.89063 -4.273437,1.1211 -2.226563,0.35547 -4.46875,0.46093 -6.722656,0.41015 -0.589844,-0.0156 -1.046875,-0.18359 -1.433594,-0.625 -0.636719,-0.72265 -1.335938,-1.39062 -1.9375,-2.14062 C 25.574219,93.800781 22.300781,86.621094 20.84375,78.636719 20.152344,74.835938 19.917969,71 20.15625,67.128906 20.796875,56.773438 24.390625,47.574219 30.859375,39.480469 c 0.21875,-0.273438 0.453125,-0.53125 0.679688,-0.796875 0.05469,0.02344 0.109375,0.04297 0.160156,0.06641' id='path4179' /%3E%3Cpath style='fill:%23333f48;fill-opacity:1;fill-rule:nonzero;stroke:none' d='m 105.41016,101.30078 c -0.13282,-0.3125 0.0234,-0.5039 0.0977,-0.69922 1.38672,-3.749997 1.98047,-7.628904 1.89844,-11.621091 -0.14453,-6.84375 -2.08594,-13.144531 -5.73437,-18.925781 C 99.890625,67.226563 97.917969,64.53125 95.835938,61.917969 94.4375,60.160156 92.988281,58.4375 91.582031,56.6875 90.632813,55.511719 89.6875,54.335938 88.792969,53.121094 c -0.835938,-1.144531 -1.488281,-2.398438 -1.953125,-3.742188 -0.523438,-1.515625 -0.695313,-3.070312 -0.511719,-4.652343 0.21875,-1.839844 1.082031,-3.339844 2.476563,-4.542969 1.039062,-0.890625 2.230468,-1.507813 3.503906,-1.980469 1.632812,-0.609375 3.320312,-0.960937 5.046875,-1.175781 1.917969,-0.238281 3.839841,-0.269531 5.769531,-0.230469 0.52734,0.01172 0.89453,0.203125 1.23828,0.585938 5.50391,6.113281 9.26172,13.144531 11.21875,21.132812 1.11719,4.554688 1.5625,9.179688 1.30469,13.855469 -0.58203,10.625 -4.23438,20.082031 -10.96094,28.339846 -0.15625,0.1914 -0.32812,0.375 -0.51562,0.58984' id='path4181' /%3E%3Cpath style='fill:%23333f48;fill-opacity:1;fill-rule:nonzero;stroke:none' d='m 39.796875,108.63281 c -0.05859,0.0117 -0.117187,0.0234 -0.175781,0.0352 0.05469,-0.0156 0.113281,-0.0312 0.167969,-0.0469 z m 0,0' id='path4183' /%3E%3C/g%3E%3C/svg%3E)
 Play animation
 Play step-by-step
 Repeat (toggle)
 Full Screen
 Pause
Pause Stop
Stop
Analysis
Analysis
In order to create space for FB's or RMF or LMF on the wing, there must be good communication and synchronisation between the full backs and the RMF/LMF.
If the full backs attack down the wing, the oppositions wingers/wide MF will usually follow their runs/movements. Space will then be created for RMF/LMF to drop back, receive the ball unmarked and turn.
In the above example, RFB moves forward and his marker follows him. RMF drops back into the space created to receive the ball on his front foot. He then has time to pick out a pass - either to No.10 or 9.