
Football/Soccer Session (Academy Sessions): Technical 1

Access Sport Learner System
Callum Riley

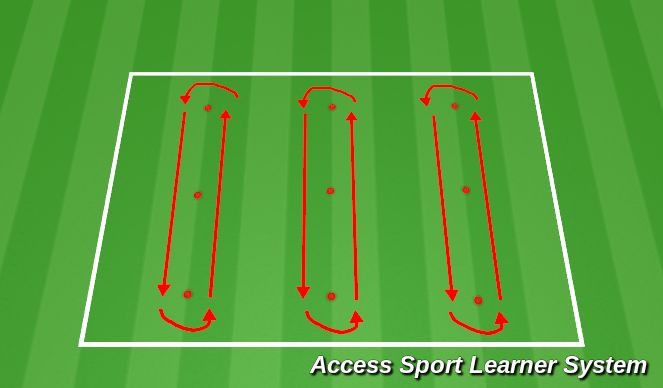
See the guidance at the top of this page to understand why you are not seeing interactive Football/Soccer images.
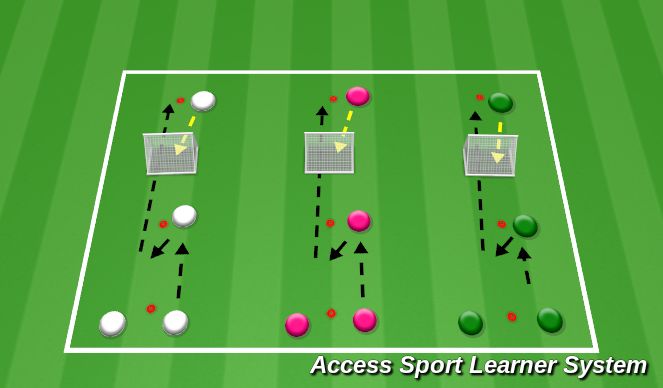
See the guidance at the top of this page to understand why you are not seeing interactive Football/Soccer images.
Finishing Challenge – 3 Teams of 4 (All Teams Active Together)
A fast, competitive finishing exercise where all three teams work simultaneously, each team taking turns resting one player per attempt. The goal is to score the most first-time finishes. Least goals = forfeit.
Setup
Three teams of 4 players.
Each team has:
1 passer (server)
1 setter
1 finisher (standing in front of a mini goal)
1 resting player (changes every rep)
Each team works on its own mini goal, spaced apart on the pitch.
How It Works
All teams start at the same time:
The passer (Player A) plays a firm ball into the setter (Player B).
Player B sets the ball back to the passer.
Player A then dinks/chips the ball forward over the mini goal.
The finisher (Player C), positioned just in front of the mini goal, attacks the ball and finishes first time.
After the finish:
Rotate roles within the team: the resting player steps in, and one of the active players becomes the new rest.
Every team rotates immediately after each rep so the exercise runs continuously.
Scoring
Each team counts their own goals.
After the timed round (e.g., 2 minutes), compare totals.
Team with the least goals = forfeit (light fitness or fun punishment).
Advanced Variation – Header-Only Finishing
Run the same format again with all teams working at the same time:
Same passing pattern:
Pass → Set → Dink over mini goal
Now the finisher must score with a header only.
Continue rotating roles each rep so one player rests each turn.
Scoring
Most goals wins.
Least = forfeit again.
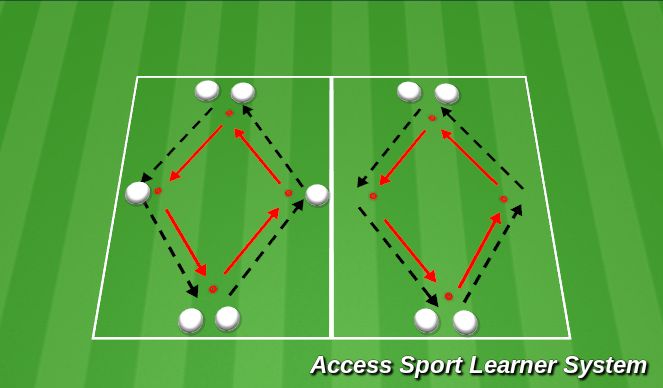
See the guidance at the top of this page to understand why you are not seeing interactive Football/Soccer images.
Diamond Passing Drill – 6 Players
Set up a diamond shape with four cones (top, bottom, left, right).
Place one player on each cone and two extra players behind the starting points to rotate in.
Phase 1 – Simple Pass & Follow (Foundation)
Organisation
Player A starts at the bottom cone with the ball.
Other players stand on the remaining cones with one spare player behind A and one behind the opposite cone.
How It Works
Player A passes to Player B (right-side cone).
A follows their pass and moves to B’s cone.
Player B receives and passes to Player C (top of the diamond), then follows their pass.
Player C passes to Player D (left-side cone) and moves to that cone.
Player D passes back down to the starting point and follows.
Focus: Clean passing, good body shape, proper follow-through, simple movement.
Phase 2 – One-Touch With Set Pass (Intermediate)
Add combination play:
Player A plays into Player B.
Player B sets the ball back to Player A (one-touch).
A plays a longer pass into Player C (the top of the diamond).
C receives, plays to D, and the pattern continues.
Movement stays the same: pass → set → longer pass → follow.
Focus:
Timing of runs
Weight of set passes
Scanning before receiving
Phase 3 – Third-Man Run (Advanced)
Introduce a more game-realistic combination:
Player A passes into Player B (right-side).
B sets back to A.
A now plays a third-man pass to Player C (top of diamond).
Player B makes a run to replace C’s cone as C plays across to D (left-side).
Pattern continues with rotating third-man movement.
Focus:
Tempo and timing
Angles of support
Movement off the ball
Realistic “give-and-go” decision-making
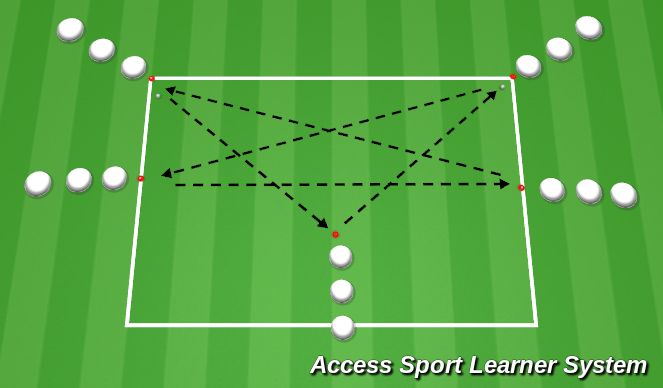
See the guidance at the top of this page to understand why you are not seeing interactive Football/Soccer images.
Star Passing Drill – 1 Central Cone & 4 Outer Cones (15 Players)
This version keeps a simple star shape but accommodates all 15 players.
Setup
1 central cone (middle player)
4 outer cones (forming a square around the middle)
15 players total:
1 player in the middle
2–3 players on each outer cone (one working, others waiting in line)
Extra players rotate in after each pass.
Phase 1 – Two-Touch Passing & Follow Your Pass (Foundation)
How It Works
Outer player (Player A) passes to the middle player (Player M).
Player A follows their pass and takes the middle position.
Middle player takes two touches and passes to another outer cone (Player B).
Middle player follows the pass to the new cone.
Next player in line steps forward, drill continues continuously.
Focus:
Clean two-touch passing
Correct body shape and first touch
Rotation/following the pass
Constant scanning and awareness
Phase 2 – One-Touch From the Middle (Intermediate)
Progression
Outer player passes to the middle.
Middle player must now play one-touch to a different outer cone.
Middle player follows the pass, outer player steps into the middle.
Focus:
Speed and tempo
Decision-making under pressure
Communication ("one more", "switch")
Phase 3 – Bounce & Third-Man Combination (Advanced)
Progression
Outer player passes into the middle.
Middle player bounces it back one-touch to the same outer player.
That outer player then plays a third-man pass to a different outer cone.
Both players rotate positions:
Middle player moves to the outer cone that received the third-man pass
Original passer enters the middle
Example Pattern:
A → M → A → C
Focus:
Quick third-man combinations
Timing of runs
Spatial awareness and angles
Maintaining tempo
See the guidance at the top of this page to understand why you are not seeing interactive Football/Soccer images.
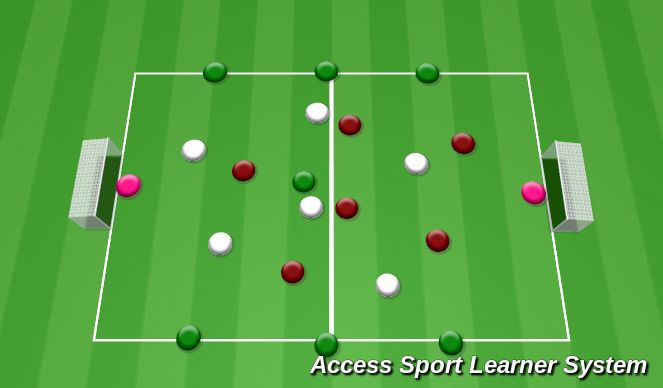
mall-Sided Game – 3 Teams of 6 + 2 Goalkeepers
Setup
Teams: 3 teams of 6 players each.
Goalkeepers: 2 keepers in goals at each end.
Pitch: Small to medium-sized playing area.
Roles per rotation:
2 teams play against each other
1 team acts as bouncers/support (can be positioned on the touchlines or central neutral players)
Optional: bouncers can only use 2 touches.
Phase 1 – Basic Possession & Support
Objective: Keep possession and build attacking play through support players.
Rules:
Teams in possession must complete 3 consecutive passes before attempting to score.
Bouncers (neutral team) support possession but cannot score.
Goalkeepers are active, distributing balls to encourage play from the back.
Rotate teams every 3–4 minutes:
Team A vs Team B (Team C as bouncers)
Team B vs Team C (Team A as bouncers), etc.
Focus:
Passing accuracy
Movement off the ball
Using support to maintain possession
Phase 2 – Passing & Switching Condition
Progression: Add restrictions to increase tactical awareness.
Middle players must switch the play to the opposite side before attempting to score.
Bouncers limited to 2-touch maximum, forcing quick redistribution.
Encourage use of goalkeepers to start attacks from the back.
Focus:
Quick ball circulation
Switching play under pressure
Awareness of supporting angles
Phase 3 – Target/Scoring Condition
Progression: Connect possession to scoring.
Teams must complete the pass condition (3–4 passes + switch) before attempting a shot on goal.
Goalkeepers defend normally.
Bouncers continue to support, maintaining their 2-touch restriction.
Focus:
Game realism: linking possession to attacking output
Timing of the final ball
Using support effectively to create scoring chances
Phase 4 – Advanced / Competitive Version
Introduce points for successful sequences ending in a shot on goal.
Limit time for possession (e.g., 10 seconds) before passing to a bouncer.
Encourage third-man combinations to unlock the defense.
Rotate roles frequently so all teams experience possession, support, and defending.
Focus:
High-intensity decision-making
Fast transitions
Combination play using width, central support, and goalkeepers
See the guidance at the top of this page to understand why you are not seeing interactive Football/Soccer images.
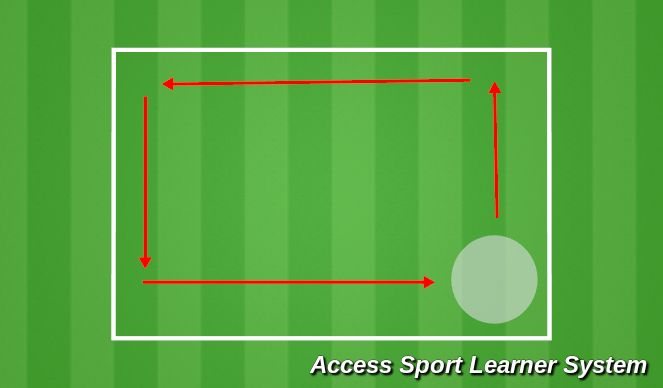
Cool Down Breakdown:
First Recovery Lap
Begin with a light jog around the pitch for the first recovery lap. Focus on keeping a steady, relaxed pace to gradually bring your heart rate down and flush out any lactic acid buildup.
After completing the lap, head to the top right corner of the pitch for the first stretch zone.
Stretch Zone 1 (2 minutes):
Hamstring Stretch: Place one leg out in front, keeping it straight, and gently lean forward from the hips, reaching for your toes. Hold for 1 minute per leg, stretching through the back of your thighs.
Second Recovery Lap
After the first stretch, continue with the second lap around the pitch at a slow, steady pace, allowing your body to continue cooling down and your heart rate to stabilize.
Stretch Zone 2 (2 minutes):
Quad Stretch: Stand tall and grab your ankle behind you, pulling your heel toward your glutes. Keep your knees close together and hold onto a nearby object for balance if necessary. Hold each side for 1 minute to stretch the front of your thighs.
The combination of easy-paced jogging and targeted stretching in these two zones helps to promote flexibility and mobility while aiding in muscle recovery. By the time you finish, your body will be in a much better state to recover, ensuring you're ready for the next training session.

 Play animation
 Play step-by-step
 Repeat (toggle)
 Full Screen
 Pause
Pause Stop
Stop
Dynamic (Non-Static) Warm-Up — What to Do
Dynamic movements are active, flowing exercises that warm the muscles through movement. These prepare players for sprinting, jumping, tackling, and sudden direction changes.
Examples of dynamic warm-ups in football:
High knees – to activate hip flexors and improve running mechanics
Butt kicks – to warm the hamstrings and promote heel recovery in sprinting
Leg swings (forward/backward and side-to-side) – to loosen hips and hamstrings
Walking or jogging lunges – to activate glutes, quads, and core
Hip openers / “open the gate, close the gate” – for groin mobility
A-skips and B-skips – for coordination and stride preparation
Carioca (grapevine) – for lateral movement and hip rotation
Accelerations (progressive sprints) – to bring intensity up to game speed
Purpose: Increase blood flow, switch on key muscle groups, improve mobility, and prepare the body for explosive actions.
Static Warm-Up (Static Stretching) — What to Do
Static stretching involves holding a stretch for a period of time without movement. These stretches are best used after training or at the very end of warm-ups, not at the beginning of a session, because holding long stretches can temporarily reduce explosive power.
Examples of static stretches in football:
Hamstring stretch (toe touch or seated stretch)
Quadriceps stretch (standing leg pull)
Calf stretch (against a wall)
Groin stretch (butterfly stretch)
Hip flexor stretch (kneeling lunge hold)
Glute stretch (figure-four stretch)
Purpose: Improve long-term flexibility, reduce muscle tightness, and help with recovery.