


Football/Soccer Session (Academy Sessions): CREATING OVERLOADS IN THE ATTACKING THIRD

Dandenong City FC
Elyas Baeini
Profile Summary

| Name: | Elyas Baeini |
|---|---|
| City: | Blackburn North |
| Country: | Australia |
| Membership: | Adult Member |
| Sport: | Football/Soccer |
See the guidance at the top of this page to understand why you are not seeing interactive Football/Soccer images.

See the guidance at the top of this page to understand why you are not seeing interactive Football/Soccer images.
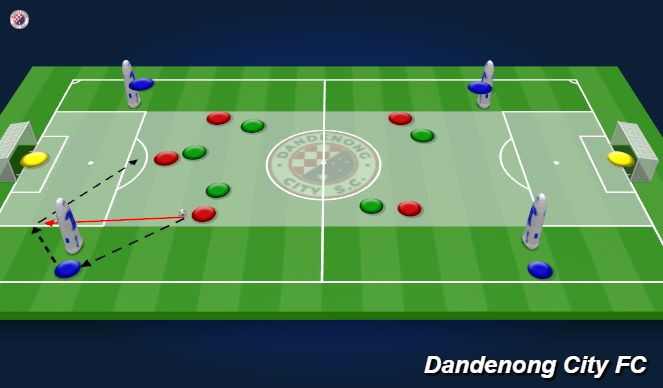
3V2 (15 mins)
Practice Objective:-
Apply combinations vs live defenders
- Identify where and which player receives beyond Practice
Explanation:- 20x30- Attacking team must get into the attacking half to score
- Defenders and 9 remain, two new attackers enter the grid and attack the other direction
- If defenders win possession and score they swap with the attackers
- Change neutral 9 every set
- Offsides apply beyond halfway
Progression:- Add wingers to receive beyond-- Third defender?
Coaching Points:
- Engage the defensive line, force them to defend the ball
-- 9 to receive against a CB to engage or drop to space to disconnect
- Forward runs timed as the defensive line are stepping or as soon as they stop to hold
- When a teammate receives with space in front to play beyond, forward runs
- Move at maximum speed, from deep to get behind
See the guidance at the top of this page to understand why you are not seeing interactive Football/Soccer images.
Screen 3
reating Overloads in the Attacking Third
This session is designed to enhance our ability to create and exploit overloads in the attacking third by encouraging purposeful ball circulation into wide areas. The objective is to develop coordinated movements between our fullbacks, wingers, and central players, ensuring that each wide entry creates multiple layers of support — both underneath the ball and beyond it.
Players will be challenged to recognize the moments to play into the wide channels with speed and precision, drawing defenders out of shape and opening opportunities to break lines. Once the ball is delivered wide, the winger must have at least two clear options:
-
An option underneath — typically a midfielder or fullback arriving to provide support, recycle possession, or combine in tight spaces.
-
An option beyond — a runner attacking the space behind the defensive line to threaten in behind and force defenders to turn.
The session emphasizes timing, body orientation, decision-making, and communication. We want our wide players to be confident receiving under pressure, while our supporting players maintain intelligent distances to enable quick combinations, third-man runs, and dynamic rotations.
By consistently creating numerical superiority in wide channels, we aim to unbalance opponents, generate crossing or cutback opportunities, and progress into goal-scoring positions with greater fluidity and control.
oaching Points – Creating Overloads in the Attacking Third
Technical
-
Quality of pass into the wide player: Firm, accurate, and timed so the winger can receive on the move and attack the defender.
-
Body shape when receiving: Open hips to face forward or across the pitch, allowing quick decisions to combine or drive.
-
First touch direction: Take the first touch into space to invite pressure or eliminate a defender and create room for combinations.
-
Passing detail: Weight and angle of passes for bounce passes, third-man runs, and quick give-and-go movements.
-
Crossing and cutbacks: Deliver with purpose—look up early and select the best option, not just swing the ball in.
Tactical
-
Recognise when to create a wide overload: As soon as the ball travels to the wide channel, supporting players must arrive at the correct angles and distances.
-
Option underneath: A midfielder or fullback must position themselves to recycle play, combine, or set up a third-man run.
-
Option beyond: Timely forward runs (winger, fullback, or 8) to stretch the defensive line, forcing defenders to drop or follow.
-
Movement off the ball: Constant rotation between fullback, winger, and central midfielder to disrupt defensive marking.
-
Speed of play: Quick combinations to exploit the moment before the defence can recover numbers.
-
Trigger cues: When the ball enters the half-space or wide channel, supporting players must anticipate and move early.
-
Creating superiority: Use overlaps, underlaps, and double movements to isolate defenders and generate 2v1 or 3v2 situations.
Physical
-
Explosive movement: Sharp changes of pace when making overlapping or underlapping runs.
-
Repeated high-intensity actions: Expect continuous sprints in the wide areas—transition quickly after playing the ball.
-
Strong core control: Maintain balance when receiving under pressure and during quick directional changes.
Psychological
-
Confidence in 1v1 situations: Encourage wingers and fullbacks to take on defenders with purpose and creativity.
<
See the guidance at the top of this page to understand why you are not seeing interactive Football/Soccer images.
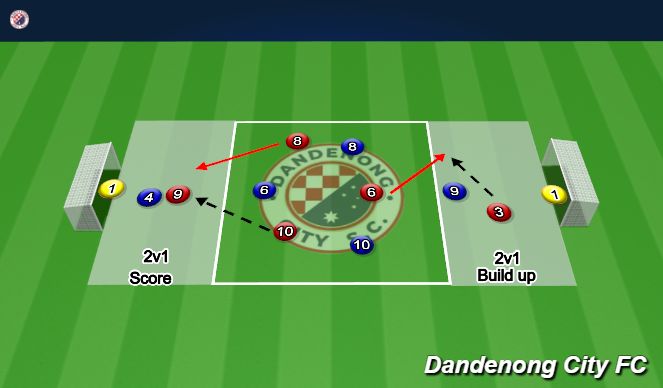
3 ZONE (15 mins)
Practice Objective
Primary Focus:
Develop central progression and strengthen connectivity with the #9 by enhancing players’ ability to recognise and use passing lanes, coordinated movement, and intelligent positional play.
Sub-Focus:
Create and exploit 2v1 overloads in each zone to build through the thirds with control, break opposition lines, and finish effectively.
Practice Design
Pitch Structure
-
The pitch is divided into three horizontal zones:
Zone 1 – Defensive Third,
Zone 2 – Midfield Third,
Zone 3 – Attacking Third. -
Players begin and reset within their designated zones.
-
The session always initiates with the goalkeeper in Zone 1, building out from the back.
Rules & Constraints
-
All play begins with the GK initiating possession in Zone 1.
-
To progress into the next zone, the attacking team must create and successfully exploit a 2v1 overload (plus GK in Zone 1).
-
Zone 1 → Zone 2:
Team must use the overload to either dribble or break the line with a pass into the midfield third. -
Zone 2 → Zone 3:
Players establish another 2v1 overload to access the #9 or carry the ball forward into the final third. -
Zone 3 (Final Third):
Team finishes the action by combining with the #9 through:-
Support play (e.g., set-and-play, bounce pass)
-
Direct dribble to goal
-
Quick 2v1 combinations around the defender
-
-
All restarts return to the GK to reinforce build-up behaviours.
Coaching Points
Zone 1 – Build Phase
Centre Backs (#4/#5):
-
Scan early to assess pressure, passing lanes, and movement ahead.
-
Maintain an open body shape to play forward on the first or second touch.
-
Recognise opportunities to play vertical or to break pressure with a controlled carrying action.
Goalkeeper:
-
Play with purpose—identify when to build short and when to advance play by bypassing the first line.
-
Provide clear communication and positional support to facilitate switching and progression.
Zone 2 – Midfield Progression
#6 (Holding Midfielder):
-
Position on the opposite side of ball movement to create optimal angles.
-
Stay on the passing line, not in it—receive with body shape prepared to play forward.
-
Provide depth to maintain a stable passing triangle for circulation and penetration.
#8/#10 (Advanced Midfielders):
-
Start just beyond or level with the opposition midfield line.
-
Occupy positions outside the opponent’s cover shadow to access the #9 centrally.
-
Time movements to unbalance markers and create pockets between lines.
General Zone 2 Principles:
-
Prioritise creating and exploiting the immediate 2v1 around the ball.
-
Use mobility, rotation, and positional interchange to disrupt the defensive structure.
Zone 3 – Final Third (Scoring Phase)
#9 (Striker):
-
Constantly scan to adjust position based on CB/FB cues and defenders’ movement.
-
Create separation through changes of speed, direction, or body angle.
-
Receive on the “safe side,” protecting the ball and securing the first action.
-
Make decisive choices: lay-off, turn, or finish depending on pressure and support.
Supporting Midfielders (#8/#10):
'%3E%3Cpath id='path4169' d='M 11.4375,70.25 C 11.457031,38.394531 37.277344,13.242188 68.253906,13.050781 99.78125,12.855469 125.73047,38.351563 125.8125,70.078125 125.89844,101.62109 100.43359,127.14063 69.148438,127.42188 37.582031,127.70703 11.464844,102.23438 11.4375,70.25 m 6.425781,-0.08984 c 0.03516,28.421871 23.027344,50.69922 50.519532,50.82031 C 96.433594,121.10156 119.30469,98.367188 119.38281,70.359375 119.45313,42.878906 97.382813,19.714844 69.015625,19.496094 40.75,19.277344 17.964844,42.035156 17.863281,70.160156' style='clip-rule:nonzero;fill:%23333f48;fill-opacity:1;fill-rule:nonzero;stroke:none' /%3E%3Cpath style='fill:%23333f48;fill-opacity:1;fill-rule:nonzero;stroke:none' d='m 39.789063,108.62109 c 0.28125,0.14454 0.550781,0.32032 0.839843,0.4336 2.734375,1.05469 5.554688,1.78125 8.453125,2.23047 2.734375,0.42578 5.484375,0.64453 8.25,0.54297 3.988282,-0.15625 7.832032,-0.94922 11.445313,-2.69532 1.683594,-0.8164 3.246094,-1.82422 4.640625,-3.07422 3.265625,-2.92578 5.171875,-6.582027 5.796875,-10.906246 0.546875,-3.761719 0.04687,-7.425781 -1.09375,-11.019531 -1.4375,-4.523438 -3.730469,-8.582032 -6.703125,-12.265625 -1.03125,-1.277344 -2.082031,-2.535157 -3.113281,-3.808594 C 66.789063,66.1875 65.332031,64.269531 64.0625,62.21875 c -1.601562,-2.582031 -2.835937,-5.316406 -3.613281,-8.261719 -0.683594,-2.574218 -0.902344,-5.1875 -0.6875,-7.828125 0.214844,-2.617187 0.910156,-5.117187 2.152344,-7.441406 2.164062,-4.050781 5.503906,-6.710937 9.816406,-8.179687 1.890625,-0.640625 3.835937,-1.058594 5.832031,-1.195313 1.121094,-0.07813 2.242188,-0.152344 3.363281,-0.164062 4.28125,-0.02734 8.4375,0.734375 12.453125,2.175781 1.871094,0.671875 3.6875,1.496094 5.523438,2.257812 0.226562,0.09375 0.4375,0.230469 0.664062,0.351563 -0.164062,0.25 -0.371093,0.160156 -0.539062,0.164062 -2.824219,0.101563 -5.535156,0.703125 -8.132813,1.804688 -1.335937,0.570312 -2.570312,1.316406 -3.648437,2.296875 -2.527344,2.296875 -3.605469,5.15625 -3.34375,8.550781 0.140625,1.855469 0.722656,3.574219 1.550781,5.222656 0.648438,1.296875 1.414063,2.523438 2.292969,3.675782 0.953125,1.25 1.929687,2.484375 2.929687,3.699218 2.085938,2.523438 4.164063,5.054688 6.050782,7.738282 2.203125,3.136718 4.140627,6.417968 5.589847,9.980468 1.16406,2.867188 2.01562,5.820313 2.39843,8.894532 0.25,2.011718 0.30079,4.03125 0.11719,6.058593 -0.24219,2.640625 -0.79297,5.195313 -1.74609,7.667969 -1.29688,3.36328 -3.300784,6.22656 -5.972659,8.63281 -2.429687,2.19141 -5.171875,3.90625 -8.109375,5.3125 -2.695312,1.29297 -5.464843,2.40235 -8.34375,3.20313 -1.953125,0.54687 -3.945312,0.8789 -5.949218,1.15625 -3.035157,0.41797 -6.085938,0.48828 -9.132813,0.3125 -5.328125,-0.3125 -10.476562,-1.46094 -15.410156,-3.52344 -3.449219,-1.44141 -6.691406,-3.25781 -9.757813,-5.39453 -0.183593,-0.12891 -0.378906,-0.25 -0.53125,-0.41016 -0.07031,-0.0703 -0.05859,-0.22656 -0.08203,-0.34375 z m 0,0' id='path4175' /%3E%3Cpath style='fill:%23333f48;fill-opacity:1;fill-rule:nonzero;stroke:none' d='M 94.699219,29.390625 C 94.089844,29.21875 93.476563,29.054688 92.867188,28.875 90.183594,28.085938 87.46875,27.441406 84.703125,27.046875 c -3.976562,-0.566406 -7.945312,-0.59375 -11.863281,0.402344 -7.535156,1.914062 -12.386719,6.71875 -14.878906,13.996094 -0.894532,2.617187 -1.179688,5.328125 -0.953125,8.078125 0.203125,2.484375 0.867187,4.859375 1.816406,7.160156 0.933594,2.261719 2.117187,4.390625 3.4375,6.449219 1.4375,2.25 3.050781,4.371093 4.640625,6.511718 1.4375,1.933594 2.867187,3.871094 4.261719,5.835938 1.230468,1.730469 2.316406,3.546875 3.273437,5.445312 1.324219,2.625 2.265625,5.378907 2.703125,8.292969 0.433594,2.902344 0.292969,5.765625 -0.660156,8.5625 -0.9375,2.74609 -2.574219,5.00781 -4.777344,6.875 -2.417969,2.04688 -5.203125,3.39844 -8.246094,4.22266 -1.835937,0.5 -3.703125,0.75781 -5.609375,0.82031 -3.886718,0.13281 -7.679687,-0.47266 -11.421875,-1.46094 -2.261718,-0.59765 -4.488281,-1.33203 -6.695312,-2.11328 -0.207031,-0.0742 -0.40625,-0.16797 -0.597656,-0.25 -0.02344,-0.24609 0.148437,-0.19141 0.25,-0.20703 1.96875,-0.30469 3.921875,-0.67969 5.804687,-1.34766 1.367188,-0.48437 2.671875,-1.10156 3.855469,-1.94922 2.25,-1.61328 3.65625,-3.765621 4.0625,-6.515621 0.273437,-1.867188 0.09375,-3.710938 -0.429688,-5.527344 -0.472656,-1.648437 -1.171875,-3.199219 -2.109375,-4.628906 -0.792968,-1.207031 -1.636718,-2.382813 -2.523437,-3.519531 -0.921875,-1.195313 -1.921875,-2.328125 -2.890625,-3.484375 -2.753906,-3.273438 -5.351563,-6.660157 -7.523438,-10.355469 -2.042968,-3.480469 -3.667968,-7.136719 -4.597656,-11.078125 -0.640625,-2.699219 -0.980469,-5.4375 -0.832031,-8.214844 0.238281,-4.53125 1.476562,-8.78125 3.824219,-12.6875 1.082031,-1.800781 2.445312,-3.375 3.988281,-4.800781 2.742187,-2.527344 5.863281,-4.480469 9.257812,-5.992188 3.746094,-1.667968 7.652344,-2.769531 11.707032,-3.394531 3.152343,-0.488281 6.324218,-0.671875 9.507812,-0.519531 8.632813,0.410156 16.671875,2.792969 24,7.433594 0.08203,0.05078 0.152344,0.109375 0.230469,0.167968 -0.0039,0.04297 -0.0078,0.08984 -0.01563,0.136719' id='path4177' /%3E%3Cpath style='fill:%23333f48;fill-opacity:1;fill-rule:nonzero;stroke:none' d='m 31.699219,38.75 c -0.07813,0.238281 -0.152344,0.476563 -0.238281,0.710938 -1.460938,4.074218 -2.066407,8.28125 -1.808594,12.59375 0.4375,7.304687 2.808594,13.925781 7.277344,19.753906 3.714843,4.84375 7.441406,9.671875 11.167968,14.503906 1.113282,1.441406 1.953125,3.007813 2.414063,4.777344 0.332031,1.257812 0.425781,2.539062 0.273437,3.820312 -0.214843,1.832032 -1.070312,3.34375 -2.464843,4.546875 -0.984375,0.851559 -2.113282,1.449219 -3.316407,1.925779 -1.378906,0.54297 -2.8125,0.89063 -4.273437,1.1211 -2.226563,0.35547 -4.46875,0.46093 -6.722656,0.41015 -0.589844,-0.0156 -1.046875,-0.18359 -1.433594,-0.625 -0.636719,-0.72265 -1.335938,-1.39062 -1.9375,-2.14062 C 25.574219,93.800781 22.300781,86.621094 20.84375,78.636719 20.152344,74.835938 19.917969,71 20.15625,67.128906 20.796875,56.773438 24.390625,47.574219 30.859375,39.480469 c 0.21875,-0.273438 0.453125,-0.53125 0.679688,-0.796875 0.05469,0.02344 0.109375,0.04297 0.160156,0.06641' id='path4179' /%3E%3Cpath style='fill:%23333f48;fill-opacity:1;fill-rule:nonzero;stroke:none' d='m 105.41016,101.30078 c -0.13282,-0.3125 0.0234,-0.5039 0.0977,-0.69922 1.38672,-3.749997 1.98047,-7.628904 1.89844,-11.621091 -0.14453,-6.84375 -2.08594,-13.144531 -5.73437,-18.925781 C 99.890625,67.226563 97.917969,64.53125 95.835938,61.917969 94.4375,60.160156 92.988281,58.4375 91.582031,56.6875 90.632813,55.511719 89.6875,54.335938 88.792969,53.121094 c -0.835938,-1.144531 -1.488281,-2.398438 -1.953125,-3.742188 -0.523438,-1.515625 -0.695313,-3.070312 -0.511719,-4.652343 0.21875,-1.839844 1.082031,-3.339844 2.476563,-4.542969 1.039062,-0.890625 2.230468,-1.507813 3.503906,-1.980469 1.632812,-0.609375 3.320312,-0.960937 5.046875,-1.175781 1.917969,-0.238281 3.839841,-0.269531 5.769531,-0.230469 0.52734,0.01172 0.89453,0.203125 1.23828,0.585938 5.50391,6.113281 9.26172,13.144531 11.21875,21.132812 1.11719,4.554688 1.5625,9.179688 1.30469,13.855469 -0.58203,10.625 -4.23438,20.082031 -10.96094,28.339846 -0.15625,0.1914 -0.32812,0.375 -0.51562,0.58984' id='path4181' /%3E%3Cpath style='fill:%23333f48;fill-opacity:1;fill-rule:nonzero;stroke:none' d='m 39.796875,108.63281 c -0.05859,0.0117 -0.117187,0.0234 -0.175781,0.0352 0.05469,-0.0156 0.113281,-0.0312 0.167969,-0.0469 z m 0,0' id='path4183' /%3E%3C/g%3E%3C/svg%3E)
 Play animation
 Play step-by-step
 Repeat (toggle)
 Full Screen
 Pause
Pause Stop
Stop
Basic warm up
Equipment - 10 cones