


Football/Soccer Session (Academy Sessions): Defending crosses week 6

FAW Coach Ed
Tawanda Kaseke
Profile Summary

| Name: | Tawanda Kaseke |
|---|---|
| City: | winter haven |
| Country: | United States of America |
| Membership: | Adult Member |
| Sport: | Football/Soccer |
Description
Organisation (Practice Layout & Transition)
See the guidance at the top of this page to understand why you are not seeing interactive Football/Soccer images.
See the guidance at the top of this page to understand why you are not seeing interactive Football/Soccer images.
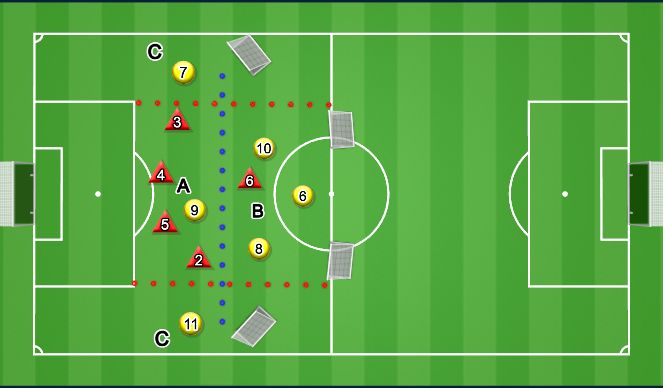
8v8 + 3
Activity
The 7+GK v 7+GK+3 small-sided game builds off the 6v5+GK tactical situation game. In this game, both teams will be training defending crosses.
Out of possession, both teams will defend in a 4-2-1 formation. The offside rule will be in effect.
The three neutral players (C) will play for whichever team is in possession and be positioned in their zones:
The neutral player in Zone A will always be allowed a maximum of three touches.
Once the ball progresses into either Zone B, the neutral player in the opposite Zone B can move into Zone A
and take up a position from which they can attack any crosses. However, whenever the ball is in Zone A, both neutral wingers must remain in their respective Zone B.
How to Score: scoring directly off a cross from Zone B with one touch = 3 goals;
scoring any other way = 1 goal.
If a team scores, a new ball will begin with their goalkeeper.
If the ball goes out of bounds, a new ball will begin with the opposition goalkeeper.
Coaching points
DEFENSIVE LINE- When the ball is in Zone A, the defensive line must ‘narrow’, denying Team A the option of playing
between the lines to the forward. The centre-backs will co-ordinate the line organisation for the offside –i.e. pushing up and ‘narrow’ when the opponent passes the ball backwards.
DEFENDING CROSS COLLECTIVELY When the ball is in Zone A and the ball travels outside to Zone B, ball-side full-back sprints to apply pressure to the winger, while aiming to be about 2 yards away in depth from the attacker in order to be able to block crosses.
Meanwhile, two central defenders and the far-side full-back quickly drop and narrow, maintaining a position of around 10 yards in depth behind the pressuring full-back; the first centre-back uses the near post as the positional reference in width.
The distance between the three defenders in the box should be less than 10 yards between players.
1v1 DEFENDING - When the ball travels out to Zone B, the ball-side full- back must quickly accelerate and begin to decelerate
within 5 yards of the attacker, forcing the play wide.
first thought should be to sprint to block crosses; the second thought is to recover the ball in the 1v1 duel,
initiating contact with arms first to control the attacker.
BODY SHAPE - Once the two centre-backs and the far-side full-backhave established their positioning inside the box, all
three must have an open body shape, enabling them to see their teammates, the ball and the opposition.
MAN-MARKING - When defending inside the box, the priority is man- marking. However, the first centre-back should zonally
defend the near post to clear crosses before it enters the box. The second centre-back and far-side full-back should
man-mark. When man-marking, initiate contact with arms to ‘bump’ attackers off their runs and challenge
for aerial balls.
MANAGING THE OPPOSITION
The team in possession should look for quick ball circulation into Zone B to enable crossing situations.
If an initial cross is not available, they should show patience to quickly rotate the ball to the opposite side.
They should prioritise scoring off crosses from Zone B as the primary way of scoring.
Vary the types of crosses – lofted, driven to secondpost, whipped on the ground behind the defensive line.
Vary the types of runs in the box – zig-zag, diagonal, straight
'%3E%3Cpath id='path4169' d='M 11.4375,70.25 C 11.457031,38.394531 37.277344,13.242188 68.253906,13.050781 99.78125,12.855469 125.73047,38.351563 125.8125,70.078125 125.89844,101.62109 100.43359,127.14063 69.148438,127.42188 37.582031,127.70703 11.464844,102.23438 11.4375,70.25 m 6.425781,-0.08984 c 0.03516,28.421871 23.027344,50.69922 50.519532,50.82031 C 96.433594,121.10156 119.30469,98.367188 119.38281,70.359375 119.45313,42.878906 97.382813,19.714844 69.015625,19.496094 40.75,19.277344 17.964844,42.035156 17.863281,70.160156' style='clip-rule:nonzero;fill:%23333f48;fill-opacity:1;fill-rule:nonzero;stroke:none' /%3E%3Cpath style='fill:%23333f48;fill-opacity:1;fill-rule:nonzero;stroke:none' d='m 39.789063,108.62109 c 0.28125,0.14454 0.550781,0.32032 0.839843,0.4336 2.734375,1.05469 5.554688,1.78125 8.453125,2.23047 2.734375,0.42578 5.484375,0.64453 8.25,0.54297 3.988282,-0.15625 7.832032,-0.94922 11.445313,-2.69532 1.683594,-0.8164 3.246094,-1.82422 4.640625,-3.07422 3.265625,-2.92578 5.171875,-6.582027 5.796875,-10.906246 0.546875,-3.761719 0.04687,-7.425781 -1.09375,-11.019531 -1.4375,-4.523438 -3.730469,-8.582032 -6.703125,-12.265625 -1.03125,-1.277344 -2.082031,-2.535157 -3.113281,-3.808594 C 66.789063,66.1875 65.332031,64.269531 64.0625,62.21875 c -1.601562,-2.582031 -2.835937,-5.316406 -3.613281,-8.261719 -0.683594,-2.574218 -0.902344,-5.1875 -0.6875,-7.828125 0.214844,-2.617187 0.910156,-5.117187 2.152344,-7.441406 2.164062,-4.050781 5.503906,-6.710937 9.816406,-8.179687 1.890625,-0.640625 3.835937,-1.058594 5.832031,-1.195313 1.121094,-0.07813 2.242188,-0.152344 3.363281,-0.164062 4.28125,-0.02734 8.4375,0.734375 12.453125,2.175781 1.871094,0.671875 3.6875,1.496094 5.523438,2.257812 0.226562,0.09375 0.4375,0.230469 0.664062,0.351563 -0.164062,0.25 -0.371093,0.160156 -0.539062,0.164062 -2.824219,0.101563 -5.535156,0.703125 -8.132813,1.804688 -1.335937,0.570312 -2.570312,1.316406 -3.648437,2.296875 -2.527344,2.296875 -3.605469,5.15625 -3.34375,8.550781 0.140625,1.855469 0.722656,3.574219 1.550781,5.222656 0.648438,1.296875 1.414063,2.523438 2.292969,3.675782 0.953125,1.25 1.929687,2.484375 2.929687,3.699218 2.085938,2.523438 4.164063,5.054688 6.050782,7.738282 2.203125,3.136718 4.140627,6.417968 5.589847,9.980468 1.16406,2.867188 2.01562,5.820313 2.39843,8.894532 0.25,2.011718 0.30079,4.03125 0.11719,6.058593 -0.24219,2.640625 -0.79297,5.195313 -1.74609,7.667969 -1.29688,3.36328 -3.300784,6.22656 -5.972659,8.63281 -2.429687,2.19141 -5.171875,3.90625 -8.109375,5.3125 -2.695312,1.29297 -5.464843,2.40235 -8.34375,3.20313 -1.953125,0.54687 -3.945312,0.8789 -5.949218,1.15625 -3.035157,0.41797 -6.085938,0.48828 -9.132813,0.3125 -5.328125,-0.3125 -10.476562,-1.46094 -15.410156,-3.52344 -3.449219,-1.44141 -6.691406,-3.25781 -9.757813,-5.39453 -0.183593,-0.12891 -0.378906,-0.25 -0.53125,-0.41016 -0.07031,-0.0703 -0.05859,-0.22656 -0.08203,-0.34375 z m 0,0' id='path4175' /%3E%3Cpath style='fill:%23333f48;fill-opacity:1;fill-rule:nonzero;stroke:none' d='M 94.699219,29.390625 C 94.089844,29.21875 93.476563,29.054688 92.867188,28.875 90.183594,28.085938 87.46875,27.441406 84.703125,27.046875 c -3.976562,-0.566406 -7.945312,-0.59375 -11.863281,0.402344 -7.535156,1.914062 -12.386719,6.71875 -14.878906,13.996094 -0.894532,2.617187 -1.179688,5.328125 -0.953125,8.078125 0.203125,2.484375 0.867187,4.859375 1.816406,7.160156 0.933594,2.261719 2.117187,4.390625 3.4375,6.449219 1.4375,2.25 3.050781,4.371093 4.640625,6.511718 1.4375,1.933594 2.867187,3.871094 4.261719,5.835938 1.230468,1.730469 2.316406,3.546875 3.273437,5.445312 1.324219,2.625 2.265625,5.378907 2.703125,8.292969 0.433594,2.902344 0.292969,5.765625 -0.660156,8.5625 -0.9375,2.74609 -2.574219,5.00781 -4.777344,6.875 -2.417969,2.04688 -5.203125,3.39844 -8.246094,4.22266 -1.835937,0.5 -3.703125,0.75781 -5.609375,0.82031 -3.886718,0.13281 -7.679687,-0.47266 -11.421875,-1.46094 -2.261718,-0.59765 -4.488281,-1.33203 -6.695312,-2.11328 -0.207031,-0.0742 -0.40625,-0.16797 -0.597656,-0.25 -0.02344,-0.24609 0.148437,-0.19141 0.25,-0.20703 1.96875,-0.30469 3.921875,-0.67969 5.804687,-1.34766 1.367188,-0.48437 2.671875,-1.10156 3.855469,-1.94922 2.25,-1.61328 3.65625,-3.765621 4.0625,-6.515621 0.273437,-1.867188 0.09375,-3.710938 -0.429688,-5.527344 -0.472656,-1.648437 -1.171875,-3.199219 -2.109375,-4.628906 -0.792968,-1.207031 -1.636718,-2.382813 -2.523437,-3.519531 -0.921875,-1.195313 -1.921875,-2.328125 -2.890625,-3.484375 -2.753906,-3.273438 -5.351563,-6.660157 -7.523438,-10.355469 -2.042968,-3.480469 -3.667968,-7.136719 -4.597656,-11.078125 -0.640625,-2.699219 -0.980469,-5.4375 -0.832031,-8.214844 0.238281,-4.53125 1.476562,-8.78125 3.824219,-12.6875 1.082031,-1.800781 2.445312,-3.375 3.988281,-4.800781 2.742187,-2.527344 5.863281,-4.480469 9.257812,-5.992188 3.746094,-1.667968 7.652344,-2.769531 11.707032,-3.394531 3.152343,-0.488281 6.324218,-0.671875 9.507812,-0.519531 8.632813,0.410156 16.671875,2.792969 24,7.433594 0.08203,0.05078 0.152344,0.109375 0.230469,0.167968 -0.0039,0.04297 -0.0078,0.08984 -0.01563,0.136719' id='path4177' /%3E%3Cpath style='fill:%23333f48;fill-opacity:1;fill-rule:nonzero;stroke:none' d='m 31.699219,38.75 c -0.07813,0.238281 -0.152344,0.476563 -0.238281,0.710938 -1.460938,4.074218 -2.066407,8.28125 -1.808594,12.59375 0.4375,7.304687 2.808594,13.925781 7.277344,19.753906 3.714843,4.84375 7.441406,9.671875 11.167968,14.503906 1.113282,1.441406 1.953125,3.007813 2.414063,4.777344 0.332031,1.257812 0.425781,2.539062 0.273437,3.820312 -0.214843,1.832032 -1.070312,3.34375 -2.464843,4.546875 -0.984375,0.851559 -2.113282,1.449219 -3.316407,1.925779 -1.378906,0.54297 -2.8125,0.89063 -4.273437,1.1211 -2.226563,0.35547 -4.46875,0.46093 -6.722656,0.41015 -0.589844,-0.0156 -1.046875,-0.18359 -1.433594,-0.625 -0.636719,-0.72265 -1.335938,-1.39062 -1.9375,-2.14062 C 25.574219,93.800781 22.300781,86.621094 20.84375,78.636719 20.152344,74.835938 19.917969,71 20.15625,67.128906 20.796875,56.773438 24.390625,47.574219 30.859375,39.480469 c 0.21875,-0.273438 0.453125,-0.53125 0.679688,-0.796875 0.05469,0.02344 0.109375,0.04297 0.160156,0.06641' id='path4179' /%3E%3Cpath style='fill:%23333f48;fill-opacity:1;fill-rule:nonzero;stroke:none' d='m 105.41016,101.30078 c -0.13282,-0.3125 0.0234,-0.5039 0.0977,-0.69922 1.38672,-3.749997 1.98047,-7.628904 1.89844,-11.621091 -0.14453,-6.84375 -2.08594,-13.144531 -5.73437,-18.925781 C 99.890625,67.226563 97.917969,64.53125 95.835938,61.917969 94.4375,60.160156 92.988281,58.4375 91.582031,56.6875 90.632813,55.511719 89.6875,54.335938 88.792969,53.121094 c -0.835938,-1.144531 -1.488281,-2.398438 -1.953125,-3.742188 -0.523438,-1.515625 -0.695313,-3.070312 -0.511719,-4.652343 0.21875,-1.839844 1.082031,-3.339844 2.476563,-4.542969 1.039062,-0.890625 2.230468,-1.507813 3.503906,-1.980469 1.632812,-0.609375 3.320312,-0.960937 5.046875,-1.175781 1.917969,-0.238281 3.839841,-0.269531 5.769531,-0.230469 0.52734,0.01172 0.89453,0.203125 1.23828,0.585938 5.50391,6.113281 9.26172,13.144531 11.21875,21.132812 1.11719,4.554688 1.5625,9.179688 1.30469,13.855469 -0.58203,10.625 -4.23438,20.082031 -10.96094,28.339846 -0.15625,0.1914 -0.32812,0.375 -0.51562,0.58984' id='path4181' /%3E%3Cpath style='fill:%23333f48;fill-opacity:1;fill-rule:nonzero;stroke:none' d='m 39.796875,108.63281 c -0.05859,0.0117 -0.117187,0.0234 -0.175781,0.0352 0.05469,-0.0156 0.113281,-0.0312 0.167969,-0.0469 z m 0,0' id='path4183' /%3E%3C/g%3E%3C/svg%3E)
 Play animation
 Play step-by-step
 Repeat (toggle)
 Full Screen
 Pause
Pause Stop
Stop
6v5+GK
Activity
The 6v5+GK tactical situation game begins in Zone A, with YELLOW in possession. YELLOW must connect three passes before playing the ball into either Zone C, towards their wingers, or into Zone B for their forward.
Yellow Team A is arranged in a 3-3 formation – 3 midfielders in Zone A, 1 forward in Zone B, and 1
winger in each Zone C.
Red team is arranged in a 4-1 formation – 1 midfielder begins in Zone A and 4 defenders begin in Zone B.
The offside rule will be in effect.
Once YELLOW Team plays a pass into Zone C, the RED full-back on the ball side can exit Zone B to press the
winger once they have taken their first touch. The winger must use a minimum of two touches.
Once the ball is played into Zone C, 1 midfielder from YELLOW and the single RED midfielder can drop into Zone B.
The winger will have 5 seconds to execute a cross into Zone B. If a cross is not available, they must recirculate
the ball through Zone A for another minimum of three passes before repeating the sequence.
If the ball rotates back through Zone A, all players on both teams must sprint back to their original starting
positions.
How to score
Yellow can score in one of three ways: directly from a cross from Zone C; scoring off a second ball in Zone B
within 5 seconds; or passing directly into Zone B from Zone A and scoring within 5 seconds.
Every time the ball exits Zone B or Zone C, the 5 second clock restarts.
Red scores by scoring in one of the four small goals positioned outside Zone A.
After a goal or when the ball goes out of bounds, play restarts with Yellow team in Zone A
Coaching Points
DEFENSIVE LINE ORGANISATION
When the ball is in Zone A, the defensive line must ‘narrow, denying YELLOW the option of playing between the lines to the lone forward. The centre-backs will co-ordinate the line organisation for the offside
DEFENDING CROSS COLLECTIVELY When the ball is in Zone A and the ball travels outside to Zone C, the ball-side full-back sprints to apply pressure to the winger, while aiming to be about 2 yards away in depth from the attacker in order to be in the crossing line and able to block. The distance between the three defenders in the box should be less than 10 yards. The central midfielders must drop to defend the midfielder joining the attack.
1v1 DEFENDING • When the ball travels out to Zone C, the ball-side full- back must quickly accelerate and begin to decelerate within 5 yards of the attacker, forcing the play wide. The first thought should be to sprint to block crosses; the second thought is to recover the ball in the 1v1 duel.
BODY SHAPE • Once the two centre-backs and far-side full-back have established positioning inside the box, all three must have an open body shape, enabling them to see their teammates, the ball and the opposition.
MAN-MARKING Defending inside the box, the priority is man- marking. However, the first centre-back should zonally defend the near post to clear crosses before it enters the box. The second centre-back and far-side full-back should man-mark. When man-marking, initiate contact with arms to ‘bump’ attackers off their runs and challenge for aerial balls.
MANAGING THE OPPOSITION • The attacking team should look for quick ball circulation into Zone C for crossing situations. If the initial cross is not available, show patience to quickly rotate ball to the opposite side. • They should vary the crosses.