Football/Soccer Session (Academy Sessions): UEFA B - Specific Session 03

FAW Coach Ed
Kris Farren
Description
Switching Play
Understand when and how to switch the point of an attack basedon the pressure applied from the opposition.
- Ball speed
- Weight of pass
- Use of depth
- Direction of pass
- Movement to receive
- Support away from ball
- Switch in as few passes as possible
See the guidance at the top of this page to understand why you are not seeing interactive Football/Soccer images.
See the guidance at the top of this page to understand why you are not seeing interactive Football/Soccer images.
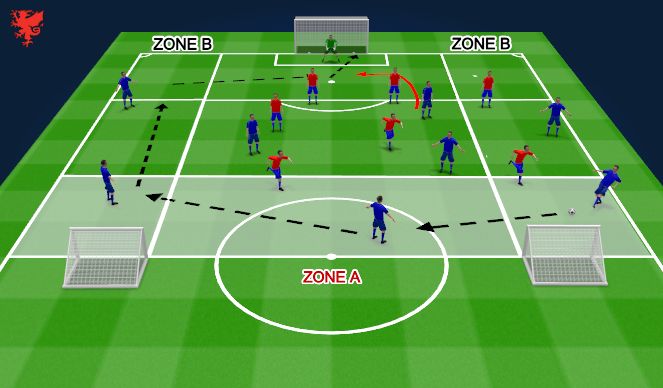
10 mins
Objectives
- To switch play in the second third/middle third using a link player positioned in Zone A
- Utilize knowledge and methods performed in the previous drill to help create space and open passing channels in congested central zones
- Look to develop overloads in central and wide areas to manipulate opposition player positioning through drawing their press
Drill
- Both teams when in possession will look to switch the play through the middle third using a link player, this represented in the graphic as the 'Second Third'
- 2 points will be scored if teams can complete the switch and finish off the move
- If the team out of possession win the ball in the oppositions defensive third they will look to 'Play Real', attacking the goal without forcing play backwards to complete a switch of play
- A goal without a switch of play completed will score a team 1 point
- Once a goal is scored, play will resume back with the scoring team in their defensive third ready to restart the game
- Offsides are again active throughout
Coaching Points
In Possession
- Wide players will look to position themselves high and wide to ensure width and depth, stretching the opposition defence and asking them questions
- Look to overload wide areas to draw opposition players out of their defensive shape, in turn opening up passing channels and creating space
- In the scenario that the central midfield options are marked tightly, one defender or forward player should look to operate in the central areas helping develop the overload and create the link needed for the switch in play
- Players should look to move the ball with speed when operating higher up the pitch
- This is important as there's typically less space and time to perform offensive actions due to the oppositions more compact shape
- Therefore the quicker the play, the harder it becomes for the opposition to re-organise into that solid structure
Out of Possession
- Operate in a compact and narrow shape attempting to prevent progression through central areas
- Look to occupy the two vertical zones closest to the ball, ensuring shorter distances between players allowing the team to remain compact
- If overloaded in central areas, one of the forwards should look to drop in to help prevent the switch of play
- If possession is lost look to press aggressively for 5 seconds before reverting into a compact shape
Progressions/regressions
- Maximum 2 touches for players operating with the ball in any section of zone A
- A maximum of two opposition players allowed in the second third of zone A, making for easier execution of offensive overloads and switches in play
See the guidance at the top of this page to understand why you are not seeing interactive Football/Soccer images.
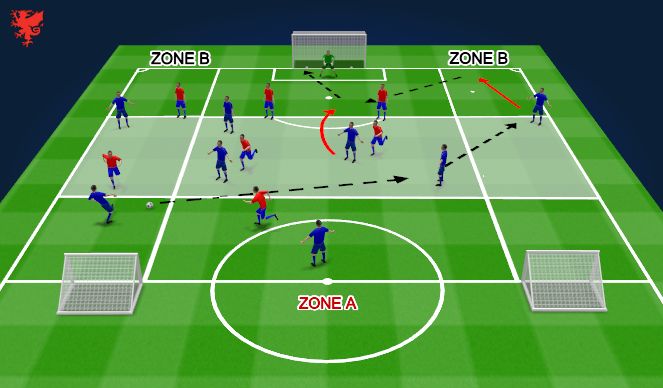
10 mins
Objectives
- To switch play using direct forward diagonal passes, looking to play through or over congested central areas
- Look to overload wide areas to draw the narrow and compact opposition shape away from the opposing flank
- Look to move the ball with intent and quality thus not allowing the opposition to settle in an organised shape
Drill
- Both teams when in possession will look to switch the play through direct forward diagonal passes into wide areas, playing the ball from one flank to the other
- If successfully completed and finished, the team will score 2 points
- If the team out of possession win the ball in higher offensive thirds they will look to 'Play Real', attacking the goal without a switch of play scoring them 1 point
- Once a goal is scored, play will resume back in the scoring teams defensive third ready to restart the game
- Offsides are also in-effective throughout
Coaching Points
In Possession
- When the wide man receives the switch in play they must look to attack quickly and with intent making the most of the space afforded to them, driving at goal, exploiting 1v1's or delivering threatening crosses
- The quality of pass is pivotal, the ball must have the correct weight and accuracy to ensure no turnovers occur while also allowing the attacker to take it in their stride
- Wide players should look to remain high and wide not only to offer width and depth but to give them an advantage when recieving the ball. With the opposition shape being very compact and the attacker being very wide, they will be afforded more time to take the ball down when recieving it while also being able to build attacking momentum when running at the defender
- When looking to overload wide areas players should constantly be attempting to draw the opposition press to disorganise opposition positioning and create space and passing channels, This can be done through playing short, quick bounce passes, manipulating the ball and incorporating intelligent off the ball movement
Out of Possession
- Operate in a compact and narrow shape attempting to prevent progression through central areas
- Look to occupy the two vertical zones closest to the ball, ensuring shorter distances between players allowing the team to remain compact
- If possession is lost look to press aggressively for 5 seconds before reverting into a compact shape
- If the ball is successfully switched, the team must re-organise with immense speed, shifting across the pitch to congested the space. The wide attacker should be pressed with aggression to prevent offensive actions while also being shown away from goal, forcing play back into central areas
Progressions/regressions
Upon receival of the switch the wide attacker has only 3 touches to influence the game and release the ball
Maximum of 1 opposition player in each B zone at a time, allowing for easier developments of overloads, executions of switches and crossing or shooting opportunities
See the guidance at the top of this page to understand why you are not seeing interactive Football/Soccer images.
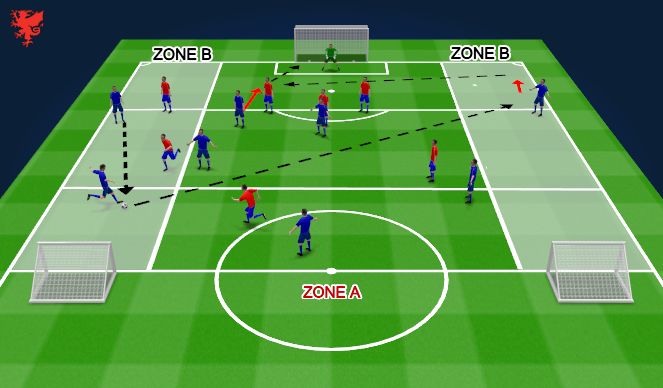
20 mins
Drill
- The final stage of the session is a game, here the players are given full responsibility with regards to decision making
- Specific point systems will be incorporated to encourage switches of play but ultimately this final stage of the session is to gauge where the players understanding is currently at
- In this game both teams will look to play as 'Real' as possible, if the switch isn't on players will attempt to attack through different methods, however, to encourage the switch and the key fundamentals that are required to develop it, bonus points will be included when either team can score after switching the play in their build up phases
- Scoring a normal goal with no switch is worth 1 goal
- Scoring a goal after the build play included one of the three switches worked on equals 2 goals
- Scoring a goal within 5 touches of the receiver collecting the ball from one of the three possible switches, equals three goals
- Finally, if a team score the opposition will restart play in their defensive thirds
- If the ball goes out, play will resume from either a throw in or if the ball goes out over the by line, play will resume through the defensive team in their defensive third
Coaching Points
- Look to observe closely, notice what the players have managed to take from the session and how they are inputting that into the game
- Offer reminders of how to perform specfic actions if required
- Ensure not to direct, allow players the freedom to solve problems and create solutions

 Play animation
 Play step-by-step
 Repeat (toggle)
 Full Screen
 Pause
Pause Stop
Stop
10 mins
Set Up
Objectives
Drill
Coaching Points
In Possession
Out of Possession
Progressions/regressions