


Football/Soccer Session (Difficult): Defending in a Low Block - 1-4-2-3-1 v 1-4-2-3-1

Premier Users' Club
Sean Eardley
Profile Summary

| Name: | Sean Eardley |
|---|---|
| City: | Llandudno |
| Country: | United Kingdom |
| Membership: | Adult Member |
| Sport: | Football/Soccer |
Description
Defending in a Low Block as a Team,knowing individual roles and responsibilities.
See the guidance at the top of this page to understand why you are not seeing interactive Football/Soccer images.
See the guidance at the top of this page to understand why you are not seeing interactive Football/Soccer images.
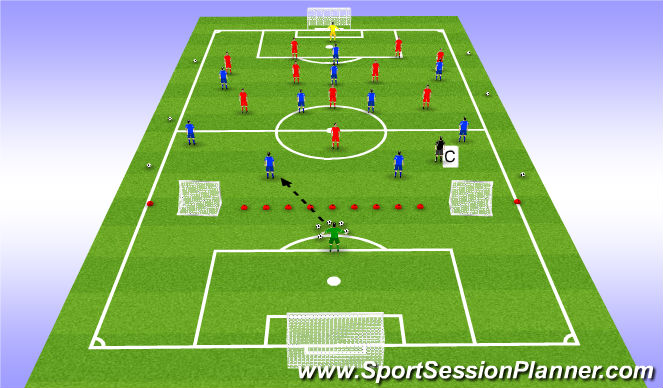
Problem 1/Solution1
Problem 1
- Ask the Blue Team to play into CBs thus creating a 2v1 against the Red No.9 then into CMs and create a 2v1 against the Red 10
- The Red No.9 must arc his run in order for the play to go down one side,as the image shows above he must arc and cut off passing line to the opposite CB.
- If the ball reaches the Blue CM they could also find the No.10 Blue in between the defensive and Midfield Lines (closest midfielder engages the ball and spare Red CM covers and stops passing line into the No.9)
Solution
- When the ball is played in central by the GK to the LCB, coach the Red No.9 to adjust his position to cut off the other CB,thus stopping a possible switch to the other CB/opposite fullback.The Red No.9 starting position is in line with the Centre Spot inside the arc of the Centre Circle, his trigger is as the ball is moving and the CB takes his first touch.
- Red No.7 screens the pass into the Blue No.11, and Red No.10 stands in between the 2 Blue CMs (shaded area) he must have one midfielder on his outside shoulder to stop the pss to the spare player.
- Red No.6 on front foot if pass is made into CM
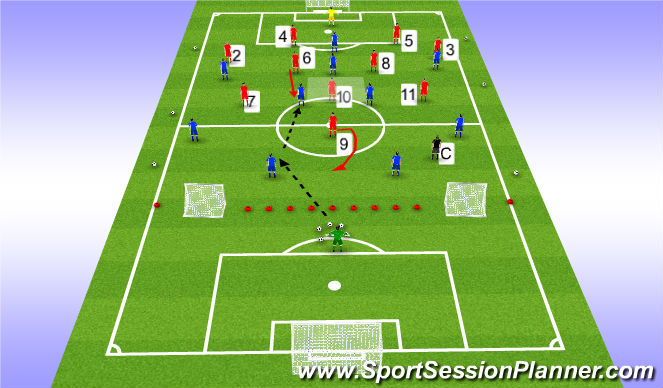
When this happens :
- Position of the Red No.3 and No.11,narrow up,5 yards inside the 18 yards box
- Position of the Red No.4 and No.5, don't be too deep,make sure distances are right between defence and midfield/attackers
What if - the Red No.9's positioning is incorrect and the opposite CB gains safe possession and carries the ball out.
- The Red No.11 cuts the ball off out wide and forces the blue play inside,his trigger to engage is when the CB crosses the halfway line the Red No.8 is on the front foot to press the opposite CM, the Red No.6 occupies the deep lyer and the Red No.10 occupies the other CM to protect central areas.
See the guidance at the top of this page to understand why you are not seeing interactive Football/Soccer images.
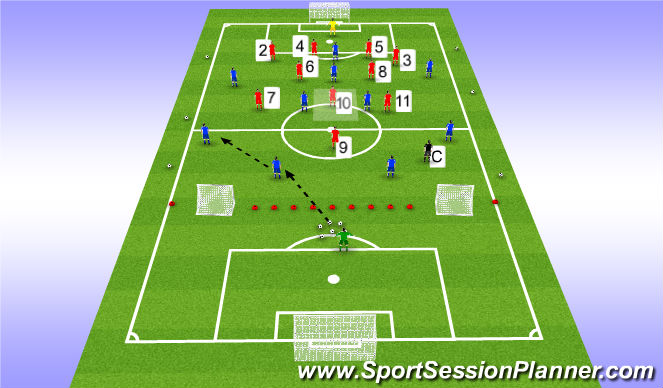
Problem 2/Solution 2
Problem 2
- Red Team defend narrow, Blues are looking to play through central areas but make the play predictable so have to go wide.
This causes a problem for the Reds as Red No.7,Red No.6,Red No.4 and Red No.2 will get pulled out of their positions and remainder of the red team need to narrow up, leaving the Blue No.2 and Blue No.7.
Solution
- As before the Red No.9 stands in line with the Centre Spot inside the arc of the Centre Circle, in this image the ball has been played to the LCB then to the LB, the Red No.9 uses the edge of the Centre Circle as a reference and will stay central, will not chase the ball.
- No.10 in between the CMs indicated in the shaded area, if the ball is with the left side CM his body position must be correct in order not to allow switch.
- Red No.7 and Red No.11 are narrow, 5 yards in from the 18 yard line, making sure the Blue No.7 and Blue No.11 are both on their outside shoulders.
- Red CBs and No.6 No.8 stay in contact and don't get dragged out of position,pass on effective communication to players around them.
What if - the Blue No.7/Blue No.11 roll inside and create space in between lines for the fullback out wide (this gives the Red fullbacks a problem whether they go with their winger or hold)
- To stop a potential switch of play, if the ball is with the LCB or LCM and the Blue No.7 rolls inside, I would encourage the Red left back to hold his ground and allow the Blue No.7 to roll onto the LCB, the 2 CBs are occupied now with the No.9 and No.7 of the blues with the Red No.2 narrowed up also with the Blue No.11 on his outside shoulder, this stops the Blues playing over the Low Block.
See the guidance at the top of this page to understand why you are not seeing interactive Football/Soccer images.
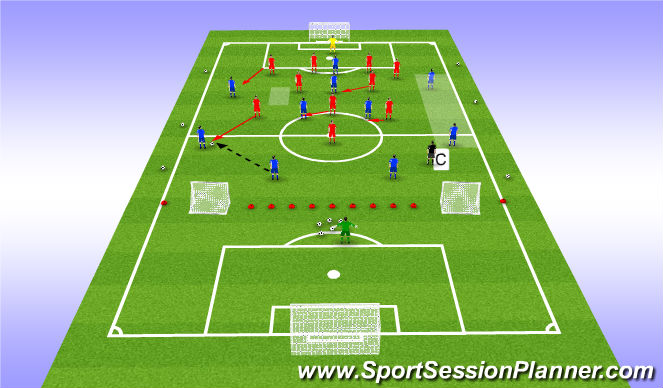
Animation of Solution 2
As the ball is played from the Blue CB to Blue LB -
- Red No.7 travels same time as the ball,cut off middle of the pitch (speed,body shape) shows outside.
- Red No.2 postion must be right to enable press on Blue No.11 and for ball not to go over his head
- Red No.6 must be around shaded area to cut off the passing line into Blue No.9, he can also see a possible midfield runner from the Blues.
- Red No.4 to mark channel side and communicate with No.2 and No.6
- Red No.9 to cut off opposite CB by staying central and using Cenre Circle as reference point
- Red No.10 comes across and marks outside shoulder of the closest CM
- Red No.11 has the role of marking outside shoulder of the opposite CM but also press the CB if the ball is played there (angle of run, show inside.
See the guidance at the top of this page to understand why you are not seeing interactive Football/Soccer images.
11v11
11v11
- Intervene and go through coaching process if need be.
- Balls around the outside for quick restarts
- Coach the Red Team in defending in the midfield block, when they win the ball they must score or have an attempt at goal within 12 passes,instructed at the start.
- If they cannot win the ball back in transition within 7 seconds they must fall into the low block
What if - distances between Red No.9 and No.10 are too big, allowing CBs to create 2v1 and CMs to create 2v1.
- Restarts for the Blues - Red No.9 and Red No.10 stay central and retreat into low,narrow block, reference point is middle of the pitch (edge of the centre circle for Red No.9) and both players to stay within the width of the 18 yard box forcing the Blues to play around the defensive shape and go wide into full backs and thus not playing through.
What if - Reds defend central areas successfully but fullbacks of Blues manage to get safe possession out wide due to positioning of Red No.7/Red No.11 after playing out wide from low block.
- The Red Fullbacks engage their opposite full backs with the No.6/No.8 applying cover to the vacated fullback position,the recovery run of th Red No.7/No.11 is that vacated of the CM.
'%3E%3Cpath id='path4169' d='M 11.4375,70.25 C 11.457031,38.394531 37.277344,13.242188 68.253906,13.050781 99.78125,12.855469 125.73047,38.351563 125.8125,70.078125 125.89844,101.62109 100.43359,127.14063 69.148438,127.42188 37.582031,127.70703 11.464844,102.23438 11.4375,70.25 m 6.425781,-0.08984 c 0.03516,28.421871 23.027344,50.69922 50.519532,50.82031 C 96.433594,121.10156 119.30469,98.367188 119.38281,70.359375 119.45313,42.878906 97.382813,19.714844 69.015625,19.496094 40.75,19.277344 17.964844,42.035156 17.863281,70.160156' style='clip-rule:nonzero;fill:%23333f48;fill-opacity:1;fill-rule:nonzero;stroke:none' /%3E%3Cpath style='fill:%23333f48;fill-opacity:1;fill-rule:nonzero;stroke:none' d='m 39.789063,108.62109 c 0.28125,0.14454 0.550781,0.32032 0.839843,0.4336 2.734375,1.05469 5.554688,1.78125 8.453125,2.23047 2.734375,0.42578 5.484375,0.64453 8.25,0.54297 3.988282,-0.15625 7.832032,-0.94922 11.445313,-2.69532 1.683594,-0.8164 3.246094,-1.82422 4.640625,-3.07422 3.265625,-2.92578 5.171875,-6.582027 5.796875,-10.906246 0.546875,-3.761719 0.04687,-7.425781 -1.09375,-11.019531 -1.4375,-4.523438 -3.730469,-8.582032 -6.703125,-12.265625 -1.03125,-1.277344 -2.082031,-2.535157 -3.113281,-3.808594 C 66.789063,66.1875 65.332031,64.269531 64.0625,62.21875 c -1.601562,-2.582031 -2.835937,-5.316406 -3.613281,-8.261719 -0.683594,-2.574218 -0.902344,-5.1875 -0.6875,-7.828125 0.214844,-2.617187 0.910156,-5.117187 2.152344,-7.441406 2.164062,-4.050781 5.503906,-6.710937 9.816406,-8.179687 1.890625,-0.640625 3.835937,-1.058594 5.832031,-1.195313 1.121094,-0.07813 2.242188,-0.152344 3.363281,-0.164062 4.28125,-0.02734 8.4375,0.734375 12.453125,2.175781 1.871094,0.671875 3.6875,1.496094 5.523438,2.257812 0.226562,0.09375 0.4375,0.230469 0.664062,0.351563 -0.164062,0.25 -0.371093,0.160156 -0.539062,0.164062 -2.824219,0.101563 -5.535156,0.703125 -8.132813,1.804688 -1.335937,0.570312 -2.570312,1.316406 -3.648437,2.296875 -2.527344,2.296875 -3.605469,5.15625 -3.34375,8.550781 0.140625,1.855469 0.722656,3.574219 1.550781,5.222656 0.648438,1.296875 1.414063,2.523438 2.292969,3.675782 0.953125,1.25 1.929687,2.484375 2.929687,3.699218 2.085938,2.523438 4.164063,5.054688 6.050782,7.738282 2.203125,3.136718 4.140627,6.417968 5.589847,9.980468 1.16406,2.867188 2.01562,5.820313 2.39843,8.894532 0.25,2.011718 0.30079,4.03125 0.11719,6.058593 -0.24219,2.640625 -0.79297,5.195313 -1.74609,7.667969 -1.29688,3.36328 -3.300784,6.22656 -5.972659,8.63281 -2.429687,2.19141 -5.171875,3.90625 -8.109375,5.3125 -2.695312,1.29297 -5.464843,2.40235 -8.34375,3.20313 -1.953125,0.54687 -3.945312,0.8789 -5.949218,1.15625 -3.035157,0.41797 -6.085938,0.48828 -9.132813,0.3125 -5.328125,-0.3125 -10.476562,-1.46094 -15.410156,-3.52344 -3.449219,-1.44141 -6.691406,-3.25781 -9.757813,-5.39453 -0.183593,-0.12891 -0.378906,-0.25 -0.53125,-0.41016 -0.07031,-0.0703 -0.05859,-0.22656 -0.08203,-0.34375 z m 0,0' id='path4175' /%3E%3Cpath style='fill:%23333f48;fill-opacity:1;fill-rule:nonzero;stroke:none' d='M 94.699219,29.390625 C 94.089844,29.21875 93.476563,29.054688 92.867188,28.875 90.183594,28.085938 87.46875,27.441406 84.703125,27.046875 c -3.976562,-0.566406 -7.945312,-0.59375 -11.863281,0.402344 -7.535156,1.914062 -12.386719,6.71875 -14.878906,13.996094 -0.894532,2.617187 -1.179688,5.328125 -0.953125,8.078125 0.203125,2.484375 0.867187,4.859375 1.816406,7.160156 0.933594,2.261719 2.117187,4.390625 3.4375,6.449219 1.4375,2.25 3.050781,4.371093 4.640625,6.511718 1.4375,1.933594 2.867187,3.871094 4.261719,5.835938 1.230468,1.730469 2.316406,3.546875 3.273437,5.445312 1.324219,2.625 2.265625,5.378907 2.703125,8.292969 0.433594,2.902344 0.292969,5.765625 -0.660156,8.5625 -0.9375,2.74609 -2.574219,5.00781 -4.777344,6.875 -2.417969,2.04688 -5.203125,3.39844 -8.246094,4.22266 -1.835937,0.5 -3.703125,0.75781 -5.609375,0.82031 -3.886718,0.13281 -7.679687,-0.47266 -11.421875,-1.46094 -2.261718,-0.59765 -4.488281,-1.33203 -6.695312,-2.11328 -0.207031,-0.0742 -0.40625,-0.16797 -0.597656,-0.25 -0.02344,-0.24609 0.148437,-0.19141 0.25,-0.20703 1.96875,-0.30469 3.921875,-0.67969 5.804687,-1.34766 1.367188,-0.48437 2.671875,-1.10156 3.855469,-1.94922 2.25,-1.61328 3.65625,-3.765621 4.0625,-6.515621 0.273437,-1.867188 0.09375,-3.710938 -0.429688,-5.527344 -0.472656,-1.648437 -1.171875,-3.199219 -2.109375,-4.628906 -0.792968,-1.207031 -1.636718,-2.382813 -2.523437,-3.519531 -0.921875,-1.195313 -1.921875,-2.328125 -2.890625,-3.484375 -2.753906,-3.273438 -5.351563,-6.660157 -7.523438,-10.355469 -2.042968,-3.480469 -3.667968,-7.136719 -4.597656,-11.078125 -0.640625,-2.699219 -0.980469,-5.4375 -0.832031,-8.214844 0.238281,-4.53125 1.476562,-8.78125 3.824219,-12.6875 1.082031,-1.800781 2.445312,-3.375 3.988281,-4.800781 2.742187,-2.527344 5.863281,-4.480469 9.257812,-5.992188 3.746094,-1.667968 7.652344,-2.769531 11.707032,-3.394531 3.152343,-0.488281 6.324218,-0.671875 9.507812,-0.519531 8.632813,0.410156 16.671875,2.792969 24,7.433594 0.08203,0.05078 0.152344,0.109375 0.230469,0.167968 -0.0039,0.04297 -0.0078,0.08984 -0.01563,0.136719' id='path4177' /%3E%3Cpath style='fill:%23333f48;fill-opacity:1;fill-rule:nonzero;stroke:none' d='m 31.699219,38.75 c -0.07813,0.238281 -0.152344,0.476563 -0.238281,0.710938 -1.460938,4.074218 -2.066407,8.28125 -1.808594,12.59375 0.4375,7.304687 2.808594,13.925781 7.277344,19.753906 3.714843,4.84375 7.441406,9.671875 11.167968,14.503906 1.113282,1.441406 1.953125,3.007813 2.414063,4.777344 0.332031,1.257812 0.425781,2.539062 0.273437,3.820312 -0.214843,1.832032 -1.070312,3.34375 -2.464843,4.546875 -0.984375,0.851559 -2.113282,1.449219 -3.316407,1.925779 -1.378906,0.54297 -2.8125,0.89063 -4.273437,1.1211 -2.226563,0.35547 -4.46875,0.46093 -6.722656,0.41015 -0.589844,-0.0156 -1.046875,-0.18359 -1.433594,-0.625 -0.636719,-0.72265 -1.335938,-1.39062 -1.9375,-2.14062 C 25.574219,93.800781 22.300781,86.621094 20.84375,78.636719 20.152344,74.835938 19.917969,71 20.15625,67.128906 20.796875,56.773438 24.390625,47.574219 30.859375,39.480469 c 0.21875,-0.273438 0.453125,-0.53125 0.679688,-0.796875 0.05469,0.02344 0.109375,0.04297 0.160156,0.06641' id='path4179' /%3E%3Cpath style='fill:%23333f48;fill-opacity:1;fill-rule:nonzero;stroke:none' d='m 105.41016,101.30078 c -0.13282,-0.3125 0.0234,-0.5039 0.0977,-0.69922 1.38672,-3.749997 1.98047,-7.628904 1.89844,-11.621091 -0.14453,-6.84375 -2.08594,-13.144531 -5.73437,-18.925781 C 99.890625,67.226563 97.917969,64.53125 95.835938,61.917969 94.4375,60.160156 92.988281,58.4375 91.582031,56.6875 90.632813,55.511719 89.6875,54.335938 88.792969,53.121094 c -0.835938,-1.144531 -1.488281,-2.398438 -1.953125,-3.742188 -0.523438,-1.515625 -0.695313,-3.070312 -0.511719,-4.652343 0.21875,-1.839844 1.082031,-3.339844 2.476563,-4.542969 1.039062,-0.890625 2.230468,-1.507813 3.503906,-1.980469 1.632812,-0.609375 3.320312,-0.960937 5.046875,-1.175781 1.917969,-0.238281 3.839841,-0.269531 5.769531,-0.230469 0.52734,0.01172 0.89453,0.203125 1.23828,0.585938 5.50391,6.113281 9.26172,13.144531 11.21875,21.132812 1.11719,4.554688 1.5625,9.179688 1.30469,13.855469 -0.58203,10.625 -4.23438,20.082031 -10.96094,28.339846 -0.15625,0.1914 -0.32812,0.375 -0.51562,0.58984' id='path4181' /%3E%3Cpath style='fill:%23333f48;fill-opacity:1;fill-rule:nonzero;stroke:none' d='m 39.796875,108.63281 c -0.05859,0.0117 -0.117187,0.0234 -0.175781,0.0352 0.05469,-0.0156 0.113281,-0.0312 0.167969,-0.0469 z m 0,0' id='path4183' /%3E%3C/g%3E%3C/svg%3E)
 Play animation
 Play step-by-step
 Repeat (toggle)
 Full Screen
 Pause
Pause Stop
Stop
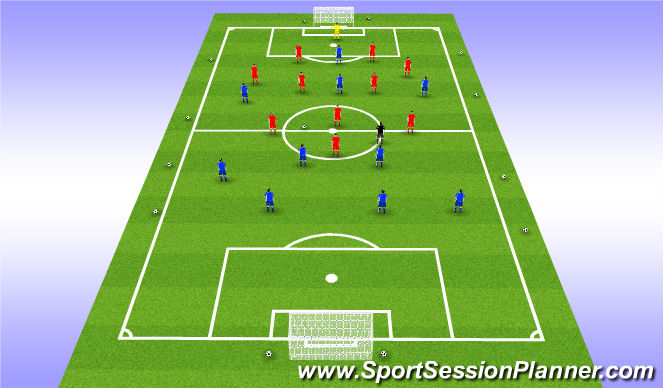
Organisation
ORGANISATION
- Blue team set up in a 4-2-3-1 formation (Keeper as a server)
- Red team set up in a 1-4-2-3-1 formation
- I will be coaching the RED Team
- Blue GK begins play into CB
- C (Me) will take up a position inside the area, which is full width and has balls spread around the outside also for quick restarts.
The session will focus on the Red Team defending the main goal and the Blue Team causing problems.
Blue Team - the session becomes active when the coach plays the ball to the Blue CB, they are looking for entries into the final 1/3 to score a goal by encouraging to play through,around or over the Red Team.
Red Team - defend as a team in a Low Block, must score within 8 passes,this will encourage them to leave their positions leaving space for the Blues in transition.