Football/Soccer Session (Beginner): Supporting the Attack in Counterattack (Start Time: 2024-10-17 18:15:00)
Description
Objective: Supporting the attack in counterattack
Main Principle: Join the attack with speed
Sub Principle: Provide support behind the ball
T.T.P.: Position to enable the attack to continue by creating passing options behind the ball
Training Day: Threshold
Player Actions: With Ball: Driving Dribbling,Passing,Shooting Without Ball: Scanning, Supporting
Session Type: Progressive
Session Length: 75 min (Including 15 min Fifa 11 warm-up and passing stations)
Physical Load: Medium
Cognitive Load: Medium
Current Behavior
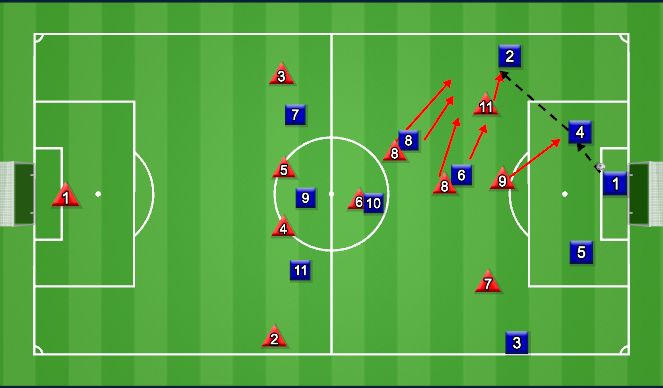
WHAT: NOT BEING ABLE TO START A COUNTER ATTACK
WHO: #9-7-11-8-8-3-2
WHERE: ATTACKING HALF
WHEN: WHEN OUR #7/11/8 WINS THE BALL AND LOOKING TO PLAY FORWARD
WHY: OUR #2-3 NOT SUPPORTING THE ATTACK TO CREATE THE WIDTH AND OUR #9-8-8 ARE STAYING PUT INSTEAD OF CREATING RUNS
Desire Behavior
WHAT: CREATING SUPPORT TO ATTACK WHEN WE WIN THE BALL AND LOOKING TO EXPLOIT THE OPPONENT'S DISORGANIZED/UNBALANCED SHAPE
WHO: #9-7-11-8-8-3-2
WHERE: ATTACKING HALF
WHEN: WHEN OUR #7/11/8 WINS THE BALL AND LOOKING TO PLAY FORWARDWHEN THE OPPONENT'S #2/3 HAS THE BALL AND LOOKING TO DRIBBLE FORWARD
WHY: OUR #2-3 SUPPORTING FROM THE MIDDLE AND #8 CREATING DIAGONAL RUNS GIVE US NUMERICAL ADVANTAGE ON THE WEAK SIDE WHERE WE ARE EXPLOITING
Guided Questions
How can we create the width when we win the ball? #2-3
Can we play forward when we win the ball in the attacking 3rd? #7-11
How can we support the attack from behind the ball? #8-3-2
Can we create a passing stations in order to move the opponent's #4-5 away from the danger zone? #9
See the guidance at the top of this page to understand why you are not seeing interactive Football/Soccer images.
See the guidance at the top of this page to understand why you are not seeing interactive Football/Soccer images.
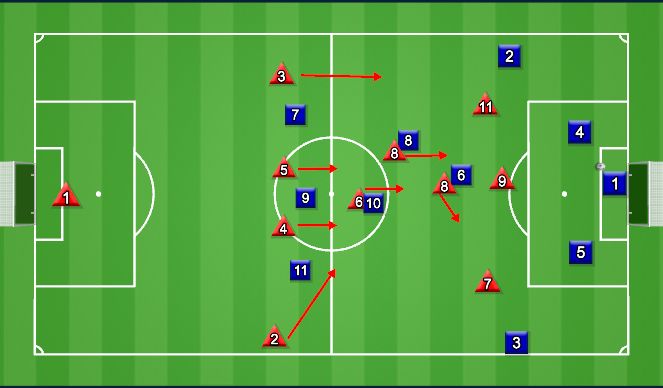
First action is pushing the defense line to the midline. This will also push our midfielders up and this will give us the optimum depth that we want in order to get/stay compact. When the ball is played to the wide channels for the opponent's fullback, the same side full back (our team) needs to push up and take countermeasure(to be ready) if/when we regain the possession of the ball. Our second full back needs to tuck in so we can have 3 defenders against 3 strikers.
See the guidance at the top of this page to understand why you are not seeing interactive Football/Soccer images.
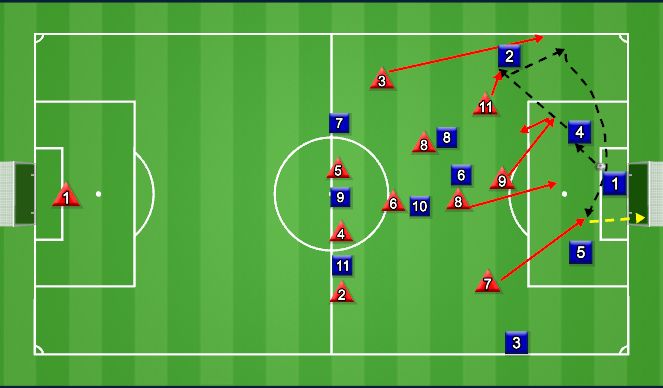
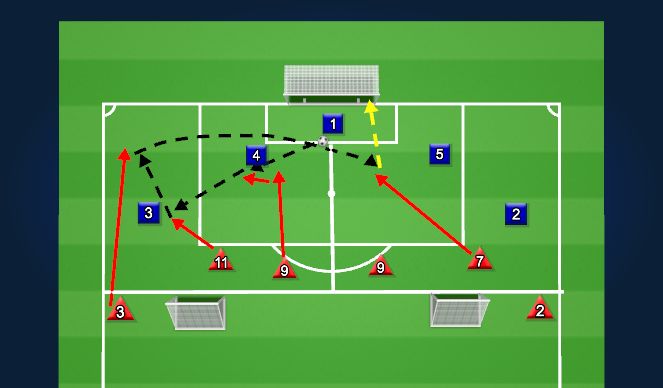
When our #11/7 wins the ball, our fullback (#2-3) has to overlap to create 2v1 and put himself in a crossing (Flat/cutback) scenario. Our #8 and #7/11 has to make a run inside to 18 to finish the attack from the cross.
See the guidance at the top of this page to understand why you are not seeing interactive Football/Soccer images.
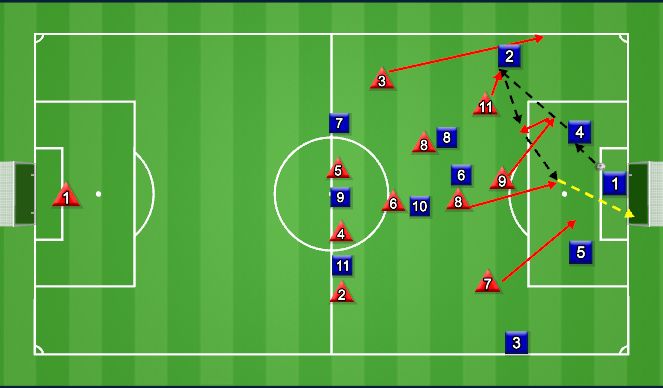
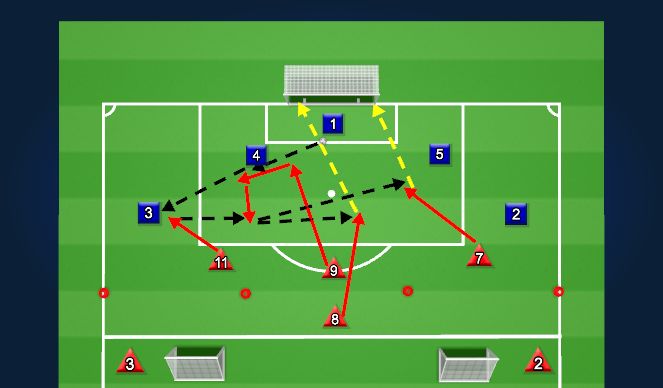
When our #11/7 wins the ball, our #9 checks in to create 2v1 in the middle. Our #8 and #7/11 has to make a run inside to 18 to finish the attack from the through ball from #9
See the guidance at the top of this page to understand why you are not seeing interactive Football/Soccer images.
Field size: Attacking 3rd in 2 halves
Each half: 3vs3 and additional red player in the cross
Blue team defends the big goal, scores to the same side mini goal
Red team defends the same side mini goal, scores to the big goal
Blue team starts every time
Success
Number of the overlaps
Number of the crosses to the player/space
Number of the goals

See the guidance at the top of this page to understand why you are not seeing interactive Football/Soccer images.
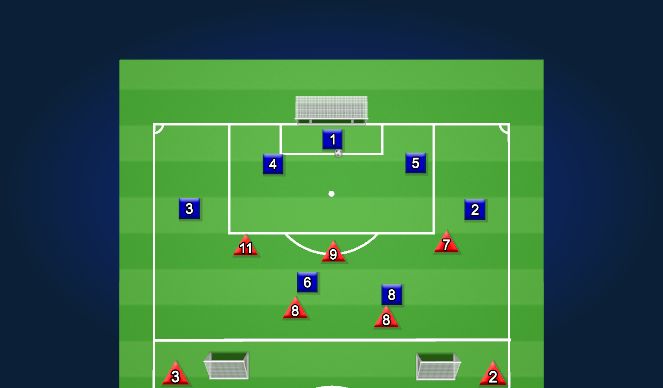
Field size: Attacking 3rd
Each half: 4vs4+GK and additional red player and additional red player in the cross
Blue team defends the big goal, scores to the mini goal 2
Red team defends the mini goals, scores to the big goal
Blue team starts every time
Red team #8 can join the team only in transition from defending the attacking moments
Success
Number of the overlaps
Number of the crosses to the player/space
Number of the goals
See the guidance at the top of this page to understand why you are not seeing interactive Football/Soccer images.
Field size: Attacking 3rd
Each half: 4vs4+GK and additional red player and additional red player in the cross
Blue team defends the big goal, scores to the mini goal 2
Red team defends the mini goals, scores to the big goal
Blue team starts every time
Red team #8 can join the team only in transition from defending the attacking moments
Success
Number of the check ins from #9 in order to receive the ball from #7/11 when they regain the possession of the ball
Number of the passes to the player/space
Number of the goals
See the guidance at the top of this page to understand why you are not seeing interactive Football/Soccer images.
Game moment.
Blue team defends the big goal, scores to the mini goal 2
Red team defends the mini goals, scores to the big goal
Blue team starts every time
Red #2-3 can only join the team only in transition from defending the attacking moments
Success
Number of the overlaps
Number of the check ins from #9 in order to receive the ball from #7/11 when they regain the possession of the ball
Number of the passes to the player/space
Number of the goals

 Play animation
 Play step-by-step
 Repeat (toggle)
 Full Screen
 Pause
Pause Stop
Stop
We are not compact in the defending moments. Our team depth is longer/wider than what we suppose to be. When we the ball with our strikers, we are running towards him in order to create passing options but we are actually making the space even smaller since we also bring the opponent with us.