


Football/Soccer Session (Academy Sessions): Defending the Switch of Play

FAW Coach Ed
Dylan Rees
Profile Summary

| Name: | Dylan Rees |
|---|---|
| City: | Prescot |
| Country: | United Kingdom |
| Membership: | Adult Member |
| Sport: | Football/Soccer |
Description
SESSION TOPIC: Defending the Switch of Play
PRINCIPLE OF PLAY: Defending the switch of play
KEY POINT: Understand when and how to stop a switch of play based on the pressure applied by the defending team
TARGET PLAYERS: Out of possession (Red team)
Objectives / Learning Outcomes
- Out-of-possession players (Red) will learn how to deny or delay a switch of play by effective positioning and pressurizing the ball (tactical objective).
- Red team will recognize the cues (body shape, passing options, and first touch) that indicate when the opposition (Blue) might switch play (cognitive objective).
- Red team will improve collective defensive organization (e.g., compactness, communication) to quickly reset into shape after any transition (organizational/communication objective).
Four-Corner Approach
Physical Corner
Work-to-Rest Ratios: Each block is 5 minutes of high-intensity defensive work (pressing, covering, tracking), followed by a brief coaching interval (~1 minute) for feedback. This results in approximately a 5:1 work-to-rest ratio.
Energy System: Predominantly anaerobic (lactate) and repeated sprint ability given frequent changes of speed and direction when pressing (Reilly, 2003; Bangsbo, 1994). Short recovery times between block sallow partial replenishment of ATP-CP stores, which aids repeated sprints.
Social Corner
Team Meetings: The coach is advised to provide brief huddles at the start and end of each block, encouraging shared problem-solving on how to stop the switch (Vygotsky, 1978).
Captains / Leaders: The designated defensive leader(e.g., CB) can guide the defensive line, ensuring constant communication regarding marking and covering.
Problem-Solving Tasks: Red players could be asked to discuss how best to compress space when Blue attempts a lateral pass, fostering collaboration and leadership within the defensive unit (Light, 2013).
Psychological Corner
Concentration and Anticipation: Encouraging defenders to read the Blue team’s body shape and first touch helps them prepare for potential switches (Dweck, 2006).
Resilience / Mindset: If Red concedes, players are encouraged to reset quickly and maintain focus on preventing the next switch(Harwood, 2008).
Confidence: Success in intercepting or forcing Blue away from switching builds self-efficacy in defensive duties (Bandura, 1997).
Technical Corner
Pressing Technique: Close down quickly using appropriate body shape, staying side-on to force play into compact areas.
Tackling and Intercepting: Timing of tackle or stepping in to intercept sideways or diagonal passes.
Cover and Balance: Support from second defender to cover passing lanes and be ready to press if the first defender is bypassed.
See the guidance at the top of this page to understand why you are not seeing interactive Football/Soccer images.
See the guidance at the top of this page to understand why you are not seeing interactive Football/Soccer images.
SP (10 mins)
Problem 1
Scenario: Blue attempts a quick switch from the left channel(LW, LCM) across to the right channel (RW). They use the CB or DM as a pivot to switch.
Solution:
Pressure on the Ball: Red’s LM quickly closes down the Blue LW to prevent the comfortable pass inside.
Block the Pivot: Red’s CAM and DM step closer to Blue’s DM or CB who might receive and switch.
Force Wide: Red’s LB covers inside while LM forces the ball carrier to remain in the same channel.
Compactness: The rest of the Red defenders remain tight horizontally, cutting off diagonal passing lanes.
Problem 2
Scenario: Blue tries to create a switch by dropping the ST deeper to pull out a CB, then quickly passing wide to an overlapping RCM.
Solution:
CB Decision: Nearest CB tracks the ST’s movement but does not get dragged too high, maintaining the defensive shape.
Covering Midfield: Red’s DM or AM picks up the dropping ST, allowing CB to hold position.
Anticipate Overlap: Red’s RM or RB reads the RCM’s run and moves early to track or intercept the pass.
Communication: GK or CB ensures the whole back line shifts across to narrow the passing corridor for the switch.
What if 1 (Blue) recognizes that Red’s midfield is too narrow?
Blue might try a quick diagonal aerial switch over the midfield line to RW.
Red Solution:
CBs drop slightly to create depth, anticipating the aerial ball.
RB positions body open to see the ball and the winger, ready to intercept or challenge in the air.
LM or AM quickly recover to apply back-pressure on the receiving winger.
What if (Blue) attempts a double pass in central zones to drag Red’s press, then quickly spreads wide?
What if 2 (Blue) might play a one-two between DM and CB, forcing Red to over-commit centrally, then switch wide.
Red Solution:
Maintain discipline: Red’s pressing midfielder (CAM) closes DM, but does not over-commit.
RB or LB holds position, anticipating the wide pass.
Communication from CB: keeps line compact so that any wide pass is made under pressure.
Progressions & Regressions
Progression:
Limit the time on the ball for Blue (e.g., 2-touch max) to increase speed of the switch, forcing Red to react faster.
Increase the pitch width to create more realistic spacing, challenging Red’s defensive coverage.
Regression:
Allow Blue unlimited touches but reduce the playing width, making it simpler for Red to remain compact and deny the switch.

See the guidance at the top of this page to understand why you are not seeing interactive Football/Soccer images.
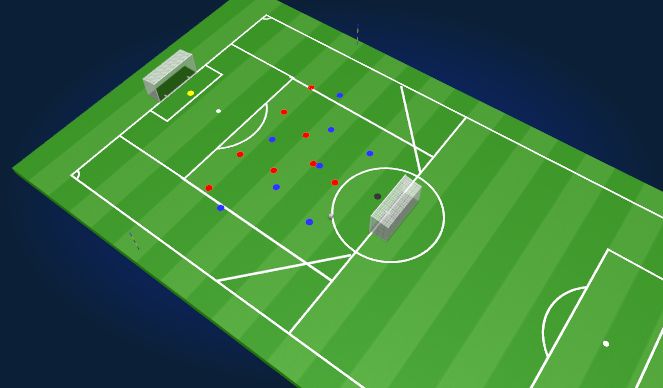
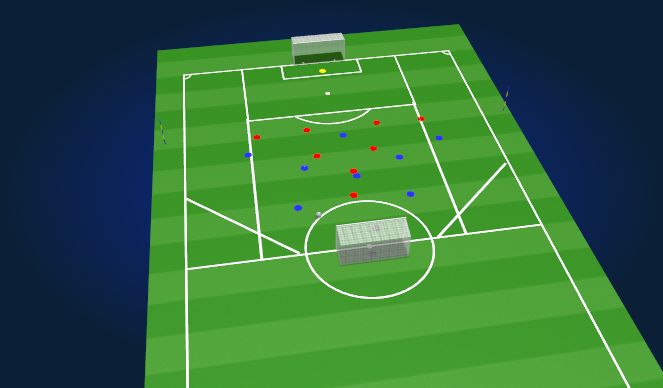
SP
Pitch Geography (Red Team Roles & Responsibilities)
Starting Positions (when Blue restarts from feeder):
GK: Positioned centrally in the penalty box, coordinating the back line.
LB & RB: Narrow positioning, slightly inside the width of the penalty area to protect central channels, ready to shift outward if ball travels wide.
CBs (2): Central and compact, ensuring minimal gaps between them and the fullbacks.
LM & RM: Tucked in initially to screen central passing lanes, but prepared to press wide areas quickly if the ball travels outside.
AM (CAM): Slightly advanced of the DM line, ready to press the first pass in central areas or drop in to help.
Execution Positions (when actively defending):
Immediate Pressure: Closest Red midfielder (LM or RM) or CAM presses the ball carrier to prevent the easy switch.
Cover and Balance: Opposite fullback and opposite CB shift across to cover potential diagonal passing lane.
Force Wide: Pressing player’s body shape funnels the Blue attack outwards (making the switch more predictable or less effective).
Detailed Coaching Points
Force Wide: Show the attacker down the line by positioning the defender’s body diagonally and cutting off the inside passing lane.
Keep Play Predictable: Red midfielders funnel plays toward the sideline or into covering defenders.
Pressure on the Ball: Immediate and aggressive press on the player who can initiate the switch.
Leave the Furthest Players: Focus on marking or pressing the near and central threats first; if a player is very far away, trust the compact shape and track only if the ball travels to that player.
Coaching Interventions
Freeze: Coach can halt play to reposition defenders and highlight spacing or body shape (“Stop there. Look how tight or spread out you are.”).
Walkthrough: Slowly walk players through the movement required to deny the switch, emphasizing angles of approach and covering positions.
Concurrent: Provide real-time feedback as the game continues (“Great job pressing early. Now check your shoulder for the wide runner.”).
Bullseye: Praise and spotlight successful instances of pressing or intercepting. For example, if the CB steps well to intercept, highlight that as a model for the rest of the team.
See the guidance at the top of this page to understand why you are not seeing interactive Football/Soccer images.
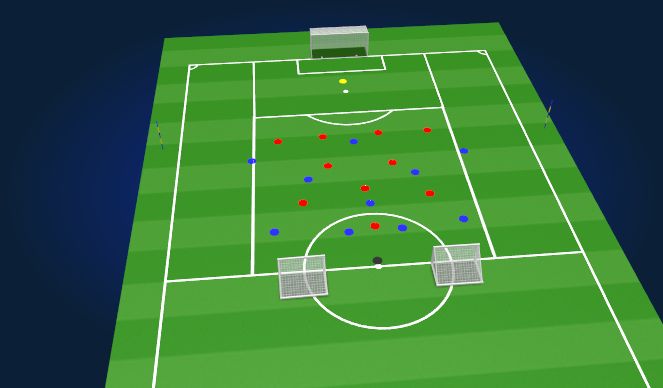
11v11 frame LSG
Organization & Setup
Area: Half pitch.
Timings: 15 minutes total, 2 blocks x 7 minutes each, with 1minute rest in between.
Numbers: 18 outfield players total (9v9), each with a GK.
Team Formations (modified):
Blue (In Possession, 4-3-3):
In Possession (Blue, 9 players): GK, RB, LB, RCM,LCM, DM, LW, RW, ST. (Two CB withdrawn)Red (Out of Possession, 4-2-3-1)
Out of Possession (Red, 9 players): GK, LB, LCB, RCB,RB, LM, RM, CAM, ST. (LW and RW withdrawn)
Description:
Normal gameplay with throw-ins or restarts from the GK.
Blue tries to attack and score in the standard goal.
Red aims to regain possession and score in the opposing goal.
Upon any restart from Blue’s GK, Red must reset quickly to a solid defensive shape.
Conditions, Targets & Challenges
Conditions:
Red team must reset defensive shape and inline (mannequin) when Blue GK restarts.
If Red regains possession and stops the switch, they aim to score within 8–10 seconds. If they fail, possession returns to Blue GK.
Targets:
Red:
Regain possession and score in 8–10s = 1 point.
Stop a switch = 2 points.
Blue:
Score = 1 point.
Each successful switch = +1 point.
Challenges:
Can Red prevent more than one switch per Blue attack?
Can Red apply immediate pressure on any potential switch pass?
Encourage relevant and realistic constraints, e.g., awarding an extra point for intercepting diagonal passes.
Roles & Responsibilities (Red Team)
Starting Positions (when Blue GK restarts):
GK: Central in goal, organizing the back line.
LB, LCB, RCB, RB: Slightly narrower than normal to discourage central passes, but ready to shift outside if ball moves wide.
LM & RM: Start tucked in to screen the DM or potential pivot passes.
CAM: Positioned in front of DM to block forward passes, canpress if ball travels centrally.
ST: Occupies the Blue CB or DM to limit passing options.
Execution Positions (when defending transitions):
Fullbacks and center-backs adjust laterally depending on which side the ball is on, always maintaining compactness.
Midfield line steps in to press the ball carrier or block passing lanes for a quick switch.
CAM and ST work together to pressure the central pivot (DM or CB), preventing easy lateral distribution.
See the guidance at the top of this page to understand why you are not seeing interactive Football/Soccer images.
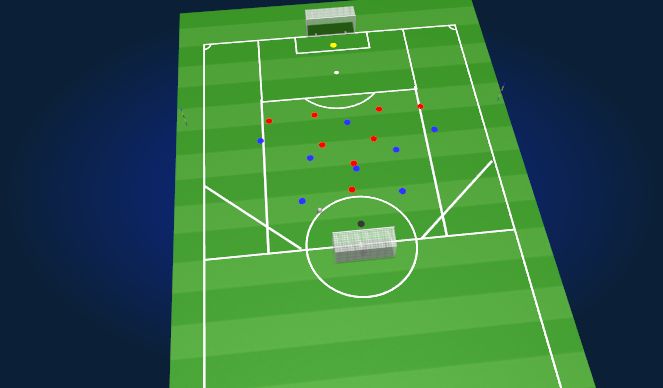
LSG (15 mins)
Problem 1
Scenario: Blue’s LB (or RB) receives from the GK and attempts a switch across the back line (example: LB → DM → RB).
Solution:
ST & CAM press the central LB or RB and DM, denying the easy central pass, forcing them to play on one side instead of across.
Compact Back Four: Red’s defensive line shifts as a unit, ensuring minimal gaps through the center.
Problem 2
Scenario: Blue overloads one wing with LB + LW + LCM, luring Red across, then quickly switches to the opposite RW.
Solution:
Near-Side Midfielder (LM) and LB press aggressively in wide overload, forcing the pass back or central.
Opposite Fullback (RB) and RM remain alert and track the RW to prevent an easy switch.
CAM provides cover to discourage a direct diagonal ball to the RW.
What if 1 (Blue) uses overlapping runs from the fullback to create a late switch?
Red should ensure the wide midfielder (LM or RM) tracks the overlapping run.
CB or RB/LB communicates to pick up the runner if the winger drifts inside, preventing an unmarked switch.
What if 2 (Blue) plays centrally to the DM, who quickly pings a long diagonal to the opposite winger?
Red organizes with the ST and CAM pressing the DM to restrict time on the ball.
The far-side fullback (RB or LB) drops early, scanning for the diagonal pass, ready to intercept or apply pressure on first touch.
Progressions & Regressions
Progression:
Reduce space (e.g., smaller half-pitch area) to increase defensive pressure and forcing quicker decisions.
Limit Blue to 2–3 touches maximum to increase the speed of potential switches.
Regression:
Allow more touches for Blue or expand width to reduce the pace of the switch, helping Red get comfortable with positioning first.
See the guidance at the top of this page to understand why you are not seeing interactive Football/Soccer images.
LSG
Detailed Coaching Points
Force Wide: Angles of approach from the nearest defender should discourage diagonal passing.
Keep Play Predictable: Red defends in a way that channels the ball into less dangerous areas (touchline or back to Blue’s GK).
Pressure on the Ball: Immediate press on potential pivot players (LB or RB/DM) to reduce the chance of a long switch.
Leave the Furthest Players: Focus on nearest threats; if the ball is far away, slide and cover collectively to keep compactness.
Coaching Interventions
Freeze: If the ball is about to be switched, freeze the play. Demonstrate how Red’s defenders can position themselves to block or intercept.
Walkthrough: Move through the shape slowly, assigning each Red player a specific reference point or cue to watch (e.g., the ball carrier’s hips).
Bullseye: Praise immediate pressure and highlight examples of effective defensive shifts, e.g., “Excellent job by the RB stepping in early.”
Concurrent: Provide on-the-spot coaching: “Shift together—make sure you block off that diagonal pass across the field.”
REFERENCES
Bangsbo, J. (1994). Fitness Training in Football: A Scientific Approach. HO + Storm.
Bandura, A. (1997). Self-efficacy: The exercise of control. W.H. Freeman.
Dweck, C. S. (2006). Mindset: The New Psychology of Success. Random House.
Harwood, C. G. (2008). ‘Developmental consulting in a professional soccer academy: The 5Cs framework’, The Sport Psychologist, 22(1),pp. 109–133.
Light, R. (2013). Game Sense: Pedagogy for performance, participation and enjoyment. Routledge.
Reilly, T. (2003). Science and Soccer. 2nd edn. Routledge.
Vygotsky, L. S. (1978). Mind in Society: The Development of Higher Psychological Processes. Harvard University Press.
'%3E%3Cpath id='path4169' d='M 11.4375,70.25 C 11.457031,38.394531 37.277344,13.242188 68.253906,13.050781 99.78125,12.855469 125.73047,38.351563 125.8125,70.078125 125.89844,101.62109 100.43359,127.14063 69.148438,127.42188 37.582031,127.70703 11.464844,102.23438 11.4375,70.25 m 6.425781,-0.08984 c 0.03516,28.421871 23.027344,50.69922 50.519532,50.82031 C 96.433594,121.10156 119.30469,98.367188 119.38281,70.359375 119.45313,42.878906 97.382813,19.714844 69.015625,19.496094 40.75,19.277344 17.964844,42.035156 17.863281,70.160156' style='clip-rule:nonzero;fill:%23333f48;fill-opacity:1;fill-rule:nonzero;stroke:none' /%3E%3Cpath style='fill:%23333f48;fill-opacity:1;fill-rule:nonzero;stroke:none' d='m 39.789063,108.62109 c 0.28125,0.14454 0.550781,0.32032 0.839843,0.4336 2.734375,1.05469 5.554688,1.78125 8.453125,2.23047 2.734375,0.42578 5.484375,0.64453 8.25,0.54297 3.988282,-0.15625 7.832032,-0.94922 11.445313,-2.69532 1.683594,-0.8164 3.246094,-1.82422 4.640625,-3.07422 3.265625,-2.92578 5.171875,-6.582027 5.796875,-10.906246 0.546875,-3.761719 0.04687,-7.425781 -1.09375,-11.019531 -1.4375,-4.523438 -3.730469,-8.582032 -6.703125,-12.265625 -1.03125,-1.277344 -2.082031,-2.535157 -3.113281,-3.808594 C 66.789063,66.1875 65.332031,64.269531 64.0625,62.21875 c -1.601562,-2.582031 -2.835937,-5.316406 -3.613281,-8.261719 -0.683594,-2.574218 -0.902344,-5.1875 -0.6875,-7.828125 0.214844,-2.617187 0.910156,-5.117187 2.152344,-7.441406 2.164062,-4.050781 5.503906,-6.710937 9.816406,-8.179687 1.890625,-0.640625 3.835937,-1.058594 5.832031,-1.195313 1.121094,-0.07813 2.242188,-0.152344 3.363281,-0.164062 4.28125,-0.02734 8.4375,0.734375 12.453125,2.175781 1.871094,0.671875 3.6875,1.496094 5.523438,2.257812 0.226562,0.09375 0.4375,0.230469 0.664062,0.351563 -0.164062,0.25 -0.371093,0.160156 -0.539062,0.164062 -2.824219,0.101563 -5.535156,0.703125 -8.132813,1.804688 -1.335937,0.570312 -2.570312,1.316406 -3.648437,2.296875 -2.527344,2.296875 -3.605469,5.15625 -3.34375,8.550781 0.140625,1.855469 0.722656,3.574219 1.550781,5.222656 0.648438,1.296875 1.414063,2.523438 2.292969,3.675782 0.953125,1.25 1.929687,2.484375 2.929687,3.699218 2.085938,2.523438 4.164063,5.054688 6.050782,7.738282 2.203125,3.136718 4.140627,6.417968 5.589847,9.980468 1.16406,2.867188 2.01562,5.820313 2.39843,8.894532 0.25,2.011718 0.30079,4.03125 0.11719,6.058593 -0.24219,2.640625 -0.79297,5.195313 -1.74609,7.667969 -1.29688,3.36328 -3.300784,6.22656 -5.972659,8.63281 -2.429687,2.19141 -5.171875,3.90625 -8.109375,5.3125 -2.695312,1.29297 -5.464843,2.40235 -8.34375,3.20313 -1.953125,0.54687 -3.945312,0.8789 -5.949218,1.15625 -3.035157,0.41797 -6.085938,0.48828 -9.132813,0.3125 -5.328125,-0.3125 -10.476562,-1.46094 -15.410156,-3.52344 -3.449219,-1.44141 -6.691406,-3.25781 -9.757813,-5.39453 -0.183593,-0.12891 -0.378906,-0.25 -0.53125,-0.41016 -0.07031,-0.0703 -0.05859,-0.22656 -0.08203,-0.34375 z m 0,0' id='path4175' /%3E%3Cpath style='fill:%23333f48;fill-opacity:1;fill-rule:nonzero;stroke:none' d='M 94.699219,29.390625 C 94.089844,29.21875 93.476563,29.054688 92.867188,28.875 90.183594,28.085938 87.46875,27.441406 84.703125,27.046875 c -3.976562,-0.566406 -7.945312,-0.59375 -11.863281,0.402344 -7.535156,1.914062 -12.386719,6.71875 -14.878906,13.996094 -0.894532,2.617187 -1.179688,5.328125 -0.953125,8.078125 0.203125,2.484375 0.867187,4.859375 1.816406,7.160156 0.933594,2.261719 2.117187,4.390625 3.4375,6.449219 1.4375,2.25 3.050781,4.371093 4.640625,6.511718 1.4375,1.933594 2.867187,3.871094 4.261719,5.835938 1.230468,1.730469 2.316406,3.546875 3.273437,5.445312 1.324219,2.625 2.265625,5.378907 2.703125,8.292969 0.433594,2.902344 0.292969,5.765625 -0.660156,8.5625 -0.9375,2.74609 -2.574219,5.00781 -4.777344,6.875 -2.417969,2.04688 -5.203125,3.39844 -8.246094,4.22266 -1.835937,0.5 -3.703125,0.75781 -5.609375,0.82031 -3.886718,0.13281 -7.679687,-0.47266 -11.421875,-1.46094 -2.261718,-0.59765 -4.488281,-1.33203 -6.695312,-2.11328 -0.207031,-0.0742 -0.40625,-0.16797 -0.597656,-0.25 -0.02344,-0.24609 0.148437,-0.19141 0.25,-0.20703 1.96875,-0.30469 3.921875,-0.67969 5.804687,-1.34766 1.367188,-0.48437 2.671875,-1.10156 3.855469,-1.94922 2.25,-1.61328 3.65625,-3.765621 4.0625,-6.515621 0.273437,-1.867188 0.09375,-3.710938 -0.429688,-5.527344 -0.472656,-1.648437 -1.171875,-3.199219 -2.109375,-4.628906 -0.792968,-1.207031 -1.636718,-2.382813 -2.523437,-3.519531 -0.921875,-1.195313 -1.921875,-2.328125 -2.890625,-3.484375 -2.753906,-3.273438 -5.351563,-6.660157 -7.523438,-10.355469 -2.042968,-3.480469 -3.667968,-7.136719 -4.597656,-11.078125 -0.640625,-2.699219 -0.980469,-5.4375 -0.832031,-8.214844 0.238281,-4.53125 1.476562,-8.78125 3.824219,-12.6875 1.082031,-1.800781 2.445312,-3.375 3.988281,-4.800781 2.742187,-2.527344 5.863281,-4.480469 9.257812,-5.992188 3.746094,-1.667968 7.652344,-2.769531 11.707032,-3.394531 3.152343,-0.488281 6.324218,-0.671875 9.507812,-0.519531 8.632813,0.410156 16.671875,2.792969 24,7.433594 0.08203,0.05078 0.152344,0.109375 0.230469,0.167968 -0.0039,0.04297 -0.0078,0.08984 -0.01563,0.136719' id='path4177' /%3E%3Cpath style='fill:%23333f48;fill-opacity:1;fill-rule:nonzero;stroke:none' d='m 31.699219,38.75 c -0.07813,0.238281 -0.152344,0.476563 -0.238281,0.710938 -1.460938,4.074218 -2.066407,8.28125 -1.808594,12.59375 0.4375,7.304687 2.808594,13.925781 7.277344,19.753906 3.714843,4.84375 7.441406,9.671875 11.167968,14.503906 1.113282,1.441406 1.953125,3.007813 2.414063,4.777344 0.332031,1.257812 0.425781,2.539062 0.273437,3.820312 -0.214843,1.832032 -1.070312,3.34375 -2.464843,4.546875 -0.984375,0.851559 -2.113282,1.449219 -3.316407,1.925779 -1.378906,0.54297 -2.8125,0.89063 -4.273437,1.1211 -2.226563,0.35547 -4.46875,0.46093 -6.722656,0.41015 -0.589844,-0.0156 -1.046875,-0.18359 -1.433594,-0.625 -0.636719,-0.72265 -1.335938,-1.39062 -1.9375,-2.14062 C 25.574219,93.800781 22.300781,86.621094 20.84375,78.636719 20.152344,74.835938 19.917969,71 20.15625,67.128906 20.796875,56.773438 24.390625,47.574219 30.859375,39.480469 c 0.21875,-0.273438 0.453125,-0.53125 0.679688,-0.796875 0.05469,0.02344 0.109375,0.04297 0.160156,0.06641' id='path4179' /%3E%3Cpath style='fill:%23333f48;fill-opacity:1;fill-rule:nonzero;stroke:none' d='m 105.41016,101.30078 c -0.13282,-0.3125 0.0234,-0.5039 0.0977,-0.69922 1.38672,-3.749997 1.98047,-7.628904 1.89844,-11.621091 -0.14453,-6.84375 -2.08594,-13.144531 -5.73437,-18.925781 C 99.890625,67.226563 97.917969,64.53125 95.835938,61.917969 94.4375,60.160156 92.988281,58.4375 91.582031,56.6875 90.632813,55.511719 89.6875,54.335938 88.792969,53.121094 c -0.835938,-1.144531 -1.488281,-2.398438 -1.953125,-3.742188 -0.523438,-1.515625 -0.695313,-3.070312 -0.511719,-4.652343 0.21875,-1.839844 1.082031,-3.339844 2.476563,-4.542969 1.039062,-0.890625 2.230468,-1.507813 3.503906,-1.980469 1.632812,-0.609375 3.320312,-0.960937 5.046875,-1.175781 1.917969,-0.238281 3.839841,-0.269531 5.769531,-0.230469 0.52734,0.01172 0.89453,0.203125 1.23828,0.585938 5.50391,6.113281 9.26172,13.144531 11.21875,21.132812 1.11719,4.554688 1.5625,9.179688 1.30469,13.855469 -0.58203,10.625 -4.23438,20.082031 -10.96094,28.339846 -0.15625,0.1914 -0.32812,0.375 -0.51562,0.58984' id='path4181' /%3E%3Cpath style='fill:%23333f48;fill-opacity:1;fill-rule:nonzero;stroke:none' d='m 39.796875,108.63281 c -0.05859,0.0117 -0.117187,0.0234 -0.175781,0.0352 0.05469,-0.0156 0.113281,-0.0312 0.167969,-0.0469 z m 0,0' id='path4183' /%3E%3C/g%3E%3C/svg%3E)
 Play animation
 Play step-by-step
 Repeat (toggle)
 Full Screen
 Pause
Pause Stop
Stop
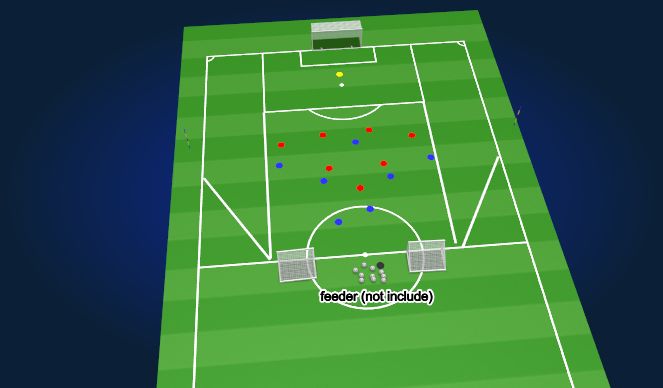
11V11 frame SP
Organization & Setup
Area: Half pitch.
Timings: 10 minutes total, split into 2 blocks x 5 minutes each
Numbers: 15 outfield players total.
Team Formations (modified):
Blue (In Possession, 4-3-3): Only 7 players involved (GK, LB, CB, RB not all included on pitch).
A Feeder (not included in play) starts every attack with the Blue team.
Red (Out of Possession, 4-2-3-1): Only 8 players involved (LW, RW, ST not on pitch).
Description:
The feeder always serves the ball to the Blue team (in possession).
Blue team aims to attack and score in the full-size goal.
Red team aims to stop or deny the switch of play, regain possession, and score in two mini-goals.
When Blue restarts (from the feeder), Red must fall back and reset quickly to their defensive shape.
Conditions, Targets & Challenges
Conditions:
Red team resets shape and inline with (mannequin) if Blue restarts from the feeder.
If Red regains the ball, they have 8–10 seconds to attempt a goal in mini-goals. If unsuccessful, play restarts from Blue’s feeder.
Targets:
Red:
Regain the ball and score in 8–10 seconds = 1 point.
Stop/prevent a switch = 2 points.
Blue:
Score in the main goal = 1 point.
Each successful switch = +1 point.
Challenges:
Can the Red team limit Blue to one or fewer switches per attack?
Can Red stop the switch early and force Blue wide?