


Football/Soccer Session (Academy Sessions): Stopping opp playing out from back

FAW Coach Ed
Michael Waters
Profile Summary

| Name: | Michael Waters |
|---|---|
| City: | Port talbot |
| Country: | United Kingdom |
| Membership: | Adult Member |
| Sport: | Football/Soccer |
Description
Session Title:
"Pressing Triggers & Compactness When Opponent Builds From the Back"
Objective:
To develop the out-of-possession team’s ability to press in a mid-to-high block when the opponent builds from the back, using clear triggers, compact unit movements, and effective pressing angles.
Pitch Setup:
Area: ¾ pitch (from the defending third to attacking third)
Goals: Full-size goal + target area (or mini-goal) for counter-attack
Teams:
Blue Team (In Possession): Build from GK to score in full goal
Red Team (Out of Possession): Press to regain and score within 10 seconds
Starting Point: Ball always starts with the Blue GK
Session Structure:
Format: 11v11 or 10v10 depending on squad size
Timing: 3 x 6-minute blocks with 2-minute coaching intervals
Focus Block: One team focuses on in-possession build-up; opposition on pressing structure and reactions
Rotation: Teams switch roles after each block or based on coaching objectives
Conditions:
Ball always starts with the GK (Blue Team)
If the Blue Team loses possession, the Red Team must score within 10 seconds
Restart with Blue GK after goal, turnover, or dead ball
See the guidance at the top of this page to understand why you are not seeing interactive Football/Soccer images.
See the guidance at the top of this page to understand why you are not seeing interactive Football/Soccer images.
Block 2
Block 2:
The near-side central midfielder (side of the diamond) is too deep or pinned to affect the full-back, allowing the opposition to escape wide and progress unopposed.
Coaching Objective:
To develop an out-of-possession strategy that shifts the pressing responsibility from midfield to full-back units when central options are limited, ensuring horizontal and vertical compactness is retained.
Tactical Solution: Full-Back-Led Pressure & Defensive Rebalancing
Back Four Responsibilities:
Right-Back (RB):
Acts as the primary presser when the opposition centre-back looks to release the full-back.
Must recognise the passing trigger early and jump quickly to engage the full-back, denying time and line-ball options.
Angle the press to force the opponent toward the sideline (pressing trap zone).
Right Centre-Back (RCB):
Steps out to engage the opposition winger if they roll inside to receive between lines.
Presses with aggression while being aware of space vacated centrally.
Left Centre-Back (LCB):
Shifts across to cover the zone vacated by the RCB.
Marks the centre-forward goal-side, protecting space in behind and maintaining the back line integrity.
Left-Back (LB):
Narrows into the defensive third to support the LCB and protect central spaces.
Willingly leaves the far-side winger free to ensure central compactness is not compromised.
Midfield Responsibilities:
CDM (6):
Screens central passing lanes into the striker (9).
Adjusts positioning to maintain vertical compactness as the press develops on the flank.
Remaining Three Midfielders:
Go man-to-man on opposition midfielders.
Stay alert for rotational movements or switches, ensuring ball-side pressure and central protection.
Front Two Responsibilities:
Strikers (9 & 10):
Begin on the edge of the opposition box, positioning between the two centre-backs.
Apply curved pressure to force the build-up toward the predetermined pressing side.
One forward may screen the pivot or show the ball into the full-back press.
Key Coaching Points:
Recognise triggers to press (CB receiving on back foot, body shape toward FB).
Communicate across units to ensure defensive chain reactions are coordinated.
Compactness and recovery positioning when players vacate the line to engage.
Timing and body shape of the presser must force predictable outcomes.
Coaching Interventions:
“RB – anticipate and go early on the pass into the FB. Can you lock them in?”
“CBs – manage the space left behind when one steps – who’s covering the 9?”
“Midfield line – stay man-tight, but don’t lose structure. Hold the middle.”
“Front two – shape the press. Don’t let them out centrally.”
See the guidance at the top of this page to understand why you are not seeing interactive Football/Soccer images.
Block 3
(Block 3):
When committing to a high press, the opposition bypass the first line and play direct into their centre-forward (No.9), targeting knockdowns or hold-up play.
Coaching Objective:
To implement a high press that anticipates direct play and manages aerial threats by positioning the defensive line and midfield units effectively to win first and second balls.
Tactical Solution: Managing Direct Play Within a High Press Structure
Defensive Unit Roles:
Centre-Backs (CBs):
Staggered positioning: One CB steps slightly in front of the striker to deny clean ball into feet or chest.
Second CB sits just behind, reading the drop and protecting the space in behind.
Communication between the two is essential for reading the striker’s movement and coordinating who engages.
Full-Backs (RB & LB):
Position inside the line of the opposition wingers to protect the central channel and provide cover for CBs.
Ready to drop quickly and defend space in behind should the long ball be flicked wide or through.
Midfield Unit Roles:
CDM (6):
Holds a central screening role, positioned to protect zone 14 and intercept second balls or direct passes into the No.9.
Can jump to press if the opponent attempts to play out short through midfield.
Sides of the Diamond (8s):
Position on the outside shoulders of the opposition central midfielders, maintaining pressure access.
Ready to press full-backs if a long diagonal is clipped into wide areas.
If bypassed, execute recovery runs to regain goal-side shape quickly.
Attacking Midfielder (10):
Operates ball-side of the opposition pivot to block access and encourage long distribution.
Works in tandem with strikers to lock play centrally and limit short build-up.
Forward Line Roles:
Strikers (9 & 10):
Start in wider positions to block central-to-wide distribution.
Shape their press to deny passes from centre-backs into full-backs.
Aim to force direct play centrally, where the team is set up to win aerial duels and second balls.
Contingency – If the Ball Goes to the Opposition Full-Back:
Side of the Diamond (8):
Immediately presses the receiving full-back at speed, locking them against the touchline.
Body shape should force play backwards or into a duel.
Rest of the Team:
Shifts across as a unit (horizontal compactness), reducing access to central areas.
Maintain balance and distances behind the ball to prevent switches or overloads.
Key Coaching Points:
Clear communication between CBs to manage the striker in front/behind.
Press with control – front players must shape the press to invite the direct pass.
Midfield line positioned to attack second balls and prevent knock-downs.
Recovery runs and structural discipline critical if press is broken.
Coach Interventions:
“CBs – stagger your positions, manage the 9 together.”
“10 – block the CDM, force them to go long.”
“Sides of the diamond – press with intent but be ready to recover.”
“Can we shift quickly as a unit to close space after the clip wide?”
'%3E%3Cpath id='path4169' d='M 11.4375,70.25 C 11.457031,38.394531 37.277344,13.242188 68.253906,13.050781 99.78125,12.855469 125.73047,38.351563 125.8125,70.078125 125.89844,101.62109 100.43359,127.14063 69.148438,127.42188 37.582031,127.70703 11.464844,102.23438 11.4375,70.25 m 6.425781,-0.08984 c 0.03516,28.421871 23.027344,50.69922 50.519532,50.82031 C 96.433594,121.10156 119.30469,98.367188 119.38281,70.359375 119.45313,42.878906 97.382813,19.714844 69.015625,19.496094 40.75,19.277344 17.964844,42.035156 17.863281,70.160156' style='clip-rule:nonzero;fill:%23333f48;fill-opacity:1;fill-rule:nonzero;stroke:none' /%3E%3Cpath style='fill:%23333f48;fill-opacity:1;fill-rule:nonzero;stroke:none' d='m 39.789063,108.62109 c 0.28125,0.14454 0.550781,0.32032 0.839843,0.4336 2.734375,1.05469 5.554688,1.78125 8.453125,2.23047 2.734375,0.42578 5.484375,0.64453 8.25,0.54297 3.988282,-0.15625 7.832032,-0.94922 11.445313,-2.69532 1.683594,-0.8164 3.246094,-1.82422 4.640625,-3.07422 3.265625,-2.92578 5.171875,-6.582027 5.796875,-10.906246 0.546875,-3.761719 0.04687,-7.425781 -1.09375,-11.019531 -1.4375,-4.523438 -3.730469,-8.582032 -6.703125,-12.265625 -1.03125,-1.277344 -2.082031,-2.535157 -3.113281,-3.808594 C 66.789063,66.1875 65.332031,64.269531 64.0625,62.21875 c -1.601562,-2.582031 -2.835937,-5.316406 -3.613281,-8.261719 -0.683594,-2.574218 -0.902344,-5.1875 -0.6875,-7.828125 0.214844,-2.617187 0.910156,-5.117187 2.152344,-7.441406 2.164062,-4.050781 5.503906,-6.710937 9.816406,-8.179687 1.890625,-0.640625 3.835937,-1.058594 5.832031,-1.195313 1.121094,-0.07813 2.242188,-0.152344 3.363281,-0.164062 4.28125,-0.02734 8.4375,0.734375 12.453125,2.175781 1.871094,0.671875 3.6875,1.496094 5.523438,2.257812 0.226562,0.09375 0.4375,0.230469 0.664062,0.351563 -0.164062,0.25 -0.371093,0.160156 -0.539062,0.164062 -2.824219,0.101563 -5.535156,0.703125 -8.132813,1.804688 -1.335937,0.570312 -2.570312,1.316406 -3.648437,2.296875 -2.527344,2.296875 -3.605469,5.15625 -3.34375,8.550781 0.140625,1.855469 0.722656,3.574219 1.550781,5.222656 0.648438,1.296875 1.414063,2.523438 2.292969,3.675782 0.953125,1.25 1.929687,2.484375 2.929687,3.699218 2.085938,2.523438 4.164063,5.054688 6.050782,7.738282 2.203125,3.136718 4.140627,6.417968 5.589847,9.980468 1.16406,2.867188 2.01562,5.820313 2.39843,8.894532 0.25,2.011718 0.30079,4.03125 0.11719,6.058593 -0.24219,2.640625 -0.79297,5.195313 -1.74609,7.667969 -1.29688,3.36328 -3.300784,6.22656 -5.972659,8.63281 -2.429687,2.19141 -5.171875,3.90625 -8.109375,5.3125 -2.695312,1.29297 -5.464843,2.40235 -8.34375,3.20313 -1.953125,0.54687 -3.945312,0.8789 -5.949218,1.15625 -3.035157,0.41797 -6.085938,0.48828 -9.132813,0.3125 -5.328125,-0.3125 -10.476562,-1.46094 -15.410156,-3.52344 -3.449219,-1.44141 -6.691406,-3.25781 -9.757813,-5.39453 -0.183593,-0.12891 -0.378906,-0.25 -0.53125,-0.41016 -0.07031,-0.0703 -0.05859,-0.22656 -0.08203,-0.34375 z m 0,0' id='path4175' /%3E%3Cpath style='fill:%23333f48;fill-opacity:1;fill-rule:nonzero;stroke:none' d='M 94.699219,29.390625 C 94.089844,29.21875 93.476563,29.054688 92.867188,28.875 90.183594,28.085938 87.46875,27.441406 84.703125,27.046875 c -3.976562,-0.566406 -7.945312,-0.59375 -11.863281,0.402344 -7.535156,1.914062 -12.386719,6.71875 -14.878906,13.996094 -0.894532,2.617187 -1.179688,5.328125 -0.953125,8.078125 0.203125,2.484375 0.867187,4.859375 1.816406,7.160156 0.933594,2.261719 2.117187,4.390625 3.4375,6.449219 1.4375,2.25 3.050781,4.371093 4.640625,6.511718 1.4375,1.933594 2.867187,3.871094 4.261719,5.835938 1.230468,1.730469 2.316406,3.546875 3.273437,5.445312 1.324219,2.625 2.265625,5.378907 2.703125,8.292969 0.433594,2.902344 0.292969,5.765625 -0.660156,8.5625 -0.9375,2.74609 -2.574219,5.00781 -4.777344,6.875 -2.417969,2.04688 -5.203125,3.39844 -8.246094,4.22266 -1.835937,0.5 -3.703125,0.75781 -5.609375,0.82031 -3.886718,0.13281 -7.679687,-0.47266 -11.421875,-1.46094 -2.261718,-0.59765 -4.488281,-1.33203 -6.695312,-2.11328 -0.207031,-0.0742 -0.40625,-0.16797 -0.597656,-0.25 -0.02344,-0.24609 0.148437,-0.19141 0.25,-0.20703 1.96875,-0.30469 3.921875,-0.67969 5.804687,-1.34766 1.367188,-0.48437 2.671875,-1.10156 3.855469,-1.94922 2.25,-1.61328 3.65625,-3.765621 4.0625,-6.515621 0.273437,-1.867188 0.09375,-3.710938 -0.429688,-5.527344 -0.472656,-1.648437 -1.171875,-3.199219 -2.109375,-4.628906 -0.792968,-1.207031 -1.636718,-2.382813 -2.523437,-3.519531 -0.921875,-1.195313 -1.921875,-2.328125 -2.890625,-3.484375 -2.753906,-3.273438 -5.351563,-6.660157 -7.523438,-10.355469 -2.042968,-3.480469 -3.667968,-7.136719 -4.597656,-11.078125 -0.640625,-2.699219 -0.980469,-5.4375 -0.832031,-8.214844 0.238281,-4.53125 1.476562,-8.78125 3.824219,-12.6875 1.082031,-1.800781 2.445312,-3.375 3.988281,-4.800781 2.742187,-2.527344 5.863281,-4.480469 9.257812,-5.992188 3.746094,-1.667968 7.652344,-2.769531 11.707032,-3.394531 3.152343,-0.488281 6.324218,-0.671875 9.507812,-0.519531 8.632813,0.410156 16.671875,2.792969 24,7.433594 0.08203,0.05078 0.152344,0.109375 0.230469,0.167968 -0.0039,0.04297 -0.0078,0.08984 -0.01563,0.136719' id='path4177' /%3E%3Cpath style='fill:%23333f48;fill-opacity:1;fill-rule:nonzero;stroke:none' d='m 31.699219,38.75 c -0.07813,0.238281 -0.152344,0.476563 -0.238281,0.710938 -1.460938,4.074218 -2.066407,8.28125 -1.808594,12.59375 0.4375,7.304687 2.808594,13.925781 7.277344,19.753906 3.714843,4.84375 7.441406,9.671875 11.167968,14.503906 1.113282,1.441406 1.953125,3.007813 2.414063,4.777344 0.332031,1.257812 0.425781,2.539062 0.273437,3.820312 -0.214843,1.832032 -1.070312,3.34375 -2.464843,4.546875 -0.984375,0.851559 -2.113282,1.449219 -3.316407,1.925779 -1.378906,0.54297 -2.8125,0.89063 -4.273437,1.1211 -2.226563,0.35547 -4.46875,0.46093 -6.722656,0.41015 -0.589844,-0.0156 -1.046875,-0.18359 -1.433594,-0.625 -0.636719,-0.72265 -1.335938,-1.39062 -1.9375,-2.14062 C 25.574219,93.800781 22.300781,86.621094 20.84375,78.636719 20.152344,74.835938 19.917969,71 20.15625,67.128906 20.796875,56.773438 24.390625,47.574219 30.859375,39.480469 c 0.21875,-0.273438 0.453125,-0.53125 0.679688,-0.796875 0.05469,0.02344 0.109375,0.04297 0.160156,0.06641' id='path4179' /%3E%3Cpath style='fill:%23333f48;fill-opacity:1;fill-rule:nonzero;stroke:none' d='m 105.41016,101.30078 c -0.13282,-0.3125 0.0234,-0.5039 0.0977,-0.69922 1.38672,-3.749997 1.98047,-7.628904 1.89844,-11.621091 -0.14453,-6.84375 -2.08594,-13.144531 -5.73437,-18.925781 C 99.890625,67.226563 97.917969,64.53125 95.835938,61.917969 94.4375,60.160156 92.988281,58.4375 91.582031,56.6875 90.632813,55.511719 89.6875,54.335938 88.792969,53.121094 c -0.835938,-1.144531 -1.488281,-2.398438 -1.953125,-3.742188 -0.523438,-1.515625 -0.695313,-3.070312 -0.511719,-4.652343 0.21875,-1.839844 1.082031,-3.339844 2.476563,-4.542969 1.039062,-0.890625 2.230468,-1.507813 3.503906,-1.980469 1.632812,-0.609375 3.320312,-0.960937 5.046875,-1.175781 1.917969,-0.238281 3.839841,-0.269531 5.769531,-0.230469 0.52734,0.01172 0.89453,0.203125 1.23828,0.585938 5.50391,6.113281 9.26172,13.144531 11.21875,21.132812 1.11719,4.554688 1.5625,9.179688 1.30469,13.855469 -0.58203,10.625 -4.23438,20.082031 -10.96094,28.339846 -0.15625,0.1914 -0.32812,0.375 -0.51562,0.58984' id='path4181' /%3E%3Cpath style='fill:%23333f48;fill-opacity:1;fill-rule:nonzero;stroke:none' d='m 39.796875,108.63281 c -0.05859,0.0117 -0.117187,0.0234 -0.175781,0.0352 0.05469,-0.0156 0.113281,-0.0312 0.167969,-0.0469 z m 0,0' id='path4183' /%3E%3C/g%3E%3C/svg%3E)
 Play animation
 Play step-by-step
 Repeat (toggle)
 Full Screen
 Pause
Pause Stop
Stop
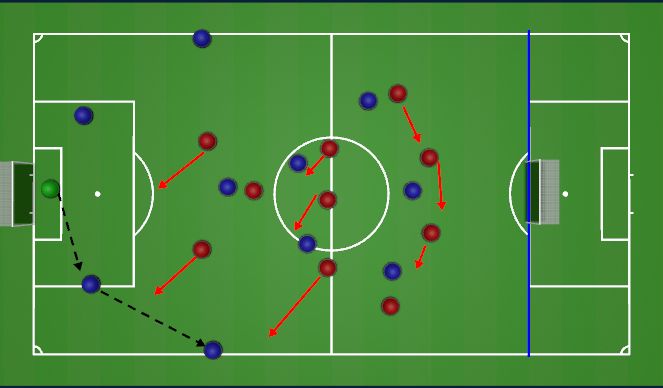
Block 1
Block 1:
Opposition building out via the full-back
Tactical Solution:
Front Two (9 & 10):
Start on the shoulders of both CBs
Curved pressing runs to force play one direction
10 locks on to the CDM if he drops in to receive
Diamond Midfield:
Side nearest the ball presses the full-back, showing outside
Opposite side shifts across to remain compact and ball-side
CDM initially screens the pivot, then steps to engage central midfielder if bypassed
Wide Defender (RB/LB):
Marks channel side of winger to prevent line-breaking pass
Stays compact but ready to press if ball is played wide
Centre Backs (RCB/LCB):
Stay tight to the striker, adjusting for any drop movements
Ready to step in or cover space in behind
Far Side Full-Back:
Tucks in to protect central channel and be ready for weak-side switches
???? Coaching Focus / Learning Outcomes:
Recognising pressing triggers (GK pass, CB poor touch, CDM drop)
Applying pressure in numbers, maintaining compactness behind
Understanding cover and balance principles when one presses
Coordinated movement to force play wide and trap in zones
Awareness of distances, body orientation, and passing lanes
Progressions / Adaptations:
Add a time constraint for Blue Team to reach halfway
Vary starting positions (e.g., goal kick, rolling ball to CB, central restart)
Introduce a neutral (GK or CB) to test pressing reactions