


Football/Soccer Session (Academy Sessions): U16 Session 12 - Build Up Play from the Back with Spontaneous Finishing - Mark Kennedy (Man City) (Start Time: 2017-05-29 20:05:00)

Premier Users' Club
Paul Inns
Profile Summary

| Name: | Paul Inns |
|---|---|
| City: | Newtown |
| Country: | United Kingdom |
| Membership: | Adult Member |
| Sport: | Football/Soccer |
Description
Build Up From the Back and Spontaneous Finishing

See the guidance at the top of this page to understand why you are not seeing interactive Football/Soccer images.
See the guidance at the top of this page to understand why you are not seeing interactive Football/Soccer images.
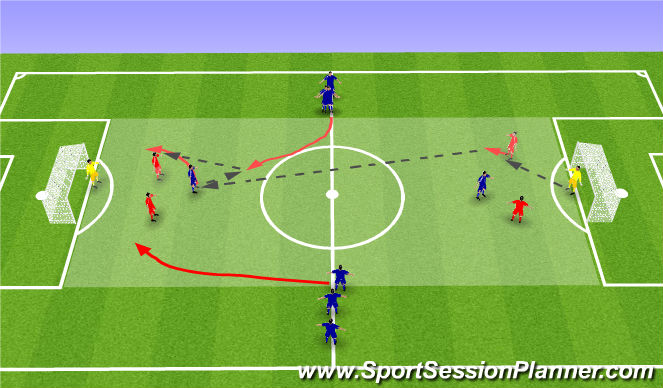
Build Up Play From the Back - Pattern no.2 (10 mins)
Pattern No.2
Similar to the previous pattern - except, when Red no.9 comes deep, the Blue Centre Back will follow him this time, in which case, Red no.8 clips the ball into Red no.7/11 depending on which Blue Centre Back has stayed with Red no.9. Opposite Midfield player must still follow in for a possible rebound - important to get into a good habit, with Red no.9 following in just in case.
Progressions
1. Introduce a Red no.10 to play in an attacking role alongside Red no.9. Communication between 9 & 10 is all important as to 1. Who comes deep to receive the pass or pull the Centre Back out; and 2. Who follows up any shot together with Red no.7 & 11, - if Red 9 goes deep, Red no.10 may follow up, with Red no.9 taking up a position on towards the edge of the area, looking for a second ball from any clearance by Blue team.
2. Replace yellow mannequin (LB/RB) with players, who together with Blue CB's, take on an active rather than passive role.
3. Replace yellow mannequins (LMF/RMF) with players - but condition them to position themselves so as to stop a direct passing line to Red no.7/11 from Red no.8
See the guidance at the top of this page to understand why you are not seeing interactive Football/Soccer images.
Function (15 mins)
Organisation
Create pitch as above - penalty area to penalty area and width of penalty area.
Split players into 4 red players, 2 GK's, with a Blue CF, and remaining players split equally to act as No.7 & 11 (alternate the players).
Red players are defenders out of possession and neutral players in possession.
Blue team are always in possession.
Instructions
GK into CB.
CB drives ball into CF. As the ball is driven, RMF makes his run, must be an arced run, coming around the front of the CF. CFl ays ball off to RMF and spins off around the off side shoulder of the Red CB. As this occurs, the LMF times his run, coming in on the blindside of the Blue CB, and creating a 3v2 situation. Distances between the Red RMF, No.9 and LMF are important - not too far apart. Easier then to break the defensive line.
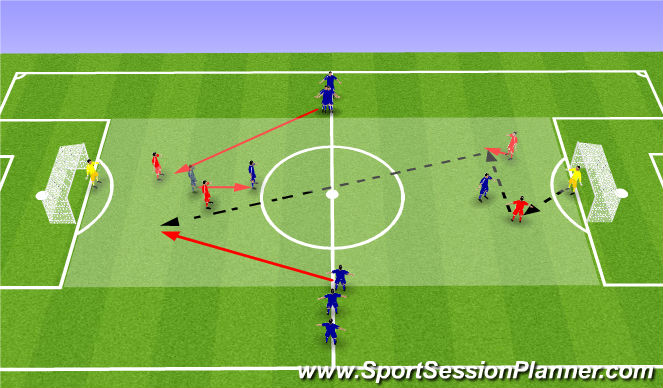
Pattern 2
GK plays ball to either CB who is tasked with passing the ball to the other CB to begin play. Front foot - advancing as receives the ball.
Ball is driven into Blue CF as before - however, on this occasion, both LMF and RMF drive forward in straight lines towards the CB's, creating an immediate 3v2. Blue No.9 receives ball on half turn and drives forward. Options? Break the lines by sliding the ball to Blue No.7 or 11, or driving forward himself - no need to spin off. If the ball is driven into Blue 7 or 11, decision making for them? Shoot, cross? pull back to Blue no.9 to shoot?
Pattern 3
Blue no.9 drops 10 yards to receive the ball from Red CB. This time, the marking CB goes with him, creating space behind. CB lofts the ball into the space behind. Nearest Blue MF races onto the ball as opposite MF makes a direct run to join in order to create a 2v1 situation.
Coaching Points
Movement
Timing
Accuracy of Pass
Weight of Pass
Decision making
Shooting and follow up
See the guidance at the top of this page to understand why you are not seeing interactive Football/Soccer images.
Function cont'd (10 mins)
See the guidance at the top of this page to understand why you are not seeing interactive Football/Soccer images.
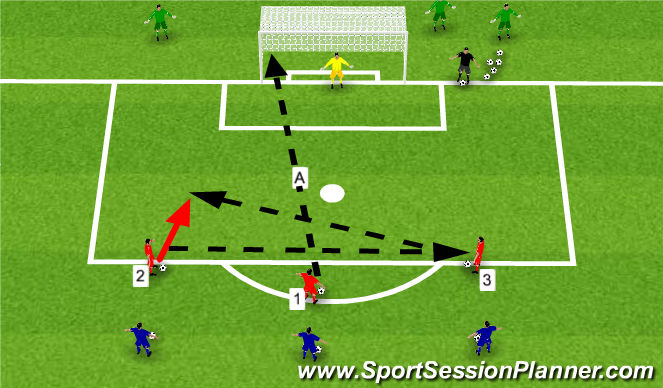
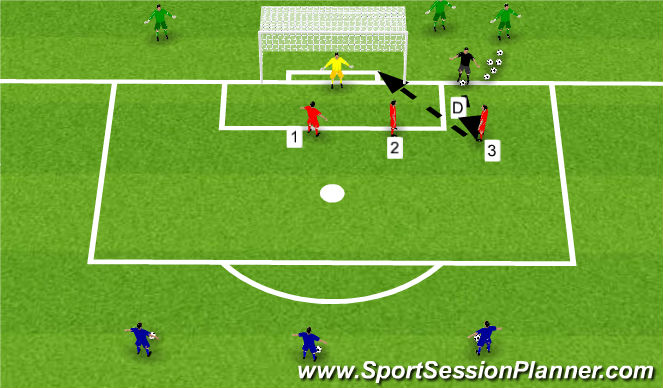
Spontaneous Finishing - Pep Ljinders -Liverpool FC - Drill (20 mins)
Organisation
Split players into 3 or 4 groups of 3 players. Goalkeeper also required, together with a server (player in black - use coach if need be).
Use a single goal.
Red players line up as indicated. They alternate with blue players to undertake the drill.
Instructions
Player 1 commences the drill by firing a shot at goal from the edge of the area (A)
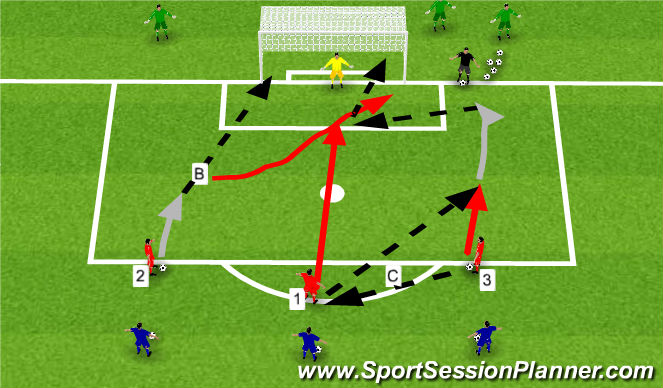
As the shot is made, Players 2 & 3 pass the ball firmly to each other with the pass from Player 3 to 2 being a lofted pass, representing a chip over the last line.
As soon as Player 2 receives the ball, he drives forward and shoots from an angle (B)
As Player 2 shoots, Player 3 passes his ball to Player 1, who returns the ball to him, and Player 3 drives forward in order to cross the ball into the area, with Player 2 looking to cover the near post, and player 1, in line with the penalty spot on the edge of the 6 yard box (C).
As soon as Player 3 has crossed the ball in, the server passes him a ball, and Player 3 shoots at goal from an angle, with Players 1 & 2 looking for the rebound.
Red team then regain a ball each as the Drill is repeated by the Blue team, with the remaining players acting as ball collectors and suppliers. Rotate all players to ensure equal participation.
Coaching Points
Although a shooting drill, the important aspect is not necessarily the shot - but what happens after. After each situation where a shot occurs, there's a new situation. After shooting, there's no time to be disappointed as the match/drill has moved on. Players need to be in a permanent state of readiness.
See the guidance at the top of this page to understand why you are not seeing interactive Football/Soccer images.
Drill continued
See the guidance at the top of this page to understand why you are not seeing interactive Football/Soccer images.
Drill continued
'%3E%3Cpath id='path4169' d='M 11.4375,70.25 C 11.457031,38.394531 37.277344,13.242188 68.253906,13.050781 99.78125,12.855469 125.73047,38.351563 125.8125,70.078125 125.89844,101.62109 100.43359,127.14063 69.148438,127.42188 37.582031,127.70703 11.464844,102.23438 11.4375,70.25 m 6.425781,-0.08984 c 0.03516,28.421871 23.027344,50.69922 50.519532,50.82031 C 96.433594,121.10156 119.30469,98.367188 119.38281,70.359375 119.45313,42.878906 97.382813,19.714844 69.015625,19.496094 40.75,19.277344 17.964844,42.035156 17.863281,70.160156' style='clip-rule:nonzero;fill:%23333f48;fill-opacity:1;fill-rule:nonzero;stroke:none' /%3E%3Cpath style='fill:%23333f48;fill-opacity:1;fill-rule:nonzero;stroke:none' d='m 39.789063,108.62109 c 0.28125,0.14454 0.550781,0.32032 0.839843,0.4336 2.734375,1.05469 5.554688,1.78125 8.453125,2.23047 2.734375,0.42578 5.484375,0.64453 8.25,0.54297 3.988282,-0.15625 7.832032,-0.94922 11.445313,-2.69532 1.683594,-0.8164 3.246094,-1.82422 4.640625,-3.07422 3.265625,-2.92578 5.171875,-6.582027 5.796875,-10.906246 0.546875,-3.761719 0.04687,-7.425781 -1.09375,-11.019531 -1.4375,-4.523438 -3.730469,-8.582032 -6.703125,-12.265625 -1.03125,-1.277344 -2.082031,-2.535157 -3.113281,-3.808594 C 66.789063,66.1875 65.332031,64.269531 64.0625,62.21875 c -1.601562,-2.582031 -2.835937,-5.316406 -3.613281,-8.261719 -0.683594,-2.574218 -0.902344,-5.1875 -0.6875,-7.828125 0.214844,-2.617187 0.910156,-5.117187 2.152344,-7.441406 2.164062,-4.050781 5.503906,-6.710937 9.816406,-8.179687 1.890625,-0.640625 3.835937,-1.058594 5.832031,-1.195313 1.121094,-0.07813 2.242188,-0.152344 3.363281,-0.164062 4.28125,-0.02734 8.4375,0.734375 12.453125,2.175781 1.871094,0.671875 3.6875,1.496094 5.523438,2.257812 0.226562,0.09375 0.4375,0.230469 0.664062,0.351563 -0.164062,0.25 -0.371093,0.160156 -0.539062,0.164062 -2.824219,0.101563 -5.535156,0.703125 -8.132813,1.804688 -1.335937,0.570312 -2.570312,1.316406 -3.648437,2.296875 -2.527344,2.296875 -3.605469,5.15625 -3.34375,8.550781 0.140625,1.855469 0.722656,3.574219 1.550781,5.222656 0.648438,1.296875 1.414063,2.523438 2.292969,3.675782 0.953125,1.25 1.929687,2.484375 2.929687,3.699218 2.085938,2.523438 4.164063,5.054688 6.050782,7.738282 2.203125,3.136718 4.140627,6.417968 5.589847,9.980468 1.16406,2.867188 2.01562,5.820313 2.39843,8.894532 0.25,2.011718 0.30079,4.03125 0.11719,6.058593 -0.24219,2.640625 -0.79297,5.195313 -1.74609,7.667969 -1.29688,3.36328 -3.300784,6.22656 -5.972659,8.63281 -2.429687,2.19141 -5.171875,3.90625 -8.109375,5.3125 -2.695312,1.29297 -5.464843,2.40235 -8.34375,3.20313 -1.953125,0.54687 -3.945312,0.8789 -5.949218,1.15625 -3.035157,0.41797 -6.085938,0.48828 -9.132813,0.3125 -5.328125,-0.3125 -10.476562,-1.46094 -15.410156,-3.52344 -3.449219,-1.44141 -6.691406,-3.25781 -9.757813,-5.39453 -0.183593,-0.12891 -0.378906,-0.25 -0.53125,-0.41016 -0.07031,-0.0703 -0.05859,-0.22656 -0.08203,-0.34375 z m 0,0' id='path4175' /%3E%3Cpath style='fill:%23333f48;fill-opacity:1;fill-rule:nonzero;stroke:none' d='M 94.699219,29.390625 C 94.089844,29.21875 93.476563,29.054688 92.867188,28.875 90.183594,28.085938 87.46875,27.441406 84.703125,27.046875 c -3.976562,-0.566406 -7.945312,-0.59375 -11.863281,0.402344 -7.535156,1.914062 -12.386719,6.71875 -14.878906,13.996094 -0.894532,2.617187 -1.179688,5.328125 -0.953125,8.078125 0.203125,2.484375 0.867187,4.859375 1.816406,7.160156 0.933594,2.261719 2.117187,4.390625 3.4375,6.449219 1.4375,2.25 3.050781,4.371093 4.640625,6.511718 1.4375,1.933594 2.867187,3.871094 4.261719,5.835938 1.230468,1.730469 2.316406,3.546875 3.273437,5.445312 1.324219,2.625 2.265625,5.378907 2.703125,8.292969 0.433594,2.902344 0.292969,5.765625 -0.660156,8.5625 -0.9375,2.74609 -2.574219,5.00781 -4.777344,6.875 -2.417969,2.04688 -5.203125,3.39844 -8.246094,4.22266 -1.835937,0.5 -3.703125,0.75781 -5.609375,0.82031 -3.886718,0.13281 -7.679687,-0.47266 -11.421875,-1.46094 -2.261718,-0.59765 -4.488281,-1.33203 -6.695312,-2.11328 -0.207031,-0.0742 -0.40625,-0.16797 -0.597656,-0.25 -0.02344,-0.24609 0.148437,-0.19141 0.25,-0.20703 1.96875,-0.30469 3.921875,-0.67969 5.804687,-1.34766 1.367188,-0.48437 2.671875,-1.10156 3.855469,-1.94922 2.25,-1.61328 3.65625,-3.765621 4.0625,-6.515621 0.273437,-1.867188 0.09375,-3.710938 -0.429688,-5.527344 -0.472656,-1.648437 -1.171875,-3.199219 -2.109375,-4.628906 -0.792968,-1.207031 -1.636718,-2.382813 -2.523437,-3.519531 -0.921875,-1.195313 -1.921875,-2.328125 -2.890625,-3.484375 -2.753906,-3.273438 -5.351563,-6.660157 -7.523438,-10.355469 -2.042968,-3.480469 -3.667968,-7.136719 -4.597656,-11.078125 -0.640625,-2.699219 -0.980469,-5.4375 -0.832031,-8.214844 0.238281,-4.53125 1.476562,-8.78125 3.824219,-12.6875 1.082031,-1.800781 2.445312,-3.375 3.988281,-4.800781 2.742187,-2.527344 5.863281,-4.480469 9.257812,-5.992188 3.746094,-1.667968 7.652344,-2.769531 11.707032,-3.394531 3.152343,-0.488281 6.324218,-0.671875 9.507812,-0.519531 8.632813,0.410156 16.671875,2.792969 24,7.433594 0.08203,0.05078 0.152344,0.109375 0.230469,0.167968 -0.0039,0.04297 -0.0078,0.08984 -0.01563,0.136719' id='path4177' /%3E%3Cpath style='fill:%23333f48;fill-opacity:1;fill-rule:nonzero;stroke:none' d='m 31.699219,38.75 c -0.07813,0.238281 -0.152344,0.476563 -0.238281,0.710938 -1.460938,4.074218 -2.066407,8.28125 -1.808594,12.59375 0.4375,7.304687 2.808594,13.925781 7.277344,19.753906 3.714843,4.84375 7.441406,9.671875 11.167968,14.503906 1.113282,1.441406 1.953125,3.007813 2.414063,4.777344 0.332031,1.257812 0.425781,2.539062 0.273437,3.820312 -0.214843,1.832032 -1.070312,3.34375 -2.464843,4.546875 -0.984375,0.851559 -2.113282,1.449219 -3.316407,1.925779 -1.378906,0.54297 -2.8125,0.89063 -4.273437,1.1211 -2.226563,0.35547 -4.46875,0.46093 -6.722656,0.41015 -0.589844,-0.0156 -1.046875,-0.18359 -1.433594,-0.625 -0.636719,-0.72265 -1.335938,-1.39062 -1.9375,-2.14062 C 25.574219,93.800781 22.300781,86.621094 20.84375,78.636719 20.152344,74.835938 19.917969,71 20.15625,67.128906 20.796875,56.773438 24.390625,47.574219 30.859375,39.480469 c 0.21875,-0.273438 0.453125,-0.53125 0.679688,-0.796875 0.05469,0.02344 0.109375,0.04297 0.160156,0.06641' id='path4179' /%3E%3Cpath style='fill:%23333f48;fill-opacity:1;fill-rule:nonzero;stroke:none' d='m 105.41016,101.30078 c -0.13282,-0.3125 0.0234,-0.5039 0.0977,-0.69922 1.38672,-3.749997 1.98047,-7.628904 1.89844,-11.621091 -0.14453,-6.84375 -2.08594,-13.144531 -5.73437,-18.925781 C 99.890625,67.226563 97.917969,64.53125 95.835938,61.917969 94.4375,60.160156 92.988281,58.4375 91.582031,56.6875 90.632813,55.511719 89.6875,54.335938 88.792969,53.121094 c -0.835938,-1.144531 -1.488281,-2.398438 -1.953125,-3.742188 -0.523438,-1.515625 -0.695313,-3.070312 -0.511719,-4.652343 0.21875,-1.839844 1.082031,-3.339844 2.476563,-4.542969 1.039062,-0.890625 2.230468,-1.507813 3.503906,-1.980469 1.632812,-0.609375 3.320312,-0.960937 5.046875,-1.175781 1.917969,-0.238281 3.839841,-0.269531 5.769531,-0.230469 0.52734,0.01172 0.89453,0.203125 1.23828,0.585938 5.50391,6.113281 9.26172,13.144531 11.21875,21.132812 1.11719,4.554688 1.5625,9.179688 1.30469,13.855469 -0.58203,10.625 -4.23438,20.082031 -10.96094,28.339846 -0.15625,0.1914 -0.32812,0.375 -0.51562,0.58984' id='path4181' /%3E%3Cpath style='fill:%23333f48;fill-opacity:1;fill-rule:nonzero;stroke:none' d='m 39.796875,108.63281 c -0.05859,0.0117 -0.117187,0.0234 -0.175781,0.0352 0.05469,-0.0156 0.113281,-0.0312 0.167969,-0.0469 z m 0,0' id='path4183' /%3E%3C/g%3E%3C/svg%3E)
 Play animation
 Play step-by-step
 Repeat (toggle)
 Full Screen
 Pause
Pause Stop
Stop
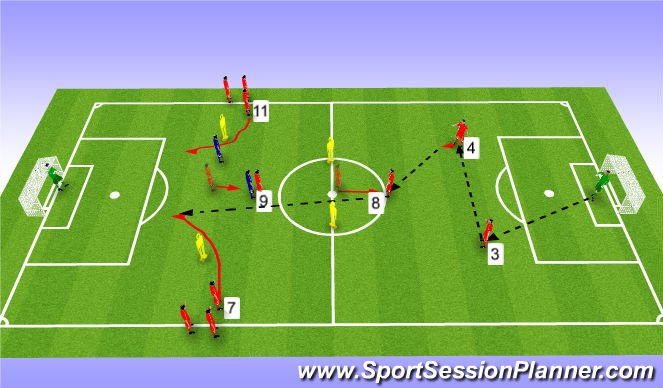
Build Up Play From the Back - Drill (15 mins)
Organisation
Use full pitch and place 4 yellow mannequins as illustrated, representing Blue LB/RB and Blue LMF/RMF.
Split players into two teams - 3 Blue players, including GK and 7 Red players, with additional red players being used to rotate LMF (7) and RMF (11).
Instructions
Play commences from Red GK each time, playing in to either Centre Back, both of which have split to edge of area. Receiving Red Centre Back passes to opposite Red Centre Back - who must receive on the front foot and drive forward - thereby reducing the distancef of the following pass he has to play.
Red no.8 received the ball on the front turn - first touch out of feet and in front of him - again - reducing the length of the following pass, and, as a consequence, increasing the prospect of an accurate pass.
Red no.8 passes the ball to red no.9 who has dropped off his markers - centre backs are conditioned to remain in situ. Midfield line has been broken.
Red no.9 receives the ball on his front foot - looking to drive forward.
As he receives the ball, Red no.7 & 11 engage - timing runs to perfection so as to avoid offside - coming inside and between the Mannequin (RB/LB) and Centre Back so as to create a 3v2 overload on the Centre Backs. Blue Centre Backs remain passive (until progression).
Rede no.7 & 9 are NOT looking to cross the ball. They will direct their runs so as to place themselves in a shooting position. Ultimately, its up to Red no.9 which pass he makes, or whether he goes himself, depending on the positioning of the Blue Centre Backs.
After a shot, all players - Red 7,9&11 must remain reactive to a rebound.
Red 7 & 11 are then alternated with other players and the drill continues with teh Red GK commencing play again.