


Football/Soccer Session (Academy Sessions): OA3 Topic - Creating and Exploiting Overloads

Premier Users' Club
Matt Jepson
Profile Summary

| Name: | Matt Jepson |
|---|---|
| City: | Leicester |
| Country: | United Kingdom |
| Membership: | Adult Member |
| Sport: | Football/Soccer |
Description
Organisation (Practice Layout & Transition)
See the guidance at the top of this page to understand why you are not seeing interactive Football/Soccer images.
See the guidance at the top of this page to understand why you are not seeing interactive Football/Soccer images.
Specific Practice (10 mins)
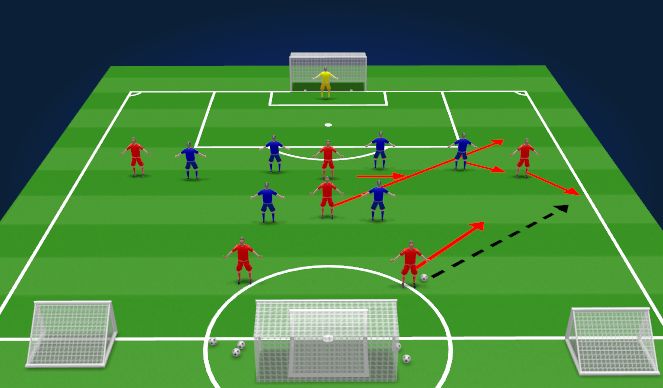
In the Specific Practice shown above, the Blues will defend as a compact and narrow block, protecting central spaces. This will cause us the problem of not being able to go through the middle, or use the most direct route to goal. Therefore, our solution will be to go wide, and look to create an overload in wide areas. An example above shows some aspects of how this may work. Above, my wide midfielder drops 5-10 yards and gets as wide as possible, to give the opposing fullback a problem. Above, the fullback is going to go with the wide player, leaving a big space for my 10 to go into if its on. My 9 is pinning their ball-side centre back to give him a problem, and my 6 that played wide, is supporting underneath. A Blue 6 will certainly try to help, and the back 4 in general will likely slide across. One of their other 6's may follow my 10, leaving my second 6 free. If the 10 is tracked by a Blue CB, it will mean that there will be more space around my 9. Essentially, we should be able to create a 4 v 3 situation. As a what if, if they manage to defend well and make it a 4 v 4 utilising both 6s and two defenders with a third defender covering, it may mean that we can exploit an overload opportunity on the other side, if we can get my second 6 out to support my wide player on the let above.
Technically ball speed, correct touch, and angles of pass and support will be important. People running off each other and being interchangeable will help too.
In transition, my Reds will be encouraged to try and protect central spaces, and get behind the ball as quickly as possible - if they cannot get fast pressure on the ball. If we have managed to create an overload but lose possession, it may be that the overload also gives us a better chance of a fast recovery of the ball, to attack once more. Once we have recognised the overload, we then need to look to create chances to score. The practice will restart with one of the 6s.
See the guidance at the top of this page to understand why you are not seeing interactive Football/Soccer images.
Small Sided Game (10 mins)
Set up - mini goals off, 3 additional players on (2 for Red, 1 for Blue to make 8 v8)
In this 8 v 8, the two teams will set up in the following way:
Reds - 1-1-2-3-1
Blues - 1-4-3
The players added represent a Red CB and GK, and for the Blues, we are adding in their 10.
The problem the Blues will look to present now, will be to make play more predictable with the 10, and try and lock us in wide areas.
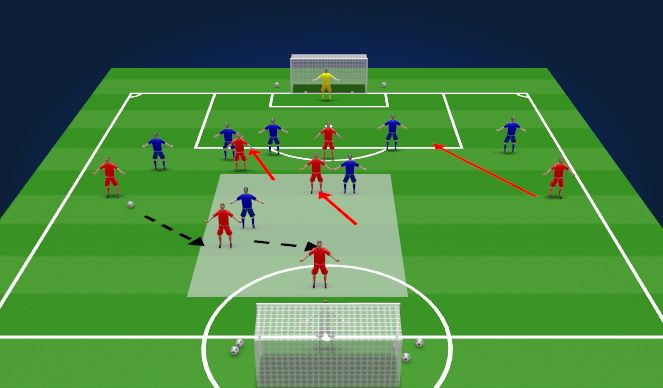
We will look to create central overloads, and attack through the middle.
There are numerous ways we will try and solve this problem, and they include the 5 pushing in, the goalkeeper supporting like a second centre back and trying to create a 5 v 3 in that way centrally. Should we do that, we will be able to commit opposing players, and exploit gaps. Even if this means going wide first as if the Blues have set the trap, we will look for movement to come back centrally and pick our way through.
If the Blues are able to combat this by pressing well and going man for man, it may that our 10 goes high, and leaves space behind for one 6 and the Red CB to join in.
In the shaded area above, the Blues have made us go wide initially, but we are able to overcome this by the 10 going high and then we are still 3 v 2 in the shaded area. If their 6 doesnt track our 10, we can have our 9 play with the 10, to make it 2 v 1 centrally, or 3 v 2 if you include our wide player.
As with the specific condition for the Blues, they will be encouraged to score quickly, and I may utilise a countdown for them to score to ensure the Reds have more possession and chances to explore the topic.
See the guidance at the top of this page to understand why you are not seeing interactive Football/Soccer images.
Coaching Points
Coaching Considerations:
With this topic, the Reds will be looking to do the following: Create and exploit the overload. When they have made this possible, success will likely come from finding the spare player.
Even though we are numbers down in the first part of the session (6 v 7) I expect the team to create overloads through player movement off the ball. This will involve players interchanging positions. The most simple overloads may be achieved through driving at the opponent, and then using an overlapping player and exploiting a 2 v 1. If we can commit opposing players and take them out the game, it will create lots of opportunities. As with many attacking situations, ball speed will be important.
How players receive the ball will be important from a technical perspective, as will positions and timing of runs.
The players may have different roles at different times. For example, our 9 may pin the ball side centre back on occasion, but may also look to create overloads through his run. If he makes a run, our 10 may look to replace him, or if the forward goes wide, it might be our wide player rolls in. Should the 10 go, our 6 may replace the 10. Of course, we need to remain both mindful and realistic about the counter attack should we lose it, and we will ensure we have layers to the midfield to try and delay any counter attack. As mentioned elsewhere, if we have created an overload, it may be that we can press quickly in that overload and regain possession too.
If in 2 v 1 situations, we will look at things like wall passes and overlaps. If in 3 v 2s it may be we can exploit a third man run. If the numbers are bigger such as a 5 v 3 example, the above may remain relevant, but finding the spare player will be the focus.
For reference points for the players, to manage the Blue team I will instruct them to try and stay within the width of the 18 yard box for the first part of the session (within reason, they are not 'restricted' to this, as dont want to make it too easy to get a wide overload), but their first priority is to block and protect the middle. For Reds, wide players will use the sidelines as reference points, and the detail around which shoulder to be on will be important too if playing wide, we will look to get outside the Blues, when playing centrally, we will try and get inside. Angles and depths will be important too, and recognising spaces.
'%3E%3Cpath id='path4169' d='M 11.4375,70.25 C 11.457031,38.394531 37.277344,13.242188 68.253906,13.050781 99.78125,12.855469 125.73047,38.351563 125.8125,70.078125 125.89844,101.62109 100.43359,127.14063 69.148438,127.42188 37.582031,127.70703 11.464844,102.23438 11.4375,70.25 m 6.425781,-0.08984 c 0.03516,28.421871 23.027344,50.69922 50.519532,50.82031 C 96.433594,121.10156 119.30469,98.367188 119.38281,70.359375 119.45313,42.878906 97.382813,19.714844 69.015625,19.496094 40.75,19.277344 17.964844,42.035156 17.863281,70.160156' style='clip-rule:nonzero;fill:%23333f48;fill-opacity:1;fill-rule:nonzero;stroke:none' /%3E%3Cpath style='fill:%23333f48;fill-opacity:1;fill-rule:nonzero;stroke:none' d='m 39.789063,108.62109 c 0.28125,0.14454 0.550781,0.32032 0.839843,0.4336 2.734375,1.05469 5.554688,1.78125 8.453125,2.23047 2.734375,0.42578 5.484375,0.64453 8.25,0.54297 3.988282,-0.15625 7.832032,-0.94922 11.445313,-2.69532 1.683594,-0.8164 3.246094,-1.82422 4.640625,-3.07422 3.265625,-2.92578 5.171875,-6.582027 5.796875,-10.906246 0.546875,-3.761719 0.04687,-7.425781 -1.09375,-11.019531 -1.4375,-4.523438 -3.730469,-8.582032 -6.703125,-12.265625 -1.03125,-1.277344 -2.082031,-2.535157 -3.113281,-3.808594 C 66.789063,66.1875 65.332031,64.269531 64.0625,62.21875 c -1.601562,-2.582031 -2.835937,-5.316406 -3.613281,-8.261719 -0.683594,-2.574218 -0.902344,-5.1875 -0.6875,-7.828125 0.214844,-2.617187 0.910156,-5.117187 2.152344,-7.441406 2.164062,-4.050781 5.503906,-6.710937 9.816406,-8.179687 1.890625,-0.640625 3.835937,-1.058594 5.832031,-1.195313 1.121094,-0.07813 2.242188,-0.152344 3.363281,-0.164062 4.28125,-0.02734 8.4375,0.734375 12.453125,2.175781 1.871094,0.671875 3.6875,1.496094 5.523438,2.257812 0.226562,0.09375 0.4375,0.230469 0.664062,0.351563 -0.164062,0.25 -0.371093,0.160156 -0.539062,0.164062 -2.824219,0.101563 -5.535156,0.703125 -8.132813,1.804688 -1.335937,0.570312 -2.570312,1.316406 -3.648437,2.296875 -2.527344,2.296875 -3.605469,5.15625 -3.34375,8.550781 0.140625,1.855469 0.722656,3.574219 1.550781,5.222656 0.648438,1.296875 1.414063,2.523438 2.292969,3.675782 0.953125,1.25 1.929687,2.484375 2.929687,3.699218 2.085938,2.523438 4.164063,5.054688 6.050782,7.738282 2.203125,3.136718 4.140627,6.417968 5.589847,9.980468 1.16406,2.867188 2.01562,5.820313 2.39843,8.894532 0.25,2.011718 0.30079,4.03125 0.11719,6.058593 -0.24219,2.640625 -0.79297,5.195313 -1.74609,7.667969 -1.29688,3.36328 -3.300784,6.22656 -5.972659,8.63281 -2.429687,2.19141 -5.171875,3.90625 -8.109375,5.3125 -2.695312,1.29297 -5.464843,2.40235 -8.34375,3.20313 -1.953125,0.54687 -3.945312,0.8789 -5.949218,1.15625 -3.035157,0.41797 -6.085938,0.48828 -9.132813,0.3125 -5.328125,-0.3125 -10.476562,-1.46094 -15.410156,-3.52344 -3.449219,-1.44141 -6.691406,-3.25781 -9.757813,-5.39453 -0.183593,-0.12891 -0.378906,-0.25 -0.53125,-0.41016 -0.07031,-0.0703 -0.05859,-0.22656 -0.08203,-0.34375 z m 0,0' id='path4175' /%3E%3Cpath style='fill:%23333f48;fill-opacity:1;fill-rule:nonzero;stroke:none' d='M 94.699219,29.390625 C 94.089844,29.21875 93.476563,29.054688 92.867188,28.875 90.183594,28.085938 87.46875,27.441406 84.703125,27.046875 c -3.976562,-0.566406 -7.945312,-0.59375 -11.863281,0.402344 -7.535156,1.914062 -12.386719,6.71875 -14.878906,13.996094 -0.894532,2.617187 -1.179688,5.328125 -0.953125,8.078125 0.203125,2.484375 0.867187,4.859375 1.816406,7.160156 0.933594,2.261719 2.117187,4.390625 3.4375,6.449219 1.4375,2.25 3.050781,4.371093 4.640625,6.511718 1.4375,1.933594 2.867187,3.871094 4.261719,5.835938 1.230468,1.730469 2.316406,3.546875 3.273437,5.445312 1.324219,2.625 2.265625,5.378907 2.703125,8.292969 0.433594,2.902344 0.292969,5.765625 -0.660156,8.5625 -0.9375,2.74609 -2.574219,5.00781 -4.777344,6.875 -2.417969,2.04688 -5.203125,3.39844 -8.246094,4.22266 -1.835937,0.5 -3.703125,0.75781 -5.609375,0.82031 -3.886718,0.13281 -7.679687,-0.47266 -11.421875,-1.46094 -2.261718,-0.59765 -4.488281,-1.33203 -6.695312,-2.11328 -0.207031,-0.0742 -0.40625,-0.16797 -0.597656,-0.25 -0.02344,-0.24609 0.148437,-0.19141 0.25,-0.20703 1.96875,-0.30469 3.921875,-0.67969 5.804687,-1.34766 1.367188,-0.48437 2.671875,-1.10156 3.855469,-1.94922 2.25,-1.61328 3.65625,-3.765621 4.0625,-6.515621 0.273437,-1.867188 0.09375,-3.710938 -0.429688,-5.527344 -0.472656,-1.648437 -1.171875,-3.199219 -2.109375,-4.628906 -0.792968,-1.207031 -1.636718,-2.382813 -2.523437,-3.519531 -0.921875,-1.195313 -1.921875,-2.328125 -2.890625,-3.484375 -2.753906,-3.273438 -5.351563,-6.660157 -7.523438,-10.355469 -2.042968,-3.480469 -3.667968,-7.136719 -4.597656,-11.078125 -0.640625,-2.699219 -0.980469,-5.4375 -0.832031,-8.214844 0.238281,-4.53125 1.476562,-8.78125 3.824219,-12.6875 1.082031,-1.800781 2.445312,-3.375 3.988281,-4.800781 2.742187,-2.527344 5.863281,-4.480469 9.257812,-5.992188 3.746094,-1.667968 7.652344,-2.769531 11.707032,-3.394531 3.152343,-0.488281 6.324218,-0.671875 9.507812,-0.519531 8.632813,0.410156 16.671875,2.792969 24,7.433594 0.08203,0.05078 0.152344,0.109375 0.230469,0.167968 -0.0039,0.04297 -0.0078,0.08984 -0.01563,0.136719' id='path4177' /%3E%3Cpath style='fill:%23333f48;fill-opacity:1;fill-rule:nonzero;stroke:none' d='m 31.699219,38.75 c -0.07813,0.238281 -0.152344,0.476563 -0.238281,0.710938 -1.460938,4.074218 -2.066407,8.28125 -1.808594,12.59375 0.4375,7.304687 2.808594,13.925781 7.277344,19.753906 3.714843,4.84375 7.441406,9.671875 11.167968,14.503906 1.113282,1.441406 1.953125,3.007813 2.414063,4.777344 0.332031,1.257812 0.425781,2.539062 0.273437,3.820312 -0.214843,1.832032 -1.070312,3.34375 -2.464843,4.546875 -0.984375,0.851559 -2.113282,1.449219 -3.316407,1.925779 -1.378906,0.54297 -2.8125,0.89063 -4.273437,1.1211 -2.226563,0.35547 -4.46875,0.46093 -6.722656,0.41015 -0.589844,-0.0156 -1.046875,-0.18359 -1.433594,-0.625 -0.636719,-0.72265 -1.335938,-1.39062 -1.9375,-2.14062 C 25.574219,93.800781 22.300781,86.621094 20.84375,78.636719 20.152344,74.835938 19.917969,71 20.15625,67.128906 20.796875,56.773438 24.390625,47.574219 30.859375,39.480469 c 0.21875,-0.273438 0.453125,-0.53125 0.679688,-0.796875 0.05469,0.02344 0.109375,0.04297 0.160156,0.06641' id='path4179' /%3E%3Cpath style='fill:%23333f48;fill-opacity:1;fill-rule:nonzero;stroke:none' d='m 105.41016,101.30078 c -0.13282,-0.3125 0.0234,-0.5039 0.0977,-0.69922 1.38672,-3.749997 1.98047,-7.628904 1.89844,-11.621091 -0.14453,-6.84375 -2.08594,-13.144531 -5.73437,-18.925781 C 99.890625,67.226563 97.917969,64.53125 95.835938,61.917969 94.4375,60.160156 92.988281,58.4375 91.582031,56.6875 90.632813,55.511719 89.6875,54.335938 88.792969,53.121094 c -0.835938,-1.144531 -1.488281,-2.398438 -1.953125,-3.742188 -0.523438,-1.515625 -0.695313,-3.070312 -0.511719,-4.652343 0.21875,-1.839844 1.082031,-3.339844 2.476563,-4.542969 1.039062,-0.890625 2.230468,-1.507813 3.503906,-1.980469 1.632812,-0.609375 3.320312,-0.960937 5.046875,-1.175781 1.917969,-0.238281 3.839841,-0.269531 5.769531,-0.230469 0.52734,0.01172 0.89453,0.203125 1.23828,0.585938 5.50391,6.113281 9.26172,13.144531 11.21875,21.132812 1.11719,4.554688 1.5625,9.179688 1.30469,13.855469 -0.58203,10.625 -4.23438,20.082031 -10.96094,28.339846 -0.15625,0.1914 -0.32812,0.375 -0.51562,0.58984' id='path4181' /%3E%3Cpath style='fill:%23333f48;fill-opacity:1;fill-rule:nonzero;stroke:none' d='m 39.796875,108.63281 c -0.05859,0.0117 -0.117187,0.0234 -0.175781,0.0352 0.05469,-0.0156 0.113281,-0.0312 0.167969,-0.0469 z m 0,0' id='path4183' /%3E%3C/g%3E%3C/svg%3E)
 Play animation
 Play step-by-step
 Repeat (toggle)
 Full Screen
 Pause
Pause Stop
Stop
Session Set Up
Set Up:
I will be the Reds against the Blues.
Starting from an 11 v 11 in the following shapes:
Red - 1-4-2-3-1
Blue - 1-4-3-3
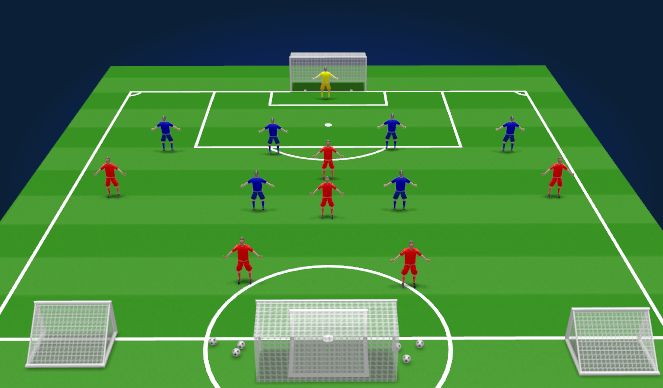
For the specific practice element shown above, I will have 13 players. The 13 players will be used as follows:
Reds, I have removed my back 4, and kept my midfield 5 and forward, in essentially a 2-3-1 (two 6s, one 10, one 7, one 11 and one 9.
The Blues will be in a 1-4-2 having lost their CAM and front three from the 11 a-side format.
The mini goals will represent targets for the Blues to hit and take the place of their front three. Blues will be encouraged to hit them quickly, as the session is about attacking for the Reds, so I want the Reds to have plenty of ball. In the event the Blues are maintaining possession and not looking to find the mini goal targets, I will introduce a countdown for them to do so. The big goal will be in position to save time for the small sided game element, but will not be used for this part of the practice.
The Reds will be looking to create the overload to goal, in two main ways. One will be worked on in the specific practice, and the other will be worked on in the small sided game phase.
I will use a terminal stoppage between the specific practice, and the small sided game to set that up and briefly help frame the second part of the session.