


Football/Soccer Session (Academy Sessions): Pattern of play in 433

FAW Coach Ed
Michael Waters
Profile Summary

| Name: | Michael Waters |
|---|---|
| City: | Port talbot |
| Country: | United Kingdom |
| Membership: | Adult Member |
| Sport: | Football/Soccer |
Description
Practice Format
11v11 Tactical Practice
Blues: 4-3-3 (Team in Possession – Coaching Focus)
Reds: 4-4-2 (Opposition – Managed by Assistant Coach)
The assistant coach instructs the Reds to maintain an aggressive high press and force the play wide. Upon regaining possession, the Reds have an 8-second window to counterattack and attempt to score, creating a realistic transition moment.
Session Objectives
Enable midfielders to receive and play forward-facing
Create numerical superiority (2v1) in wide areas
Develop effective progression through the thirds (build-up, consolidation, and creation phases)
Coaching Points
Rotations and movement within midfield and wide channels to disorganise the opposition shape
Triggers for movement and support (e.g., full-back body position, pressure cues, third man run opportunities)
Receiving skills: body shape, scanning, and first touch to play forward
Quality of pass: appropriate weight, timing, and detail to enable positive next action
Decision-making: selecting whether to play through, around, or over the opposition’s structure
Defensive transition: rapid organisation into defensive shape upon turnover, especially to protect central spaces and delay counters
See the guidance at the top of this page to understand why you are not seeing interactive Football/Soccer images.
See the guidance at the top of this page to understand why you are not seeing interactive Football/Soccer images.
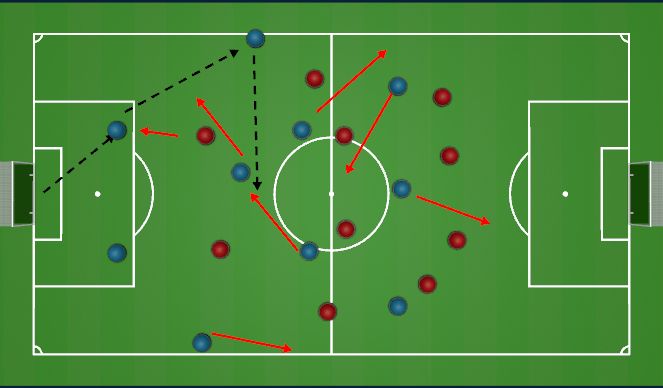
Block 2
Block 2 – Positional Play and Rotations (Build-Up Phase – 4-3-3)
Objective: Use positional rotations and occupation of key zones to progress the ball through the thirds, disrupt opposition marking lines, and create space for central penetration.
Pattern Overview
The goalkeeper initiates by playing into the left centre-back (LCB), who then feeds the left-back (LB).
This pass to the LB acts as a rotational trigger:
The right central midfielder (RCM) rotates centrally into the pivot space (CDM zone).
The CDM drops off on the blindside and pulls slightly wide while maintaining a body shape to face play.
The left central midfielder (LCM) rotates out to the left flank, offering width and stretch.
The left winger (LW) inverts into the No.10 space, occupying a central pocket between the lines.
The No.9 remains high and central, occupying both centre-backs to pin the defensive line.
The right winger (RW) stays high and wide, positioned between the full-back and centre-back to stretch the back four horizontally and remain a threat between the lines.
With the RCM now positioned in the pivot (CDM) zone, they are ideally placed to receive and thread a pass into the LW, now operating as the 10.
Scenario Adjustment – Opponent Reaction
If the opposition right-back follows the LW inside into the No.10 space, the LB can bypass the press by playing a direct pass down the line into the LCM, now positioned wide.
Alternatively, if the CDM (now positioned outside) has already received the ball, they may exploit the space vacated by the RB by playing a penetrative pass into the channel, attacking the space behind the defensive line.
Coaching Focus Areas
Rotational discipline and timing: understanding and reacting to positional triggers.
Body orientation: receiving to play forward with minimal touches.
Zone occupation and interchange: maintaining width, depth, and overloads centrally.
Decision-making: recognising when to play inside, down the line, or into vacated space.
Opponent manipulation: using movement to provoke defensive disorganisation.
Transition structure: maintain balance and cover behind the ball during rotations.
See the guidance at the top of this page to understand why you are not seeing interactive Football/Soccer images.
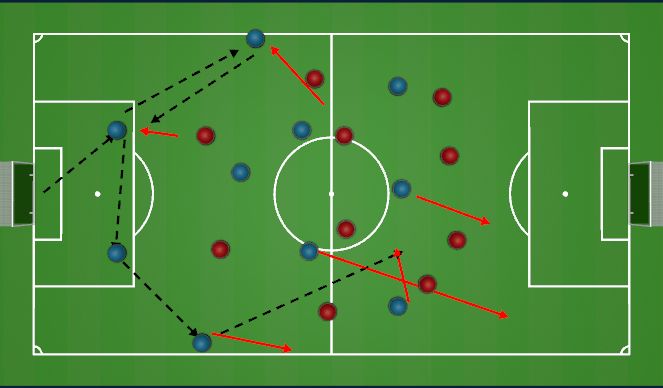
Block 3
Block 3 – Build-Up Using a False Full-Back (FFB) & Rotations in a 4-3-3
Objective: To progress from deep by using positional rotations, a false full-back (FFB), and width from the centre-backs to break the opposition's first line of pressure and access advanced central zones.
Pattern Overview
Goalkeeper initiates by playing to the left centre-back (LCB).
The LCB combines with the left-back (LB) in a short 1-2, before switching play across to the right centre-back (RCB).
This lateral movement acts as a trigger for the right-back (RB) to push high, dragging the opposition winger back towards the halfway line.
Simultaneously, the CDM drops into the false full-back (FFB) position on the left side, receiving the ball facing forward — offering control, security, and progression.
The right central midfielder (RCM) rotates into the No.10 space, dragging the opposition's left central midfielder (LCM) away and creating space centrally.
The left central midfielder (LCM) covers round into a more central and deeper position, maintaining structural balance in case of turnover and preparing for defensive transition.
Attacking Options from the FFB Zone
Once the CDM receives in the FFB zone, the team can exploit several attacking possibilities depending on the opposition’s positioning and pressure cues.
If the Opposition Strikers Block the Pass into the CDM
If both opposition forwards position themselves on the outside shoulders of the centre-backs, effectively screening the CDM’s access to the ball:
Both centre-backs stretch even wider, increasing the lateral distance between them.
This action creates a central pocket of space behind the pressing strikers.
The CDM times their movement to drop into this vacated central zone, receiving the ball beyond the first line of pressure, ensuring body shape is open to play forward.
Coaching Focus Areas
Positional awareness and timing of rotations (e.g., RB movement, RCM's occupation of 10 space)
Exploiting triggers and creating disorganisation in the opponent's press
Use of the false full-back role to attract, unbalance, and progress
Centre-back width to manipulate pressing lines and open central channels
CDM body shape: receive beyond pressure, scan, and play forward
Structural balance: LCM awareness to support defensive transition and prevent counterattacks
'%3E%3Cpath id='path4169' d='M 11.4375,70.25 C 11.457031,38.394531 37.277344,13.242188 68.253906,13.050781 99.78125,12.855469 125.73047,38.351563 125.8125,70.078125 125.89844,101.62109 100.43359,127.14063 69.148438,127.42188 37.582031,127.70703 11.464844,102.23438 11.4375,70.25 m 6.425781,-0.08984 c 0.03516,28.421871 23.027344,50.69922 50.519532,50.82031 C 96.433594,121.10156 119.30469,98.367188 119.38281,70.359375 119.45313,42.878906 97.382813,19.714844 69.015625,19.496094 40.75,19.277344 17.964844,42.035156 17.863281,70.160156' style='clip-rule:nonzero;fill:%23333f48;fill-opacity:1;fill-rule:nonzero;stroke:none' /%3E%3Cpath style='fill:%23333f48;fill-opacity:1;fill-rule:nonzero;stroke:none' d='m 39.789063,108.62109 c 0.28125,0.14454 0.550781,0.32032 0.839843,0.4336 2.734375,1.05469 5.554688,1.78125 8.453125,2.23047 2.734375,0.42578 5.484375,0.64453 8.25,0.54297 3.988282,-0.15625 7.832032,-0.94922 11.445313,-2.69532 1.683594,-0.8164 3.246094,-1.82422 4.640625,-3.07422 3.265625,-2.92578 5.171875,-6.582027 5.796875,-10.906246 0.546875,-3.761719 0.04687,-7.425781 -1.09375,-11.019531 -1.4375,-4.523438 -3.730469,-8.582032 -6.703125,-12.265625 -1.03125,-1.277344 -2.082031,-2.535157 -3.113281,-3.808594 C 66.789063,66.1875 65.332031,64.269531 64.0625,62.21875 c -1.601562,-2.582031 -2.835937,-5.316406 -3.613281,-8.261719 -0.683594,-2.574218 -0.902344,-5.1875 -0.6875,-7.828125 0.214844,-2.617187 0.910156,-5.117187 2.152344,-7.441406 2.164062,-4.050781 5.503906,-6.710937 9.816406,-8.179687 1.890625,-0.640625 3.835937,-1.058594 5.832031,-1.195313 1.121094,-0.07813 2.242188,-0.152344 3.363281,-0.164062 4.28125,-0.02734 8.4375,0.734375 12.453125,2.175781 1.871094,0.671875 3.6875,1.496094 5.523438,2.257812 0.226562,0.09375 0.4375,0.230469 0.664062,0.351563 -0.164062,0.25 -0.371093,0.160156 -0.539062,0.164062 -2.824219,0.101563 -5.535156,0.703125 -8.132813,1.804688 -1.335937,0.570312 -2.570312,1.316406 -3.648437,2.296875 -2.527344,2.296875 -3.605469,5.15625 -3.34375,8.550781 0.140625,1.855469 0.722656,3.574219 1.550781,5.222656 0.648438,1.296875 1.414063,2.523438 2.292969,3.675782 0.953125,1.25 1.929687,2.484375 2.929687,3.699218 2.085938,2.523438 4.164063,5.054688 6.050782,7.738282 2.203125,3.136718 4.140627,6.417968 5.589847,9.980468 1.16406,2.867188 2.01562,5.820313 2.39843,8.894532 0.25,2.011718 0.30079,4.03125 0.11719,6.058593 -0.24219,2.640625 -0.79297,5.195313 -1.74609,7.667969 -1.29688,3.36328 -3.300784,6.22656 -5.972659,8.63281 -2.429687,2.19141 -5.171875,3.90625 -8.109375,5.3125 -2.695312,1.29297 -5.464843,2.40235 -8.34375,3.20313 -1.953125,0.54687 -3.945312,0.8789 -5.949218,1.15625 -3.035157,0.41797 -6.085938,0.48828 -9.132813,0.3125 -5.328125,-0.3125 -10.476562,-1.46094 -15.410156,-3.52344 -3.449219,-1.44141 -6.691406,-3.25781 -9.757813,-5.39453 -0.183593,-0.12891 -0.378906,-0.25 -0.53125,-0.41016 -0.07031,-0.0703 -0.05859,-0.22656 -0.08203,-0.34375 z m 0,0' id='path4175' /%3E%3Cpath style='fill:%23333f48;fill-opacity:1;fill-rule:nonzero;stroke:none' d='M 94.699219,29.390625 C 94.089844,29.21875 93.476563,29.054688 92.867188,28.875 90.183594,28.085938 87.46875,27.441406 84.703125,27.046875 c -3.976562,-0.566406 -7.945312,-0.59375 -11.863281,0.402344 -7.535156,1.914062 -12.386719,6.71875 -14.878906,13.996094 -0.894532,2.617187 -1.179688,5.328125 -0.953125,8.078125 0.203125,2.484375 0.867187,4.859375 1.816406,7.160156 0.933594,2.261719 2.117187,4.390625 3.4375,6.449219 1.4375,2.25 3.050781,4.371093 4.640625,6.511718 1.4375,1.933594 2.867187,3.871094 4.261719,5.835938 1.230468,1.730469 2.316406,3.546875 3.273437,5.445312 1.324219,2.625 2.265625,5.378907 2.703125,8.292969 0.433594,2.902344 0.292969,5.765625 -0.660156,8.5625 -0.9375,2.74609 -2.574219,5.00781 -4.777344,6.875 -2.417969,2.04688 -5.203125,3.39844 -8.246094,4.22266 -1.835937,0.5 -3.703125,0.75781 -5.609375,0.82031 -3.886718,0.13281 -7.679687,-0.47266 -11.421875,-1.46094 -2.261718,-0.59765 -4.488281,-1.33203 -6.695312,-2.11328 -0.207031,-0.0742 -0.40625,-0.16797 -0.597656,-0.25 -0.02344,-0.24609 0.148437,-0.19141 0.25,-0.20703 1.96875,-0.30469 3.921875,-0.67969 5.804687,-1.34766 1.367188,-0.48437 2.671875,-1.10156 3.855469,-1.94922 2.25,-1.61328 3.65625,-3.765621 4.0625,-6.515621 0.273437,-1.867188 0.09375,-3.710938 -0.429688,-5.527344 -0.472656,-1.648437 -1.171875,-3.199219 -2.109375,-4.628906 -0.792968,-1.207031 -1.636718,-2.382813 -2.523437,-3.519531 -0.921875,-1.195313 -1.921875,-2.328125 -2.890625,-3.484375 -2.753906,-3.273438 -5.351563,-6.660157 -7.523438,-10.355469 -2.042968,-3.480469 -3.667968,-7.136719 -4.597656,-11.078125 -0.640625,-2.699219 -0.980469,-5.4375 -0.832031,-8.214844 0.238281,-4.53125 1.476562,-8.78125 3.824219,-12.6875 1.082031,-1.800781 2.445312,-3.375 3.988281,-4.800781 2.742187,-2.527344 5.863281,-4.480469 9.257812,-5.992188 3.746094,-1.667968 7.652344,-2.769531 11.707032,-3.394531 3.152343,-0.488281 6.324218,-0.671875 9.507812,-0.519531 8.632813,0.410156 16.671875,2.792969 24,7.433594 0.08203,0.05078 0.152344,0.109375 0.230469,0.167968 -0.0039,0.04297 -0.0078,0.08984 -0.01563,0.136719' id='path4177' /%3E%3Cpath style='fill:%23333f48;fill-opacity:1;fill-rule:nonzero;stroke:none' d='m 31.699219,38.75 c -0.07813,0.238281 -0.152344,0.476563 -0.238281,0.710938 -1.460938,4.074218 -2.066407,8.28125 -1.808594,12.59375 0.4375,7.304687 2.808594,13.925781 7.277344,19.753906 3.714843,4.84375 7.441406,9.671875 11.167968,14.503906 1.113282,1.441406 1.953125,3.007813 2.414063,4.777344 0.332031,1.257812 0.425781,2.539062 0.273437,3.820312 -0.214843,1.832032 -1.070312,3.34375 -2.464843,4.546875 -0.984375,0.851559 -2.113282,1.449219 -3.316407,1.925779 -1.378906,0.54297 -2.8125,0.89063 -4.273437,1.1211 -2.226563,0.35547 -4.46875,0.46093 -6.722656,0.41015 -0.589844,-0.0156 -1.046875,-0.18359 -1.433594,-0.625 -0.636719,-0.72265 -1.335938,-1.39062 -1.9375,-2.14062 C 25.574219,93.800781 22.300781,86.621094 20.84375,78.636719 20.152344,74.835938 19.917969,71 20.15625,67.128906 20.796875,56.773438 24.390625,47.574219 30.859375,39.480469 c 0.21875,-0.273438 0.453125,-0.53125 0.679688,-0.796875 0.05469,0.02344 0.109375,0.04297 0.160156,0.06641' id='path4179' /%3E%3Cpath style='fill:%23333f48;fill-opacity:1;fill-rule:nonzero;stroke:none' d='m 105.41016,101.30078 c -0.13282,-0.3125 0.0234,-0.5039 0.0977,-0.69922 1.38672,-3.749997 1.98047,-7.628904 1.89844,-11.621091 -0.14453,-6.84375 -2.08594,-13.144531 -5.73437,-18.925781 C 99.890625,67.226563 97.917969,64.53125 95.835938,61.917969 94.4375,60.160156 92.988281,58.4375 91.582031,56.6875 90.632813,55.511719 89.6875,54.335938 88.792969,53.121094 c -0.835938,-1.144531 -1.488281,-2.398438 -1.953125,-3.742188 -0.523438,-1.515625 -0.695313,-3.070312 -0.511719,-4.652343 0.21875,-1.839844 1.082031,-3.339844 2.476563,-4.542969 1.039062,-0.890625 2.230468,-1.507813 3.503906,-1.980469 1.632812,-0.609375 3.320312,-0.960937 5.046875,-1.175781 1.917969,-0.238281 3.839841,-0.269531 5.769531,-0.230469 0.52734,0.01172 0.89453,0.203125 1.23828,0.585938 5.50391,6.113281 9.26172,13.144531 11.21875,21.132812 1.11719,4.554688 1.5625,9.179688 1.30469,13.855469 -0.58203,10.625 -4.23438,20.082031 -10.96094,28.339846 -0.15625,0.1914 -0.32812,0.375 -0.51562,0.58984' id='path4181' /%3E%3Cpath style='fill:%23333f48;fill-opacity:1;fill-rule:nonzero;stroke:none' d='m 39.796875,108.63281 c -0.05859,0.0117 -0.117187,0.0234 -0.175781,0.0352 0.05469,-0.0156 0.113281,-0.0312 0.167969,-0.0469 z m 0,0' id='path4183' /%3E%3C/g%3E%3C/svg%3E)
 Play animation
 Play step-by-step
 Repeat (toggle)
 Full Screen
 Pause
Pause Stop
Stop
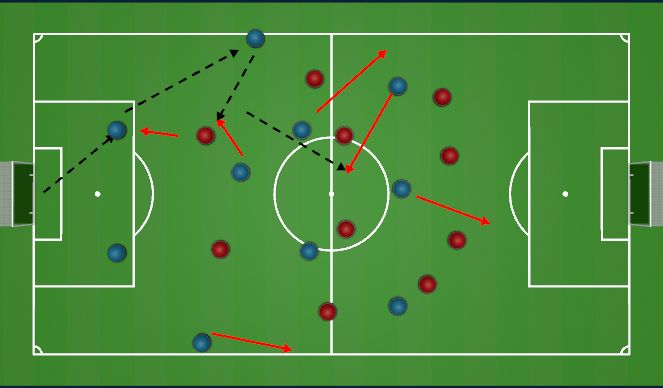
Block 1
Tactical Pattern of Play – Build-Up Phase (4-3-3 vs 4-4-2)
Objective: Controlled progression from the goalkeeper through structured movement and positional rotations to access central and advanced areas.
Pattern Description
The goalkeeper initiates by playing into the left centre-back (LCB), who then distributes to the left-back (LB).
This pass to the LB acts as a trigger for the left central midfielder (LCM) to stretch the pitch by moving wide towards the touchline, creating width and space.
The right central midfielder (RCM) maintains a high position, pinning the opposing midfield line and creating space centrally for the CDM (No.6) to receive facing forward.
The left winger (LW) rotates inside into the No.10 position, exploiting the vacated central lane.
The right winger (RW) holds the width to stretch the back line and offer an outlet on the weak side.
The No.9 (centre forward) positions between the two centre-backs to occupy and pin the defensive line.
The right-back (RB) advances on the opposite side, providing additional width and an overlapping option. If the opposition’s left midfielder remains wide, the RB can invert to create a midfield overload.
As the team progresses past the halfway line, the CDM should find space to drive forward, potentially engaging an opponent and creating an overload centrally or in wide areas.
Contingency Plans
If the opposition right winger blocks the inside pass into the CDM, the LB can bypass centrally and play directly into the LCM, who is now positioned wide on the touchline.
If the opposition central midfielder steps high to press the CDM, the LB can instead look to play into the LW, who has rotated into the No.10 space, exploiting the gap left by the pressing midfielder.
Coaching Focus
Recognising and reacting to positional triggers
Positional rotations to disrupt opposition shape
Supporting angles and distances for progression
Using the third man to bypass pressing traps
Playing with purpose: when to circulate, when to penetrate
Transitional structure behind the ball for security