


Football/Soccer Session (Academy Sessions): OA3 Assessment - Attacking the Final Third

Premier Users' Club
Frazer Fowler
Profile Summary

| Name: | Frazer Fowler |
|---|---|
| City: | Woking |
| Country: | United Kingdom |
| Membership: | Adult Member |
| Sport: | Football/Soccer |
Description
Organisation (Practice Layout & Transition)
See the guidance at the top of this page to understand why you are not seeing interactive Football/Soccer images.
See the guidance at the top of this page to understand why you are not seeing interactive Football/Soccer images.
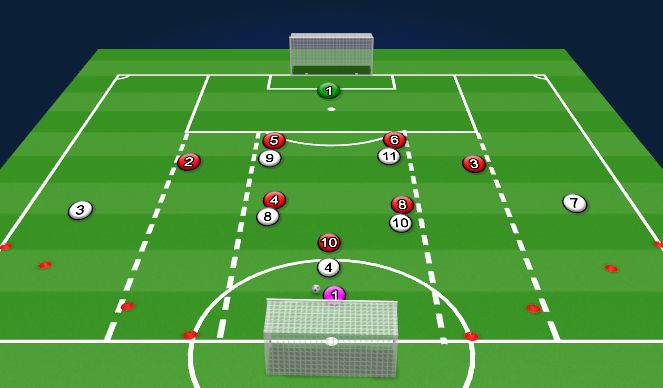
Block 1
Block 1 - Using wide areas to create chances in the final third (3 mins)Roles & Responsibilities
As ball goes live -
4 - Look to receive the ball in a central pocket
8 - Ball side of CM, to provide an option for 4 to bounce to move the ball into a half space to play the ball wide.
10 - Ball side of CM, to provide an option for 4 to bounce to move the ball into a half space to play the ball wide.
3 - Get wide and stretch the pitch - Chalk on boots
7 - Get wide and stretch the pitch - Chalk on boots
9 - Pin the CB.
11 - Pin the CB.
Ball received by RM -
10 - Provide support under the ball.
8 - Lock the box.
4 - Fill 10's space and lock the box.
3 - Make the box, arriving at the back post.
9 - Look to draw the CB away and then arrive in the 6 yard box.
11 - Look to arrive at the front post.
7 - Receive the ball and look to put balls in the box. What ifs to cover type of cross.
Wingers (7&11) - Double Movements:
If playing to feet - Start out come in to receive.
If playing in behind - Come in to then spin out, potential to add in a bounce to take FB out of the game.
What if 1 - Winger beats the FB - Then run ball to the byline and into the T-zone looking to either whip the ball hard and low or cut the ball back into the box.
What if 2 - FB stands up and delays play - Either roll ball to 10 who can float a cross into the box, or if wide and high enough (box height) look to stand a cross up into the box.
See the guidance at the top of this page to understand why you are not seeing interactive Football/Soccer images.
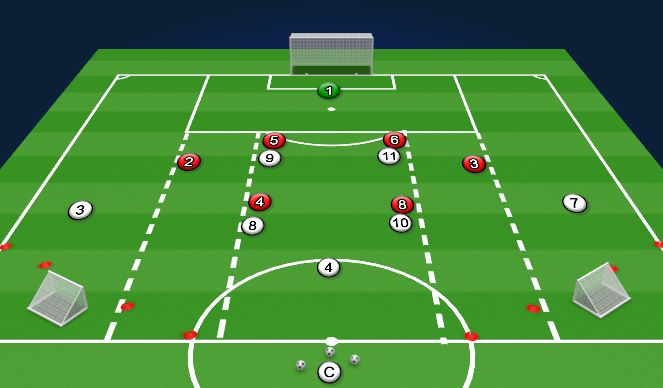
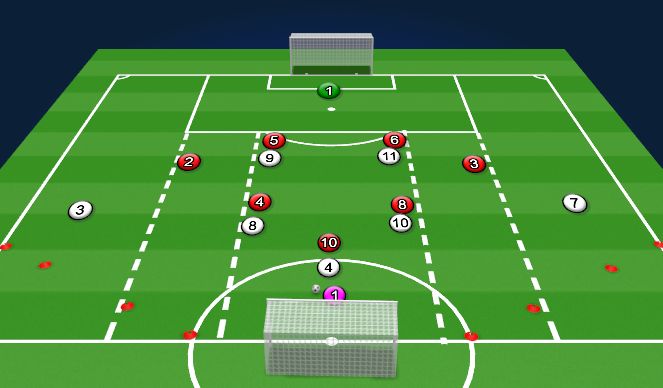
Block 2
Block 2 - Using central combinations to create chances in the final third (3 mins)
Roles & Responsibilities
3 - Narrow off to box width, in essence becoming bounce players to help the midfielders break lines.
7 - Narrow off to box width, in essence becoming bounce players to help the midfielders break lines.
8 - Look to stretch the midfield by pulling to the edge of the D width, allowing for a greater chance of a split to happen.
10 - Look to stretch the midfield by pulling to the edge of the D width, allowing for a greater chance of a split to happen.
4 - Get on the ball and look to split the CM's where possible.
9 - Ball side of the CB, look to pin them and protect the ball when it comes in, looking to roll other ST in behind to finish.
11 - Ball side of the CB, look to pin them and protect the ball when it comes in, looking to roll other ST in behind to finish.
What if 1 - What if a CM jumps to lock onto the 4. Can the free CM look to find a pocket to receive the ball in and combine with the winger to find the feet of the 9.
What if 2 - CB prevents the 9's from combining - Can 9 look to set the CM who plays a ball between CB and FB for the winger to run onto for a cut back into the box.
See the guidance at the top of this page to understand why you are not seeing interactive Football/Soccer images.
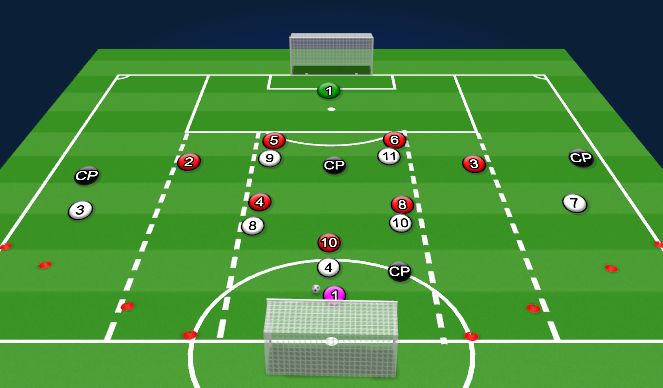
SSG Set Up
Coached Team - 3-5-2 - Less the back 3
Managed Team - 4-2-3-1 - Less the ST, LW, RW
Player added in is RED 10.
8v8 Small Sided Game
Tapering used to remove the areas where the LW and RW would occupy, and to allow 3 & 7 to focus more on their in possession responsibilities in line with the session topic.
Walk through (1 min)
Block 1 - Half space combinations (4 mins + 1 Terminal)
Block 2 - Balls between CB and FB (4 mins + 1 Terminal)
Block 3 - Check for understanding (4 mins)
If SSG reduced to 10 mins for player welfare for OA3 assessment then I would remove block 3 and focus purely on the content whilst checking for understanding throughout.
See the guidance at the top of this page to understand why you are not seeing interactive Football/Soccer images.
Block 1
Block 1 - Half space combinationsRoles & Responsibilities
1 - Look to play the ball into the player in the half space. Ball speed has to be good to enable the player to play off one or two touches.
3 - High & wide to give the full back a headache and create in decision allowing play to go through the back line.
7 - High & wide to give the full back a headache and create in decision allowing play to go through the back line.
4 - Look to occupy the 10 and provide a short bounce option for the keeper if he needs to change the angle to play into the half space.
8 - Pull into the half space ready to play forward into the space.
10 - Pull into the other half space to create a bigger pocket for one of the ST to drop into.
9 - Look to stay high and occupy the CB, be ready to run across the CB to receive the ball from 11 and strike at goal. Strike should be aimed at bottom corners to challenge the keeper with the angle.
11 - Double movement to drop into the pocket and get on the ball, look to slot the 9 through with a ball into the space.
What if - CB sits in the back line and lets 11 get on the ball. Either turn and drive at the back line look to combine with 9 to create chances, or move the ball wide to allow for balls into the box.
See the guidance at the top of this page to understand why you are not seeing interactive Football/Soccer images.
Block 2
Block 2 - Balls between CB and FB
Roles & Responsibilities
1 - Play into the 4 and provide a backwards option when necessary.
3 - Stay wide until ball travels to other side, as ball travels look to begin run to make the back post for when the cross comes in, arriving at the back post as the ball arrives in the box.
7 - Wide to stretch the pitch, look to be positive when receiving and drive the FB back towards goal. Use 10 as a wall pass to beat the FB and look to run the ball to the byline and cut the ball back across the box for a finish.
4 - Play the ball wide and then look to provide a backwards option in the build phase, as the ball enters the final third drift back inside and stay deepest lying player, staying with the RED 10 if he stays high locking off the box and reducing transitional risks.
8 - As ball is played wide occupy the central channel to provide a switching option if required as ball reaches the box look to wait outside the box for any spill outs, a first time strike should be used where possible here.
10 - Pull into the half space to provide bounce pass with Winger to beat the FB, then get under the ball to provide backwards support if required. If ball played back look to deliver the ball with a whipped cross into the 6 yard box.
9 - Make run across CB arriving in the 6 yard box to finish.
11 - Make front post run to finish.
What if - FB jumps quickly and stops play down that side, then switch the play through the 4 or 8 and look to attack down the other side. Role reversal for 8 and 10 with 8 looking to support under the ball and 7 would now make the back post run.
What if - CB jumps to press winger once FB beaten, then RB and other CB are likely to shuffle to occupy 9 and 11, therefore leaving back post area free. Ball should therefore be whipped across the box to the vacant area for 3 to finish. If Winger cannot cross then ball should be played into supporting midfielder whose whipped cross should aim for the back post area.
'%3E%3Cpath id='path4169' d='M 11.4375,70.25 C 11.457031,38.394531 37.277344,13.242188 68.253906,13.050781 99.78125,12.855469 125.73047,38.351563 125.8125,70.078125 125.89844,101.62109 100.43359,127.14063 69.148438,127.42188 37.582031,127.70703 11.464844,102.23438 11.4375,70.25 m 6.425781,-0.08984 c 0.03516,28.421871 23.027344,50.69922 50.519532,50.82031 C 96.433594,121.10156 119.30469,98.367188 119.38281,70.359375 119.45313,42.878906 97.382813,19.714844 69.015625,19.496094 40.75,19.277344 17.964844,42.035156 17.863281,70.160156' style='clip-rule:nonzero;fill:%23333f48;fill-opacity:1;fill-rule:nonzero;stroke:none' /%3E%3Cpath style='fill:%23333f48;fill-opacity:1;fill-rule:nonzero;stroke:none' d='m 39.789063,108.62109 c 0.28125,0.14454 0.550781,0.32032 0.839843,0.4336 2.734375,1.05469 5.554688,1.78125 8.453125,2.23047 2.734375,0.42578 5.484375,0.64453 8.25,0.54297 3.988282,-0.15625 7.832032,-0.94922 11.445313,-2.69532 1.683594,-0.8164 3.246094,-1.82422 4.640625,-3.07422 3.265625,-2.92578 5.171875,-6.582027 5.796875,-10.906246 0.546875,-3.761719 0.04687,-7.425781 -1.09375,-11.019531 -1.4375,-4.523438 -3.730469,-8.582032 -6.703125,-12.265625 -1.03125,-1.277344 -2.082031,-2.535157 -3.113281,-3.808594 C 66.789063,66.1875 65.332031,64.269531 64.0625,62.21875 c -1.601562,-2.582031 -2.835937,-5.316406 -3.613281,-8.261719 -0.683594,-2.574218 -0.902344,-5.1875 -0.6875,-7.828125 0.214844,-2.617187 0.910156,-5.117187 2.152344,-7.441406 2.164062,-4.050781 5.503906,-6.710937 9.816406,-8.179687 1.890625,-0.640625 3.835937,-1.058594 5.832031,-1.195313 1.121094,-0.07813 2.242188,-0.152344 3.363281,-0.164062 4.28125,-0.02734 8.4375,0.734375 12.453125,2.175781 1.871094,0.671875 3.6875,1.496094 5.523438,2.257812 0.226562,0.09375 0.4375,0.230469 0.664062,0.351563 -0.164062,0.25 -0.371093,0.160156 -0.539062,0.164062 -2.824219,0.101563 -5.535156,0.703125 -8.132813,1.804688 -1.335937,0.570312 -2.570312,1.316406 -3.648437,2.296875 -2.527344,2.296875 -3.605469,5.15625 -3.34375,8.550781 0.140625,1.855469 0.722656,3.574219 1.550781,5.222656 0.648438,1.296875 1.414063,2.523438 2.292969,3.675782 0.953125,1.25 1.929687,2.484375 2.929687,3.699218 2.085938,2.523438 4.164063,5.054688 6.050782,7.738282 2.203125,3.136718 4.140627,6.417968 5.589847,9.980468 1.16406,2.867188 2.01562,5.820313 2.39843,8.894532 0.25,2.011718 0.30079,4.03125 0.11719,6.058593 -0.24219,2.640625 -0.79297,5.195313 -1.74609,7.667969 -1.29688,3.36328 -3.300784,6.22656 -5.972659,8.63281 -2.429687,2.19141 -5.171875,3.90625 -8.109375,5.3125 -2.695312,1.29297 -5.464843,2.40235 -8.34375,3.20313 -1.953125,0.54687 -3.945312,0.8789 -5.949218,1.15625 -3.035157,0.41797 -6.085938,0.48828 -9.132813,0.3125 -5.328125,-0.3125 -10.476562,-1.46094 -15.410156,-3.52344 -3.449219,-1.44141 -6.691406,-3.25781 -9.757813,-5.39453 -0.183593,-0.12891 -0.378906,-0.25 -0.53125,-0.41016 -0.07031,-0.0703 -0.05859,-0.22656 -0.08203,-0.34375 z m 0,0' id='path4175' /%3E%3Cpath style='fill:%23333f48;fill-opacity:1;fill-rule:nonzero;stroke:none' d='M 94.699219,29.390625 C 94.089844,29.21875 93.476563,29.054688 92.867188,28.875 90.183594,28.085938 87.46875,27.441406 84.703125,27.046875 c -3.976562,-0.566406 -7.945312,-0.59375 -11.863281,0.402344 -7.535156,1.914062 -12.386719,6.71875 -14.878906,13.996094 -0.894532,2.617187 -1.179688,5.328125 -0.953125,8.078125 0.203125,2.484375 0.867187,4.859375 1.816406,7.160156 0.933594,2.261719 2.117187,4.390625 3.4375,6.449219 1.4375,2.25 3.050781,4.371093 4.640625,6.511718 1.4375,1.933594 2.867187,3.871094 4.261719,5.835938 1.230468,1.730469 2.316406,3.546875 3.273437,5.445312 1.324219,2.625 2.265625,5.378907 2.703125,8.292969 0.433594,2.902344 0.292969,5.765625 -0.660156,8.5625 -0.9375,2.74609 -2.574219,5.00781 -4.777344,6.875 -2.417969,2.04688 -5.203125,3.39844 -8.246094,4.22266 -1.835937,0.5 -3.703125,0.75781 -5.609375,0.82031 -3.886718,0.13281 -7.679687,-0.47266 -11.421875,-1.46094 -2.261718,-0.59765 -4.488281,-1.33203 -6.695312,-2.11328 -0.207031,-0.0742 -0.40625,-0.16797 -0.597656,-0.25 -0.02344,-0.24609 0.148437,-0.19141 0.25,-0.20703 1.96875,-0.30469 3.921875,-0.67969 5.804687,-1.34766 1.367188,-0.48437 2.671875,-1.10156 3.855469,-1.94922 2.25,-1.61328 3.65625,-3.765621 4.0625,-6.515621 0.273437,-1.867188 0.09375,-3.710938 -0.429688,-5.527344 -0.472656,-1.648437 -1.171875,-3.199219 -2.109375,-4.628906 -0.792968,-1.207031 -1.636718,-2.382813 -2.523437,-3.519531 -0.921875,-1.195313 -1.921875,-2.328125 -2.890625,-3.484375 -2.753906,-3.273438 -5.351563,-6.660157 -7.523438,-10.355469 -2.042968,-3.480469 -3.667968,-7.136719 -4.597656,-11.078125 -0.640625,-2.699219 -0.980469,-5.4375 -0.832031,-8.214844 0.238281,-4.53125 1.476562,-8.78125 3.824219,-12.6875 1.082031,-1.800781 2.445312,-3.375 3.988281,-4.800781 2.742187,-2.527344 5.863281,-4.480469 9.257812,-5.992188 3.746094,-1.667968 7.652344,-2.769531 11.707032,-3.394531 3.152343,-0.488281 6.324218,-0.671875 9.507812,-0.519531 8.632813,0.410156 16.671875,2.792969 24,7.433594 0.08203,0.05078 0.152344,0.109375 0.230469,0.167968 -0.0039,0.04297 -0.0078,0.08984 -0.01563,0.136719' id='path4177' /%3E%3Cpath style='fill:%23333f48;fill-opacity:1;fill-rule:nonzero;stroke:none' d='m 31.699219,38.75 c -0.07813,0.238281 -0.152344,0.476563 -0.238281,0.710938 -1.460938,4.074218 -2.066407,8.28125 -1.808594,12.59375 0.4375,7.304687 2.808594,13.925781 7.277344,19.753906 3.714843,4.84375 7.441406,9.671875 11.167968,14.503906 1.113282,1.441406 1.953125,3.007813 2.414063,4.777344 0.332031,1.257812 0.425781,2.539062 0.273437,3.820312 -0.214843,1.832032 -1.070312,3.34375 -2.464843,4.546875 -0.984375,0.851559 -2.113282,1.449219 -3.316407,1.925779 -1.378906,0.54297 -2.8125,0.89063 -4.273437,1.1211 -2.226563,0.35547 -4.46875,0.46093 -6.722656,0.41015 -0.589844,-0.0156 -1.046875,-0.18359 -1.433594,-0.625 -0.636719,-0.72265 -1.335938,-1.39062 -1.9375,-2.14062 C 25.574219,93.800781 22.300781,86.621094 20.84375,78.636719 20.152344,74.835938 19.917969,71 20.15625,67.128906 20.796875,56.773438 24.390625,47.574219 30.859375,39.480469 c 0.21875,-0.273438 0.453125,-0.53125 0.679688,-0.796875 0.05469,0.02344 0.109375,0.04297 0.160156,0.06641' id='path4179' /%3E%3Cpath style='fill:%23333f48;fill-opacity:1;fill-rule:nonzero;stroke:none' d='m 105.41016,101.30078 c -0.13282,-0.3125 0.0234,-0.5039 0.0977,-0.69922 1.38672,-3.749997 1.98047,-7.628904 1.89844,-11.621091 -0.14453,-6.84375 -2.08594,-13.144531 -5.73437,-18.925781 C 99.890625,67.226563 97.917969,64.53125 95.835938,61.917969 94.4375,60.160156 92.988281,58.4375 91.582031,56.6875 90.632813,55.511719 89.6875,54.335938 88.792969,53.121094 c -0.835938,-1.144531 -1.488281,-2.398438 -1.953125,-3.742188 -0.523438,-1.515625 -0.695313,-3.070312 -0.511719,-4.652343 0.21875,-1.839844 1.082031,-3.339844 2.476563,-4.542969 1.039062,-0.890625 2.230468,-1.507813 3.503906,-1.980469 1.632812,-0.609375 3.320312,-0.960937 5.046875,-1.175781 1.917969,-0.238281 3.839841,-0.269531 5.769531,-0.230469 0.52734,0.01172 0.89453,0.203125 1.23828,0.585938 5.50391,6.113281 9.26172,13.144531 11.21875,21.132812 1.11719,4.554688 1.5625,9.179688 1.30469,13.855469 -0.58203,10.625 -4.23438,20.082031 -10.96094,28.339846 -0.15625,0.1914 -0.32812,0.375 -0.51562,0.58984' id='path4181' /%3E%3Cpath style='fill:%23333f48;fill-opacity:1;fill-rule:nonzero;stroke:none' d='m 39.796875,108.63281 c -0.05859,0.0117 -0.117187,0.0234 -0.175781,0.0352 0.05469,-0.0156 0.113281,-0.0312 0.167969,-0.0469 z m 0,0' id='path4183' /%3E%3C/g%3E%3C/svg%3E)
 Play animation
 Play step-by-step
 Repeat (toggle)
 Full Screen
 Pause
Pause Stop
Stop
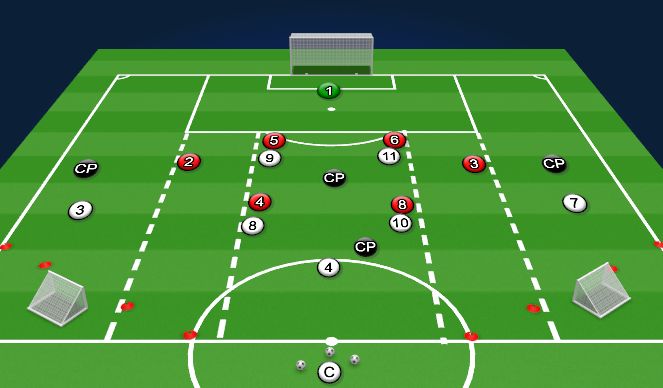
Specific Set Up
Coached Team - 3-5-2 - Less the back 3 and the GK.
Managed Team - 4-2-3-1 - Less the ST and 3 CAM's.
Managed Team - Protect the middle 3 channels, jump when ball in the wide channels. If possession won score in the mini goals as quickly as possible.
Drill rules - Ball always starts from central coach, and is played into one of the three midfield players. Wingers to be locked into the wide channels for the duration of the practice.
Tapering has been used to reduce the wide players defensive responsibilities due to the nature of the drill.
Walk through (1 min)
Block 1 - Using wide areas to create chances in the final third (3 mins)
Block 2 - Using central combinations to create chances in the final third (3 mins)
Block 3 - Check for understanding (3 mins)
CP - Coaching Positions