


Football/Soccer Session (Academy Sessions): FAW C Certificate Finishing

FAW Coach Ed
Anthony Houlahan
Profile Summary

| Name: | Anthony Houlahan |
|---|---|
| City: | Singapore |
| Country: | Singapore |
| Membership: | Adult Member |
| Sport: | Football/Soccer |
Description
Objective: increase finishing accuracy; capability to finish under pressure; finish first time; combine and finish quickly
See the guidance at the top of this page to understand why you are not seeing interactive Football/Soccer images.
See the guidance at the top of this page to understand why you are not seeing interactive Football/Soccer images.
Warm up
Objectives:
Build skills to do wall pass at high speed (needed for next drill)
Warm players
Ensure high accuracy of passes
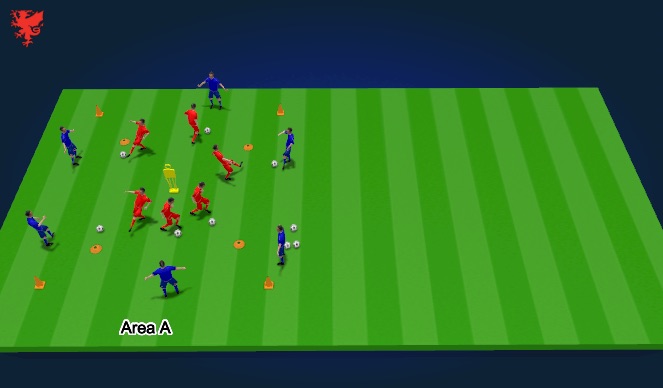
Set up: Use Area A (Note: goals and cones as shown in the Set Up diagram (previous) aren't shown in this diagram. This is just for simplicity but in reality all items shown in the set up diagram will be there. They won't affect the drill so just ignore them.
Action:
Players run with the ball in the middle (20x20) square, when they get close to the edge of the inner square they exchange a wall pass with a player on the edge of the outside (30x30) square.
Coach mechanics of passing and receiving. In particular, coach the mechanics in the context of a wall pass since this will be relied upon heavily later in the session.
1 minute per rep. Give each team 3 reps. Ask players to increase weight of passes in each rep. Light; medium; crisp passes. Tell them to find a weight of pass where success is 90%+. We'll use this later.
Do dynamic stretches between reps.
Passing mechanics:
Tell players that passing mechanics are very similar to shooting mechanics and often goals are finished with a shot that looks a lot like a pass.
Receiving mechanics:
- On toes
- Eyes on the ball
- Get in line with ball
- Decide first time pass or touch out of feet
- Decide and present
- surface towards ball
- Relax on impact
See the guidance at the top of this page to understand why you are not seeing interactive Football/Soccer images.
Accurate finishing
Aim: Improve mechanics of shooting with a focus on accuracy
Set up:
Use Area A only.
10 - 14 players in 2 equal groups at opposite corners.
1 ball per player
Manequin in centre
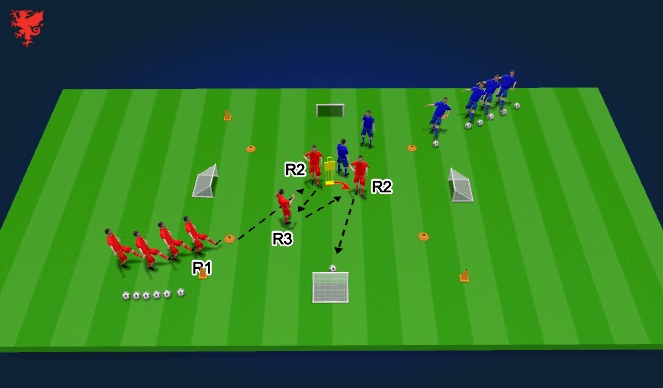
Action:
R1 (server) passes to R2 (scorer)
R2 (scorer) lays the ball to R3 (wall-passer) and moves to a better position to score
R3 (wall-passer) plays a wall pass to R2
R2 scores
Players rotate after each rep:
- New player to server
- Server to wall passer
- Wall passer to striker
Both groups (red and blue) work at the same
Coach shooting mechanics:
1. Get your body in a position to strike
2. Angled approach
3. Non-kicking foot beside the ball
4. Head over the ball
5. Select Surface & Strike: E.g. Laces.
6. Follow through
7. Accuracy (and Aim)
And note also that shots especially those from closer to the goal rely more upon passing mechanics. See previous drill.
Sequence:
P0: work on goal to the left of the striker
P1: work on goal to the right of the striker
P2: striker to signal his preferred side to wall passer (using voice or movement) and wall passer to play accordingly.
P3: increase power of finish
Add pressure to increase speed
P4: add a defender who starts next to server (R1) and only sets off after wall passer (R3) has played the ball.
Player rotation then becomes:
WP > Striker
Defender > WP
Server > Defender
New player > Server
Observe ability to shoot with accuracy and physical capabilities; if there is a big variation use observations from this drill to split the group into 2 based on ability for the next drill which will add more pressure.
See the guidance at the top of this page to understand why you are not seeing interactive Football/Soccer images.
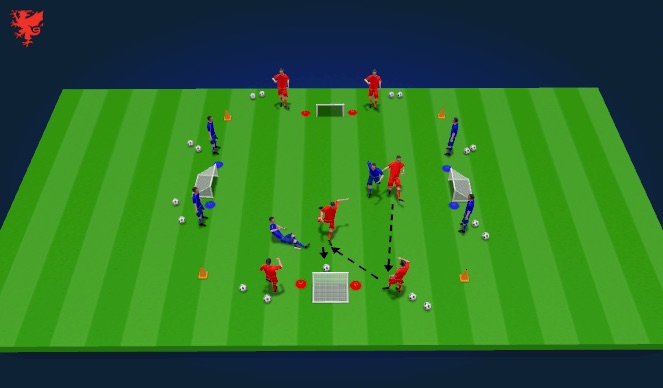
Finishing under pressure
If needed, split group into 2 by ability based on observations from prior drills (warm-up and accuracy)
Higher ability group uses Area A (shown above); lower ability group uses Area B (the only difference is that the goals aren't set back and hence closer to the players).
PURPOSE: To improve finishing under pressure
SET UP:
Attacker and defender on the field
Servers on the corners.
ACTION
If Attacker scores then, a teammate serves again to him, if Attacker misses or the ball goes out of play the attacker and defender change roles. Similarly, if the defender steals the ball from the attacker he becomes the attacker.
Change middle players every 60 seconds
Encourage players to use C.O.D’s to make space to shoot.
Coach shooting mechanics :
1. Get your body in a position to strike
2. Angled approach
3. Non-kicking foot beside the ball
4. Head over the ball
5. Select Surface & Strike: E.g. Laces.
6. Follow through
7. Accuracy (and Aim)
See the guidance at the top of this page to understand why you are not seeing interactive Football/Soccer images.
First time finishing
PURPOSE. To Improve First Time Finishing.
Set up:
Both groups use Area A
Remove inner 4 cones which marked the 20 x 20 space in the previous drill.
Get balls close to each goal so that wall passers can serve them in.
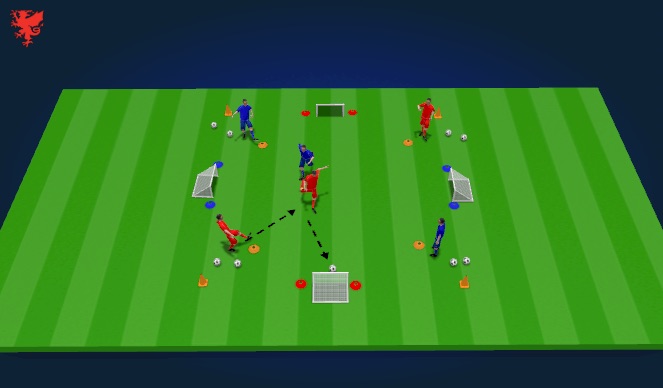
ACTION.
The perimeter players by the goals only have one touch each time they play the ball and
try to set up their team mates to score.
The two teams in the middle play 2 v 2, 3v3 or 4v4 according to their age and ability levels.
Teams can score in either of their goals from a first time pass from the players by the goals. The
team that scores gets possession at the restart.
Change the perimeter players often.
Coaching points:
Shooting mechanics (see previous drill)
The first player to the ball has the advantage of scoring; so focus all the time.

See the guidance at the top of this page to understand why you are not seeing interactive Football/Soccer images.
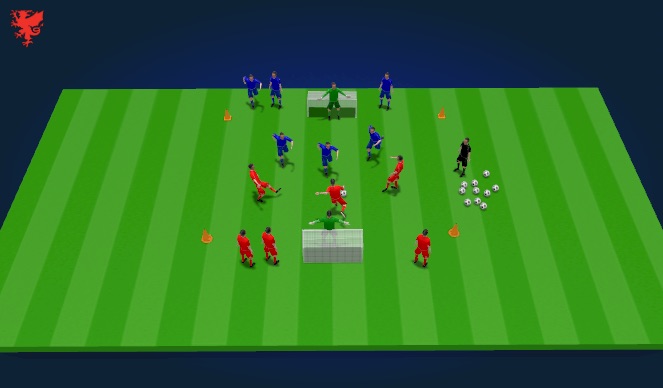
Fast finishing
Aim: Improve quick decision making and power and accuracy of finishing
SET UP.
Use Area A.
Remove the 4 small goals and the blue and red markers next to them.
Add the large goal.
Use the orange markers to mark a six yard line and an 18-yard line.
Coach and 6 Attackers with a ball each lined up, 18 yards from goal.
GK and 4 or more defenders on either side of the goal.
ACTION.
First attacker (A1) sprints to the 6yd line, touches it then turns to receive a pass from Coach and turns to
shoot.
As A1 hits the 6 yd line the 4 Defenders enter the field to defend and stop A1 shooting.
Whether A1 scores or is blocked or dispossessed he immediately turns to receive from the second attacker (A2) and plays a 1-2 with A2 or takes it himself while A2 supports
The 4 defenders once on the field stay there and defend full pressure.
As soon as a A1 or A2 score or lose ball A1 or A2 immediately sprints towards the third attacker (A3) to receive; the 3 attackers now combine with for any of them to get a shot on goal.
When this sequence is over A1 immediately sprints to A4 and repeats the previous sequences only it’s
now 4v4.
He does the same with A5 and then A6 and ends with a 5 v 4.
COACH TIP: Have a supply of balls so you can continue to serve the attackers after all players on field.
PLAYER TIP. Don’t always look for perfect opportunities. Be prepared to shoot in traffic., other players
follow up
See the guidance at the top of this page to understand why you are not seeing interactive Football/Soccer images.
Finishing game
Optional end game: Put it all together in an even sided game.
Use Area A.
Start w 3v3 progress to 4v4 or even 5v5 if players are getting high levels of success.
Every minute rotate so that any resting players come on.
COACH TIP: Have a supply of balls so you can continue to serve the attackers after all players on field.
PLAYER TIP. Don’t always look for perfect opportunities. Be prepared to shoot in traffic., other players
follow up
'%3E%3Cpath id='path4169' d='M 11.4375,70.25 C 11.457031,38.394531 37.277344,13.242188 68.253906,13.050781 99.78125,12.855469 125.73047,38.351563 125.8125,70.078125 125.89844,101.62109 100.43359,127.14063 69.148438,127.42188 37.582031,127.70703 11.464844,102.23438 11.4375,70.25 m 6.425781,-0.08984 c 0.03516,28.421871 23.027344,50.69922 50.519532,50.82031 C 96.433594,121.10156 119.30469,98.367188 119.38281,70.359375 119.45313,42.878906 97.382813,19.714844 69.015625,19.496094 40.75,19.277344 17.964844,42.035156 17.863281,70.160156' style='clip-rule:nonzero;fill:%23333f48;fill-opacity:1;fill-rule:nonzero;stroke:none' /%3E%3Cpath style='fill:%23333f48;fill-opacity:1;fill-rule:nonzero;stroke:none' d='m 39.789063,108.62109 c 0.28125,0.14454 0.550781,0.32032 0.839843,0.4336 2.734375,1.05469 5.554688,1.78125 8.453125,2.23047 2.734375,0.42578 5.484375,0.64453 8.25,0.54297 3.988282,-0.15625 7.832032,-0.94922 11.445313,-2.69532 1.683594,-0.8164 3.246094,-1.82422 4.640625,-3.07422 3.265625,-2.92578 5.171875,-6.582027 5.796875,-10.906246 0.546875,-3.761719 0.04687,-7.425781 -1.09375,-11.019531 -1.4375,-4.523438 -3.730469,-8.582032 -6.703125,-12.265625 -1.03125,-1.277344 -2.082031,-2.535157 -3.113281,-3.808594 C 66.789063,66.1875 65.332031,64.269531 64.0625,62.21875 c -1.601562,-2.582031 -2.835937,-5.316406 -3.613281,-8.261719 -0.683594,-2.574218 -0.902344,-5.1875 -0.6875,-7.828125 0.214844,-2.617187 0.910156,-5.117187 2.152344,-7.441406 2.164062,-4.050781 5.503906,-6.710937 9.816406,-8.179687 1.890625,-0.640625 3.835937,-1.058594 5.832031,-1.195313 1.121094,-0.07813 2.242188,-0.152344 3.363281,-0.164062 4.28125,-0.02734 8.4375,0.734375 12.453125,2.175781 1.871094,0.671875 3.6875,1.496094 5.523438,2.257812 0.226562,0.09375 0.4375,0.230469 0.664062,0.351563 -0.164062,0.25 -0.371093,0.160156 -0.539062,0.164062 -2.824219,0.101563 -5.535156,0.703125 -8.132813,1.804688 -1.335937,0.570312 -2.570312,1.316406 -3.648437,2.296875 -2.527344,2.296875 -3.605469,5.15625 -3.34375,8.550781 0.140625,1.855469 0.722656,3.574219 1.550781,5.222656 0.648438,1.296875 1.414063,2.523438 2.292969,3.675782 0.953125,1.25 1.929687,2.484375 2.929687,3.699218 2.085938,2.523438 4.164063,5.054688 6.050782,7.738282 2.203125,3.136718 4.140627,6.417968 5.589847,9.980468 1.16406,2.867188 2.01562,5.820313 2.39843,8.894532 0.25,2.011718 0.30079,4.03125 0.11719,6.058593 -0.24219,2.640625 -0.79297,5.195313 -1.74609,7.667969 -1.29688,3.36328 -3.300784,6.22656 -5.972659,8.63281 -2.429687,2.19141 -5.171875,3.90625 -8.109375,5.3125 -2.695312,1.29297 -5.464843,2.40235 -8.34375,3.20313 -1.953125,0.54687 -3.945312,0.8789 -5.949218,1.15625 -3.035157,0.41797 -6.085938,0.48828 -9.132813,0.3125 -5.328125,-0.3125 -10.476562,-1.46094 -15.410156,-3.52344 -3.449219,-1.44141 -6.691406,-3.25781 -9.757813,-5.39453 -0.183593,-0.12891 -0.378906,-0.25 -0.53125,-0.41016 -0.07031,-0.0703 -0.05859,-0.22656 -0.08203,-0.34375 z m 0,0' id='path4175' /%3E%3Cpath style='fill:%23333f48;fill-opacity:1;fill-rule:nonzero;stroke:none' d='M 94.699219,29.390625 C 94.089844,29.21875 93.476563,29.054688 92.867188,28.875 90.183594,28.085938 87.46875,27.441406 84.703125,27.046875 c -3.976562,-0.566406 -7.945312,-0.59375 -11.863281,0.402344 -7.535156,1.914062 -12.386719,6.71875 -14.878906,13.996094 -0.894532,2.617187 -1.179688,5.328125 -0.953125,8.078125 0.203125,2.484375 0.867187,4.859375 1.816406,7.160156 0.933594,2.261719 2.117187,4.390625 3.4375,6.449219 1.4375,2.25 3.050781,4.371093 4.640625,6.511718 1.4375,1.933594 2.867187,3.871094 4.261719,5.835938 1.230468,1.730469 2.316406,3.546875 3.273437,5.445312 1.324219,2.625 2.265625,5.378907 2.703125,8.292969 0.433594,2.902344 0.292969,5.765625 -0.660156,8.5625 -0.9375,2.74609 -2.574219,5.00781 -4.777344,6.875 -2.417969,2.04688 -5.203125,3.39844 -8.246094,4.22266 -1.835937,0.5 -3.703125,0.75781 -5.609375,0.82031 -3.886718,0.13281 -7.679687,-0.47266 -11.421875,-1.46094 -2.261718,-0.59765 -4.488281,-1.33203 -6.695312,-2.11328 -0.207031,-0.0742 -0.40625,-0.16797 -0.597656,-0.25 -0.02344,-0.24609 0.148437,-0.19141 0.25,-0.20703 1.96875,-0.30469 3.921875,-0.67969 5.804687,-1.34766 1.367188,-0.48437 2.671875,-1.10156 3.855469,-1.94922 2.25,-1.61328 3.65625,-3.765621 4.0625,-6.515621 0.273437,-1.867188 0.09375,-3.710938 -0.429688,-5.527344 -0.472656,-1.648437 -1.171875,-3.199219 -2.109375,-4.628906 -0.792968,-1.207031 -1.636718,-2.382813 -2.523437,-3.519531 -0.921875,-1.195313 -1.921875,-2.328125 -2.890625,-3.484375 -2.753906,-3.273438 -5.351563,-6.660157 -7.523438,-10.355469 -2.042968,-3.480469 -3.667968,-7.136719 -4.597656,-11.078125 -0.640625,-2.699219 -0.980469,-5.4375 -0.832031,-8.214844 0.238281,-4.53125 1.476562,-8.78125 3.824219,-12.6875 1.082031,-1.800781 2.445312,-3.375 3.988281,-4.800781 2.742187,-2.527344 5.863281,-4.480469 9.257812,-5.992188 3.746094,-1.667968 7.652344,-2.769531 11.707032,-3.394531 3.152343,-0.488281 6.324218,-0.671875 9.507812,-0.519531 8.632813,0.410156 16.671875,2.792969 24,7.433594 0.08203,0.05078 0.152344,0.109375 0.230469,0.167968 -0.0039,0.04297 -0.0078,0.08984 -0.01563,0.136719' id='path4177' /%3E%3Cpath style='fill:%23333f48;fill-opacity:1;fill-rule:nonzero;stroke:none' d='m 31.699219,38.75 c -0.07813,0.238281 -0.152344,0.476563 -0.238281,0.710938 -1.460938,4.074218 -2.066407,8.28125 -1.808594,12.59375 0.4375,7.304687 2.808594,13.925781 7.277344,19.753906 3.714843,4.84375 7.441406,9.671875 11.167968,14.503906 1.113282,1.441406 1.953125,3.007813 2.414063,4.777344 0.332031,1.257812 0.425781,2.539062 0.273437,3.820312 -0.214843,1.832032 -1.070312,3.34375 -2.464843,4.546875 -0.984375,0.851559 -2.113282,1.449219 -3.316407,1.925779 -1.378906,0.54297 -2.8125,0.89063 -4.273437,1.1211 -2.226563,0.35547 -4.46875,0.46093 -6.722656,0.41015 -0.589844,-0.0156 -1.046875,-0.18359 -1.433594,-0.625 -0.636719,-0.72265 -1.335938,-1.39062 -1.9375,-2.14062 C 25.574219,93.800781 22.300781,86.621094 20.84375,78.636719 20.152344,74.835938 19.917969,71 20.15625,67.128906 20.796875,56.773438 24.390625,47.574219 30.859375,39.480469 c 0.21875,-0.273438 0.453125,-0.53125 0.679688,-0.796875 0.05469,0.02344 0.109375,0.04297 0.160156,0.06641' id='path4179' /%3E%3Cpath style='fill:%23333f48;fill-opacity:1;fill-rule:nonzero;stroke:none' d='m 105.41016,101.30078 c -0.13282,-0.3125 0.0234,-0.5039 0.0977,-0.69922 1.38672,-3.749997 1.98047,-7.628904 1.89844,-11.621091 -0.14453,-6.84375 -2.08594,-13.144531 -5.73437,-18.925781 C 99.890625,67.226563 97.917969,64.53125 95.835938,61.917969 94.4375,60.160156 92.988281,58.4375 91.582031,56.6875 90.632813,55.511719 89.6875,54.335938 88.792969,53.121094 c -0.835938,-1.144531 -1.488281,-2.398438 -1.953125,-3.742188 -0.523438,-1.515625 -0.695313,-3.070312 -0.511719,-4.652343 0.21875,-1.839844 1.082031,-3.339844 2.476563,-4.542969 1.039062,-0.890625 2.230468,-1.507813 3.503906,-1.980469 1.632812,-0.609375 3.320312,-0.960937 5.046875,-1.175781 1.917969,-0.238281 3.839841,-0.269531 5.769531,-0.230469 0.52734,0.01172 0.89453,0.203125 1.23828,0.585938 5.50391,6.113281 9.26172,13.144531 11.21875,21.132812 1.11719,4.554688 1.5625,9.179688 1.30469,13.855469 -0.58203,10.625 -4.23438,20.082031 -10.96094,28.339846 -0.15625,0.1914 -0.32812,0.375 -0.51562,0.58984' id='path4181' /%3E%3Cpath style='fill:%23333f48;fill-opacity:1;fill-rule:nonzero;stroke:none' d='m 39.796875,108.63281 c -0.05859,0.0117 -0.117187,0.0234 -0.175781,0.0352 0.05469,-0.0156 0.113281,-0.0312 0.167969,-0.0469 z m 0,0' id='path4183' /%3E%3C/g%3E%3C/svg%3E)
 Play animation
 Play step-by-step
 Repeat (toggle)
 Full Screen
 Pause
Pause Stop
Stop
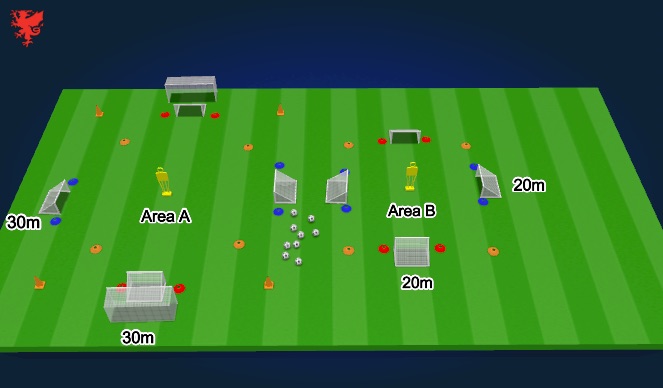
Set up
2 areas:
Area A: 30 m x 30 m
Area B: 20m x 20m
Leave a 2m - 3m gap between Area A and Area B.
Total space needed: 35m x 55m. To reduce space to omit 'Under pressure' drill which is only drill which uses Area B. Then space required is 35m x 35m.
Each area has a goal at the centre of each side.
Two opposite goals are marked with red cones at the side of each post.
The other two goals are marked with a blue cone outside each post.
If you don't have goals, use the cones as goals.
Orange cones mark the corners of the 30mx30m area.
Orange disc markers at the corners of the 20m x 20m area.
There is a 20m x 20m area marked with orange cones positioned centrally inside area A.
Have 2 spare full size goals near each end of Area A for use in later parts of the session.
Aim for 2 balls per player.
All drills take place in Area A. Area B is used only for half of the group for the 'under pressure' drill and can be omitted.