


Football/Soccer Session (Beginner): Prevent the Opponent from Creating Scoring Options (Start Time: 2024-09-12 18:15:00)
Profile Summary

| Name: | Murat Akyol |
|---|---|
| City: | Tempe |
| Country: | United States of America |
| Membership: | Adult Member |
| Sport: | Football/Soccer |
Description
Objective: Prevent the opponent from creating scoring options
Main Principle: Keep compact, stay compact
T.T.P.: Create zonal marking until the opponent is in the danger zone, get numbers back quickly, #9-7-11 can receive the ball but prevent them turning with the ball and facing our goal
Player Actions: Scanning, Adopting body shape, dropping back, marking, covering
Training Day: Preparative
Session Type: Progressive
Session Length: 75 min (Including Fifa 11 and passing stations warm-up)
Physical Load: Low
Cognitive Load: High
Current Behavior
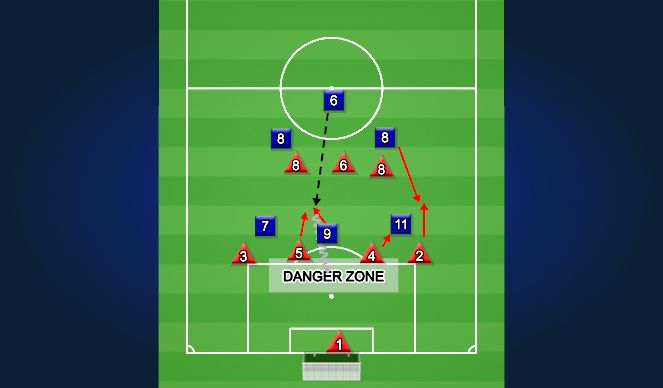
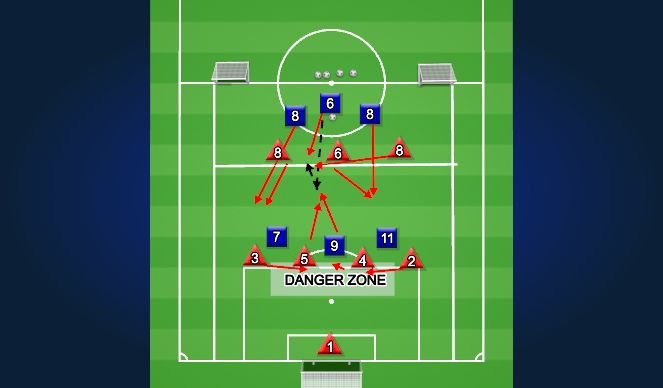
WHAT: OPPONENT'S #9-7-11 ARE RECEIVING THE BALL AND GOING FOR 1V1
WHO: #4-5-2-3-1
SECONDARY: #6-8-8
WHERE: DEFENDING 3RD
WHEN: WHEN THE OPPONENT BREAKS OUR MIDFIELD LINE WITH A PASS OR DRIBBLE
WHY: OUR #4-5 STEPS UP TO STOP THE OPPONENT'S MIDFIELDERS AND LEAVES 3 1V1 IN THE DANGER ZONE/CONE
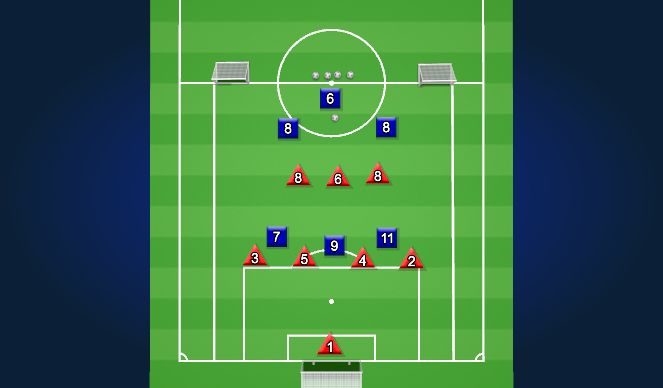
Desired Behavior
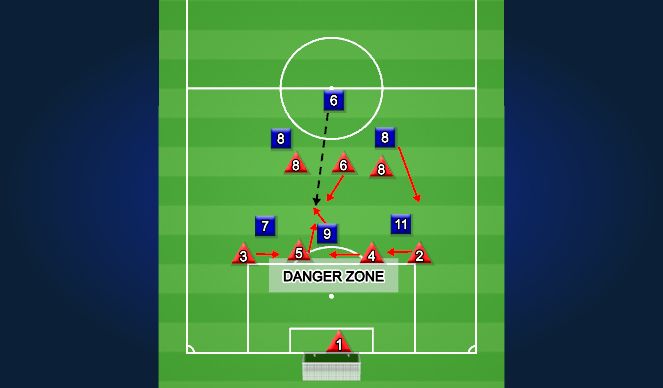
WHAT: OUR DEFENSIVE LINE STAYING COMPACT IN/AROUND THE DANGER ZONE/CONE
WHO: #4-5-2-3-1
SECONDARY: #6-8-8
WHERE: DEFENDING 3RD
WHEN: WHEN THE OPPONENT BREAKS OUR MIDFIELD LINE WITH A PASS OR DRIBBLE
WHY: #OUR DEFENSIVE LINE NOT STEPPING UP TO STOP THE OPPONENT'S MIDFIELDER WHEN HE IS IN THE DANGER ZONE/CONE AND OUR MIDFIELDERS DROPPING BACK TO OUTNUMBER THE OPPONENT
Guided questions
What do we leave behind when our #4-5 steps out of his zone?
What does the opponent create when their midfielders supports the attack but when we do not drop back?
Where do we want the opponent to go?
Which way do we want the opponent face?
What is the situation(numbers) in this moment? Count the number of the players
What is the moment when we regain the possession of the ball?
See the guidance at the top of this page to understand why you are not seeing interactive Football/Soccer images.
See the guidance at the top of this page to understand why you are not seeing interactive Football/Soccer images.
DESIRED BEHAVIOR
When one of our centerbacks (#4-5) pushes up, we need our other centerback and our fullbacks (#2-3) tuck in to cover in/around the danger zone for the opponent's runs/dribble into our danger zone
See the guidance at the top of this page to understand why you are not seeing interactive Football/Soccer images.
Learning Objectives

|
Technical |

|
Tactical |

|
Physical |

|
Psychological |

|
Social |
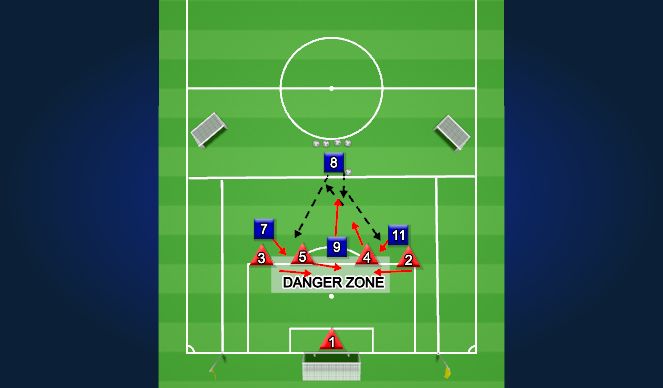
Activity 1 (10 mins)
Activation and Implementation of the player actions from the defensive unit/line
4+GKvs4
Field size: 45x40
Red team is the focus team
Defends the big goal and scores to 2 mini goals which represents #7/11
Blue team is the non-focus team
Scores to the big goal
Blue #8 will start with the ball in every reset
Restrictions:
Red team
Can only touch ball 2-3 times in order the score after winning the ball
Only one center back (#4/5) can push up in order to follow the #9
Can not leave the red zone in order to score
Blue team
#8 can not enter the playing zone, he positions himself as a passing stations out of the playing zone
Cues/Triggers
Red team
#2-3 tucks in when one of the centerbacks (#4/5) pushes up to follow the opponent's #9
When one centerback pushes up, the other center back positions himself central
See the guidance at the top of this page to understand why you are not seeing interactive Football/Soccer images.
Learning Objectives
|
|
Technical |
|
|
Tactical |
|
|
Physical |
|
|
Psychological |
|
|
Social |
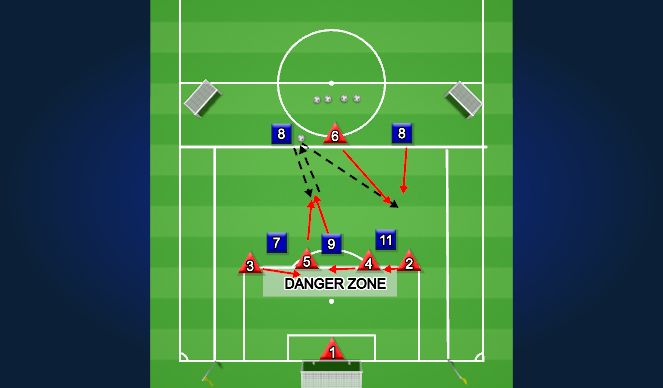
Activity 2 (15 mins)
5+GKvs5
Field size: 55x40
Red team is the focus team
Defends the big goal and scores to 2 mini goals which represents #7/11
Blue team is the non-focus team
Scores to the big goal
Blue #8 will start with the ball in every reset
Restrictions:
Red team
Can only touch ball 2-3 times in order the score after winning the ball
Only one center back (#4/5) can push up in order to follow the #9
#6 can only drop back when #8 of the opponent enters the playing zone
Can not leave the playing zone in order to score
Blue team
#8 who has the ball can not enter the playing zone, he positions himself as a passing stations out of the playing zone
#8 who has not have the ball can enter the playing zone when #9-7-11 receives the ball
#8 who entered the playing zone can not leave the zone in order to defend/stop the ball
Cues/Triggers
Red team
#2-3 tucks in when one of the centerbacks (#4/5) pushes up to follow the opponent's #9
When one centerback pushes up, the other center back positions himself central
When #8 supports the attack, red team's #6 has to drop back
What can go wrong
#2 or #3 can push up in order to mark #8 and that will leave us outnumbered in the back
#6 can jog back or not drop back at all and that will give the opponent 4 1v1 in/around the danger zone
#4/5 who stayed back may not shift in order to cover the middle
#2-3 may not shift to create compact 3 in/around the danger zone in order to outnumbered the opponent
See the guidance at the top of this page to understand why you are not seeing interactive Football/Soccer images.
Learning Objectives
|
|
Technical |
|
|
Tactical |
|
|
Physical |
|
|
Psychological |
|
|
Social |
Activity 3 (20 mins)
7+GKvs6
Field size: 65x40
Red team is the focus team
Defends the big goal and scores to 2 mini goals which represents #7/11
Blue team is the non-focus team
Scores to the big goal
Blue #8 will start with the ball in every reset
Restrictions:
Red team
Can only touch ball 2-3 times in order the score after winning the ball
Only one center back (#4/5) can push up in order to follow the #9
#6 can only drop back when #8 of the opponent enters the playing zone
Can not leave the playing zone in order to score
#8 is responsible for the opponent's #6 and prevent him receiving the ball from the opponent's #9
#6-8 responsible for the opponent's supporting the attack runs inside the playing zone
Blue team
#6 who has the ball can not enter the playing zone, he positions himself as a passing stations out of the playing zone
Both #8s now can enter the playing zone when #9-7-11 receives the ball
Cues/Triggers
Red team
#2-3 tucks in when one of the centerbacks (#4/5) pushes up to follow the opponent's #9
When one centerback pushes up, the other center back positions himself central
When #8 supports the attack, red team's #6 has to drop back
#2-3 may not shift to create compact 3 in/around the danger zone in order to outnumbered the opponent
#8 will mark when the opponent's #6 is looking for receive the ball back in order to reset
Second #8 will follow the opponent's #8's support the attack run
What can go wrong
#2 or #3 can push up in order to mark #8 and that will leave us outnumbered in the back
#6 can jog back or not drop back at all and that will give the opponent 4 1v1 in/around the danger zone
#4/5 who stayed back may not shift in order to cover the middle
#2-3 may not shift to create compact 3 in/around the danger zone in order to outnumbered the opponent
#8 may not mark when the opponent's #6 is looking for receive the ball back in order to reset
Second #8 may not follow the opponent's #8's support the attack run
See the guidance at the top of this page to understand why you are not seeing interactive Football/Soccer images.
Learning Objectives
|
|
Technical |
|
|
Tactical |
|
|
Physical |
|
|
Psychological |
|
|
Social |
Game Phase (20 mins)
7+GKvs6
Field size: 65x40
Red team is the focus team
Defends the big goal and scores to 2 mini goals which represents #7/11
Blue team is the non-focus team
Scores to the big goal
Blue #6 will start with the ball in every reset
'%3E%3Cpath id='path4169' d='M 11.4375,70.25 C 11.457031,38.394531 37.277344,13.242188 68.253906,13.050781 99.78125,12.855469 125.73047,38.351563 125.8125,70.078125 125.89844,101.62109 100.43359,127.14063 69.148438,127.42188 37.582031,127.70703 11.464844,102.23438 11.4375,70.25 m 6.425781,-0.08984 c 0.03516,28.421871 23.027344,50.69922 50.519532,50.82031 C 96.433594,121.10156 119.30469,98.367188 119.38281,70.359375 119.45313,42.878906 97.382813,19.714844 69.015625,19.496094 40.75,19.277344 17.964844,42.035156 17.863281,70.160156' style='clip-rule:nonzero;fill:%23333f48;fill-opacity:1;fill-rule:nonzero;stroke:none' /%3E%3Cpath style='fill:%23333f48;fill-opacity:1;fill-rule:nonzero;stroke:none' d='m 39.789063,108.62109 c 0.28125,0.14454 0.550781,0.32032 0.839843,0.4336 2.734375,1.05469 5.554688,1.78125 8.453125,2.23047 2.734375,0.42578 5.484375,0.64453 8.25,0.54297 3.988282,-0.15625 7.832032,-0.94922 11.445313,-2.69532 1.683594,-0.8164 3.246094,-1.82422 4.640625,-3.07422 3.265625,-2.92578 5.171875,-6.582027 5.796875,-10.906246 0.546875,-3.761719 0.04687,-7.425781 -1.09375,-11.019531 -1.4375,-4.523438 -3.730469,-8.582032 -6.703125,-12.265625 -1.03125,-1.277344 -2.082031,-2.535157 -3.113281,-3.808594 C 66.789063,66.1875 65.332031,64.269531 64.0625,62.21875 c -1.601562,-2.582031 -2.835937,-5.316406 -3.613281,-8.261719 -0.683594,-2.574218 -0.902344,-5.1875 -0.6875,-7.828125 0.214844,-2.617187 0.910156,-5.117187 2.152344,-7.441406 2.164062,-4.050781 5.503906,-6.710937 9.816406,-8.179687 1.890625,-0.640625 3.835937,-1.058594 5.832031,-1.195313 1.121094,-0.07813 2.242188,-0.152344 3.363281,-0.164062 4.28125,-0.02734 8.4375,0.734375 12.453125,2.175781 1.871094,0.671875 3.6875,1.496094 5.523438,2.257812 0.226562,0.09375 0.4375,0.230469 0.664062,0.351563 -0.164062,0.25 -0.371093,0.160156 -0.539062,0.164062 -2.824219,0.101563 -5.535156,0.703125 -8.132813,1.804688 -1.335937,0.570312 -2.570312,1.316406 -3.648437,2.296875 -2.527344,2.296875 -3.605469,5.15625 -3.34375,8.550781 0.140625,1.855469 0.722656,3.574219 1.550781,5.222656 0.648438,1.296875 1.414063,2.523438 2.292969,3.675782 0.953125,1.25 1.929687,2.484375 2.929687,3.699218 2.085938,2.523438 4.164063,5.054688 6.050782,7.738282 2.203125,3.136718 4.140627,6.417968 5.589847,9.980468 1.16406,2.867188 2.01562,5.820313 2.39843,8.894532 0.25,2.011718 0.30079,4.03125 0.11719,6.058593 -0.24219,2.640625 -0.79297,5.195313 -1.74609,7.667969 -1.29688,3.36328 -3.300784,6.22656 -5.972659,8.63281 -2.429687,2.19141 -5.171875,3.90625 -8.109375,5.3125 -2.695312,1.29297 -5.464843,2.40235 -8.34375,3.20313 -1.953125,0.54687 -3.945312,0.8789 -5.949218,1.15625 -3.035157,0.41797 -6.085938,0.48828 -9.132813,0.3125 -5.328125,-0.3125 -10.476562,-1.46094 -15.410156,-3.52344 -3.449219,-1.44141 -6.691406,-3.25781 -9.757813,-5.39453 -0.183593,-0.12891 -0.378906,-0.25 -0.53125,-0.41016 -0.07031,-0.0703 -0.05859,-0.22656 -0.08203,-0.34375 z m 0,0' id='path4175' /%3E%3Cpath style='fill:%23333f48;fill-opacity:1;fill-rule:nonzero;stroke:none' d='M 94.699219,29.390625 C 94.089844,29.21875 93.476563,29.054688 92.867188,28.875 90.183594,28.085938 87.46875,27.441406 84.703125,27.046875 c -3.976562,-0.566406 -7.945312,-0.59375 -11.863281,0.402344 -7.535156,1.914062 -12.386719,6.71875 -14.878906,13.996094 -0.894532,2.617187 -1.179688,5.328125 -0.953125,8.078125 0.203125,2.484375 0.867187,4.859375 1.816406,7.160156 0.933594,2.261719 2.117187,4.390625 3.4375,6.449219 1.4375,2.25 3.050781,4.371093 4.640625,6.511718 1.4375,1.933594 2.867187,3.871094 4.261719,5.835938 1.230468,1.730469 2.316406,3.546875 3.273437,5.445312 1.324219,2.625 2.265625,5.378907 2.703125,8.292969 0.433594,2.902344 0.292969,5.765625 -0.660156,8.5625 -0.9375,2.74609 -2.574219,5.00781 -4.777344,6.875 -2.417969,2.04688 -5.203125,3.39844 -8.246094,4.22266 -1.835937,0.5 -3.703125,0.75781 -5.609375,0.82031 -3.886718,0.13281 -7.679687,-0.47266 -11.421875,-1.46094 -2.261718,-0.59765 -4.488281,-1.33203 -6.695312,-2.11328 -0.207031,-0.0742 -0.40625,-0.16797 -0.597656,-0.25 -0.02344,-0.24609 0.148437,-0.19141 0.25,-0.20703 1.96875,-0.30469 3.921875,-0.67969 5.804687,-1.34766 1.367188,-0.48437 2.671875,-1.10156 3.855469,-1.94922 2.25,-1.61328 3.65625,-3.765621 4.0625,-6.515621 0.273437,-1.867188 0.09375,-3.710938 -0.429688,-5.527344 -0.472656,-1.648437 -1.171875,-3.199219 -2.109375,-4.628906 -0.792968,-1.207031 -1.636718,-2.382813 -2.523437,-3.519531 -0.921875,-1.195313 -1.921875,-2.328125 -2.890625,-3.484375 -2.753906,-3.273438 -5.351563,-6.660157 -7.523438,-10.355469 -2.042968,-3.480469 -3.667968,-7.136719 -4.597656,-11.078125 -0.640625,-2.699219 -0.980469,-5.4375 -0.832031,-8.214844 0.238281,-4.53125 1.476562,-8.78125 3.824219,-12.6875 1.082031,-1.800781 2.445312,-3.375 3.988281,-4.800781 2.742187,-2.527344 5.863281,-4.480469 9.257812,-5.992188 3.746094,-1.667968 7.652344,-2.769531 11.707032,-3.394531 3.152343,-0.488281 6.324218,-0.671875 9.507812,-0.519531 8.632813,0.410156 16.671875,2.792969 24,7.433594 0.08203,0.05078 0.152344,0.109375 0.230469,0.167968 -0.0039,0.04297 -0.0078,0.08984 -0.01563,0.136719' id='path4177' /%3E%3Cpath style='fill:%23333f48;fill-opacity:1;fill-rule:nonzero;stroke:none' d='m 31.699219,38.75 c -0.07813,0.238281 -0.152344,0.476563 -0.238281,0.710938 -1.460938,4.074218 -2.066407,8.28125 -1.808594,12.59375 0.4375,7.304687 2.808594,13.925781 7.277344,19.753906 3.714843,4.84375 7.441406,9.671875 11.167968,14.503906 1.113282,1.441406 1.953125,3.007813 2.414063,4.777344 0.332031,1.257812 0.425781,2.539062 0.273437,3.820312 -0.214843,1.832032 -1.070312,3.34375 -2.464843,4.546875 -0.984375,0.851559 -2.113282,1.449219 -3.316407,1.925779 -1.378906,0.54297 -2.8125,0.89063 -4.273437,1.1211 -2.226563,0.35547 -4.46875,0.46093 -6.722656,0.41015 -0.589844,-0.0156 -1.046875,-0.18359 -1.433594,-0.625 -0.636719,-0.72265 -1.335938,-1.39062 -1.9375,-2.14062 C 25.574219,93.800781 22.300781,86.621094 20.84375,78.636719 20.152344,74.835938 19.917969,71 20.15625,67.128906 20.796875,56.773438 24.390625,47.574219 30.859375,39.480469 c 0.21875,-0.273438 0.453125,-0.53125 0.679688,-0.796875 0.05469,0.02344 0.109375,0.04297 0.160156,0.06641' id='path4179' /%3E%3Cpath style='fill:%23333f48;fill-opacity:1;fill-rule:nonzero;stroke:none' d='m 105.41016,101.30078 c -0.13282,-0.3125 0.0234,-0.5039 0.0977,-0.69922 1.38672,-3.749997 1.98047,-7.628904 1.89844,-11.621091 -0.14453,-6.84375 -2.08594,-13.144531 -5.73437,-18.925781 C 99.890625,67.226563 97.917969,64.53125 95.835938,61.917969 94.4375,60.160156 92.988281,58.4375 91.582031,56.6875 90.632813,55.511719 89.6875,54.335938 88.792969,53.121094 c -0.835938,-1.144531 -1.488281,-2.398438 -1.953125,-3.742188 -0.523438,-1.515625 -0.695313,-3.070312 -0.511719,-4.652343 0.21875,-1.839844 1.082031,-3.339844 2.476563,-4.542969 1.039062,-0.890625 2.230468,-1.507813 3.503906,-1.980469 1.632812,-0.609375 3.320312,-0.960937 5.046875,-1.175781 1.917969,-0.238281 3.839841,-0.269531 5.769531,-0.230469 0.52734,0.01172 0.89453,0.203125 1.23828,0.585938 5.50391,6.113281 9.26172,13.144531 11.21875,21.132812 1.11719,4.554688 1.5625,9.179688 1.30469,13.855469 -0.58203,10.625 -4.23438,20.082031 -10.96094,28.339846 -0.15625,0.1914 -0.32812,0.375 -0.51562,0.58984' id='path4181' /%3E%3Cpath style='fill:%23333f48;fill-opacity:1;fill-rule:nonzero;stroke:none' d='m 39.796875,108.63281 c -0.05859,0.0117 -0.117187,0.0234 -0.175781,0.0352 0.05469,-0.0156 0.113281,-0.0312 0.167969,-0.0469 z m 0,0' id='path4183' /%3E%3C/g%3E%3C/svg%3E)
 Play animation
 Play step-by-step
 Repeat (toggle)
 Full Screen
 Pause
Pause Stop
Stop
Current Behavior
When the opponent's #9 receives the ball, instead of creating 3 back line, our #2/3 also pushes up to focus on the secondary runs from the opponent's #6-8-8 (when our midfielders do not drop back to support and defend), leave a gap and 1v1 in/around the danger zone.
Our #4/5 is also giving the opponent's #9 the time and the space to turn with the ball and face our goal