


Football/Soccer Session (Moderate): Defending with a lone striker, withdrawn striker, and midfield four (Start Time: 2018-01-26 12:25:00)

Premier Users' Club
Aaron Longomo
Profile Summary

| Name: | Aaron Longomo |
|---|---|
| City: | cardiff |
| Country: | United Kingdom |
| Membership: | Adult Member |
| Sport: | Football/Soccer |
Description
See the guidance at the top of this page to understand why you are not seeing interactive Football/Soccer images.
See the guidance at the top of this page to understand why you are not seeing interactive Football/Soccer images.
Drill 2 (5 mins)
Topic: Defending with a lone striker, withdrawn striker, and midfield 4
Initials Representation: B1= Block 1. B2= Block 2. B3 = Block 3
Drill 2: Formation 7v6 (including goalkeeper)
Blues (Attacking team): 4-1-1
Goalkeeper, 2 center back, 2 fullbacks, 1 defending midfielder,1striker
Reds (Defending team): 4-1-1
2 wide midfielders, 2 center midfield, 1 withdrawn striker, 1 lone striker
Blues (9v9) would be 4-2-2
(11v11) would be 4-4-2
Reds (9v9) would be 2-4-1-1
(11v11) would be 4-4-1-1
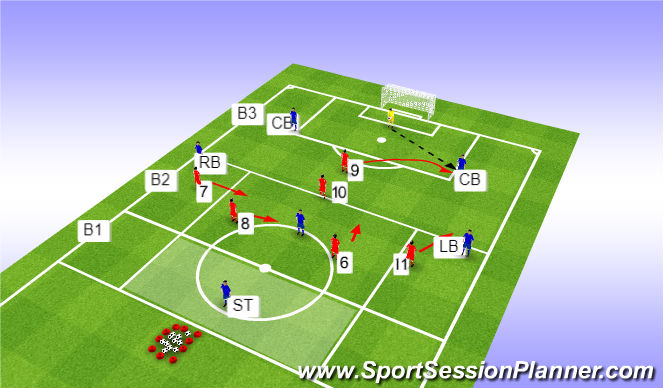
Session Description: Drill 2
- Second scenario. The defender has the ball, if the defender manages to pass the ball back to the goalkeeper, the lone striker (9) must press the goalkeeper whilst blocking the left back defenders view to prevent the keeper going back to him. At this point, the goalkeeper will be forced to play to the right center back. This will is when the rotation between the lone striker and withdrawn striker come in play. Whilst the goalkeeper set the pass, as the ball is moving, that's the trigger for the withdrawn striker (10) to make the run and press with a curved run stopping the keeper to receive it back again. In this moment as the withdrawn striker (10) presses the defender, this is when the lone striker (9) drops back in the withdrawn striker's position to create cover in case the ball is played through midfield.
Conditions:
Blues:
-Must always play out from the back starting with the goalkeeper.
- Specific Players must stay inside their Blocked area (B1,B2,B3)
-Fullbacks can now move anywhere inside B2 & B1
-Striker is restricted in the shaded area.
Reds
-Specific Players must stay inside their Blocked area (B1,B2,B3) when out of possession
- Withdrawn striker (10) in now allowed in B3& B2 when the ball is in midfield area
-Midfield 4 must stay inside B1, B2 (when out of possession)
- Only 1 midfield player can enter B3 when in possession for counterattack
- 8 seconds to score when you win the ball back
Defensive Principles:
- Pressure on the ball (When, Who, How, Why, What if)
- Position focus
- Communication
- Tracking runners, and Cover when necessary
Key Coaching points:
-Opposition play out from the back
-Lone striker when to press
-Press as Fast as possible to create pressure and force mistakes
-Angled run
- What if switched play
-Positioning of midfield 4
- Speed of the ball when in possession
- Counterattack with numbers of players
Regression:
Apply pressure and stay close to the men marking
See the guidance at the top of this page to understand why you are not seeing interactive Football/Soccer images.
Screen 3 (5 mins)
Topic: Defending with a lone striker, Withdrawn striker, and midfield 4
Initials Representation: B1= Block 1. B2= Block 2. B3 = Block 3
Drill 3: Formation 7v6
Blues (Attacking team): 4-1-1
Goalkeeper, 2 center back, 2 fullbacks, 1center midfielders, 1 striker
Reds (Defending team): 4-1-1
2 wide midfielders, 2 center midfield, 1 withdrawn striker, 1 lone striker
Blues (9v9) would be 4-2-2
(11v11) would be 4-4-2
Reds (9v9) would be 2-4-1-1
(11v11) would be 4-4-1-1
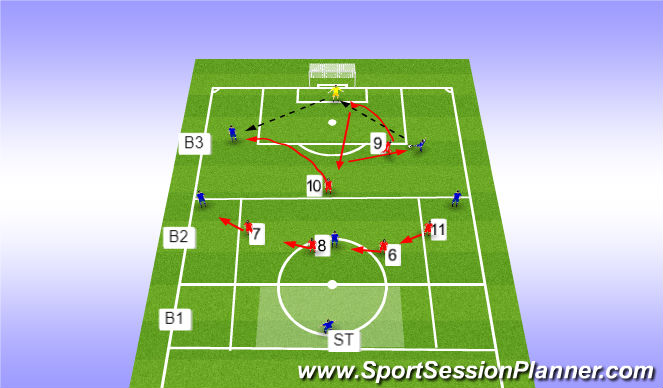
Session Description: Drill 3
-Third Scenario. As the ball gets played from goalkeeper to left/ right center back, the lone Striker (9) should be making the run to press the ball. When that happens, if the ball gets switched from left/right center back to right/left center back, as the ball travel, that is the trigger for the withdrawn striker (10) to start pressing and the rotation between both strikers will be visible at this point.
Conditions:
Blues:
-Must always play and start out from the back starting with the goalkeeper.
Players can now be active in all Blocked area (except Striker)
-Fullback can now enter any blocked area
-Striker is now active in the B1.
Reds:
-10 seconds to win the ball back
-2 Midfielders must stay inside B2 (when in possession)
-Only 1 midfield players are allowed to join B3 at any time
- Everyone else can enter any Blocked area.
Defensive Principles:
- Pressure on the ball (When, Who, How, Why, What if)
- Position focus
- Communication
- Tracking runners, and Cover when necessary
- Timing
Key Coaching points:
-Lone striker when to press
- Press as Fast as possible to create pressure and force mistakes with the intention
to win the ball back and score
-Angled run
- What if switched play
-Position of midfield 4
See the guidance at the top of this page to understand why you are not seeing interactive Football/Soccer images.
Small Sided Game (15 mins)
Topic: Defending with a lone striker, withdrawn striker, and midfield 4
Initials Representation: B1= Block 1. B2= Block 2. B3 = Block 3
Small Sided Game Formation:
Reds: 2-4-1-1
Blues: 4-2-2
Blues (Attacking team): 4-2-2
Goalkeeper, 2 center back, 2 fullbacks, 2 center midfielders
Reds (Defending team): 2-4-1-1
2 wide midfielders, 2 center midfield, 1 withdrawn striker, 1 lone striker
Blues (9v9) would be 4-2-2
(11v11) would be 4-4-2
Reds (9v9) would be 2-4-1-1
(11v11) would be 4-4-1-1
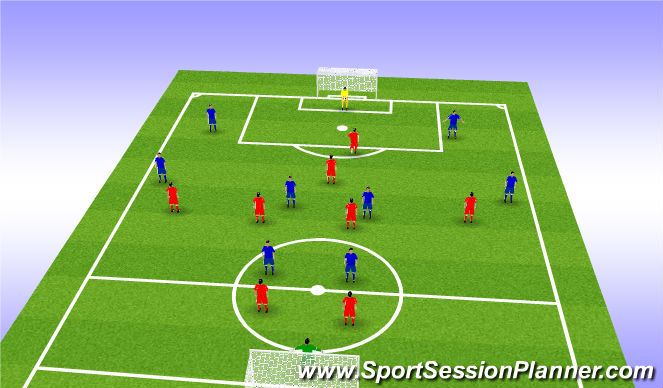
Session Description: Small Sided Game
First scenario. The goalkeeper passes the ball to the left or right center back which will set the trigger for the lone striker (9) to press and showing the defender outside forcing him to play wide. When that happens, the midfield four should tuck in nice and compact within the direction of the ball, whilst be screening opposition's player positions to prevent any gaps for through balls.
Second scenario. The defender has the ball, if the defender manages to pass the ball back to the goalkeeper, the lone striker (9) must press the goalkeeper whilst blocking the left back defenders view to prevent the keeper going back to him. At this point, the goalkeeper will be forced to play to the right center back. This will is when the rotation between the lone striker and withdrawn striker come in play. Whilst the goalkeeper set the pass, as the ball is moving, that's the trigger for the withdrawn striker (10) to make the run and press with a curved run stopping the keeper to receive it back again. In this moment as the withdrawn striker (10) presses the defender, this is when the lone striker (9) drops back in the withdrawn striker's position to create cover in case the ball is played through midfield.
-Third Scenario. As the ball gets played from goalkeeper to left/ right center back, the lone striker (9) should be making the run to press the ball. When that happens, if the ball gets switched from left/right center back to right/left center back, as the ball travel, that is the trigger for the withdrawn striker (10) to start pressing and the rotation between both strikers will be visible at this point.
Conditions:
Blues:
-Must always play and start out from the back starting with the goalkeeper.
Players can now be active in all Blocked area (except Striker)
-Fullback can now enter any blocked area
-Striker is now active in the B1 and B2.
Reds:
-10 seconds to win the ball back
-2 Midfielders must stay inside B2 (when in possession)
-Only two midfield players are allowed to join B3 at any time but within good reason.
- Everyone else can enter any Blocked area.
Defensive Principles:
- Pressure on the ball (When, Who, How, Why, What if)
- Position focus
- Communication
- Tracking runners, and Cover when necessary
- Timing
Key Coaching points:
-Lone striker when to press
- Press as Fast as possible to create pressure and force mistakes with the intention
to win the ball back and score
-Angled run
- What if switched play
-Positioning of midfield 4
'%3E%3Cpath id='path4169' d='M 11.4375,70.25 C 11.457031,38.394531 37.277344,13.242188 68.253906,13.050781 99.78125,12.855469 125.73047,38.351563 125.8125,70.078125 125.89844,101.62109 100.43359,127.14063 69.148438,127.42188 37.582031,127.70703 11.464844,102.23438 11.4375,70.25 m 6.425781,-0.08984 c 0.03516,28.421871 23.027344,50.69922 50.519532,50.82031 C 96.433594,121.10156 119.30469,98.367188 119.38281,70.359375 119.45313,42.878906 97.382813,19.714844 69.015625,19.496094 40.75,19.277344 17.964844,42.035156 17.863281,70.160156' style='clip-rule:nonzero;fill:%23333f48;fill-opacity:1;fill-rule:nonzero;stroke:none' /%3E%3Cpath style='fill:%23333f48;fill-opacity:1;fill-rule:nonzero;stroke:none' d='m 39.789063,108.62109 c 0.28125,0.14454 0.550781,0.32032 0.839843,0.4336 2.734375,1.05469 5.554688,1.78125 8.453125,2.23047 2.734375,0.42578 5.484375,0.64453 8.25,0.54297 3.988282,-0.15625 7.832032,-0.94922 11.445313,-2.69532 1.683594,-0.8164 3.246094,-1.82422 4.640625,-3.07422 3.265625,-2.92578 5.171875,-6.582027 5.796875,-10.906246 0.546875,-3.761719 0.04687,-7.425781 -1.09375,-11.019531 -1.4375,-4.523438 -3.730469,-8.582032 -6.703125,-12.265625 -1.03125,-1.277344 -2.082031,-2.535157 -3.113281,-3.808594 C 66.789063,66.1875 65.332031,64.269531 64.0625,62.21875 c -1.601562,-2.582031 -2.835937,-5.316406 -3.613281,-8.261719 -0.683594,-2.574218 -0.902344,-5.1875 -0.6875,-7.828125 0.214844,-2.617187 0.910156,-5.117187 2.152344,-7.441406 2.164062,-4.050781 5.503906,-6.710937 9.816406,-8.179687 1.890625,-0.640625 3.835937,-1.058594 5.832031,-1.195313 1.121094,-0.07813 2.242188,-0.152344 3.363281,-0.164062 4.28125,-0.02734 8.4375,0.734375 12.453125,2.175781 1.871094,0.671875 3.6875,1.496094 5.523438,2.257812 0.226562,0.09375 0.4375,0.230469 0.664062,0.351563 -0.164062,0.25 -0.371093,0.160156 -0.539062,0.164062 -2.824219,0.101563 -5.535156,0.703125 -8.132813,1.804688 -1.335937,0.570312 -2.570312,1.316406 -3.648437,2.296875 -2.527344,2.296875 -3.605469,5.15625 -3.34375,8.550781 0.140625,1.855469 0.722656,3.574219 1.550781,5.222656 0.648438,1.296875 1.414063,2.523438 2.292969,3.675782 0.953125,1.25 1.929687,2.484375 2.929687,3.699218 2.085938,2.523438 4.164063,5.054688 6.050782,7.738282 2.203125,3.136718 4.140627,6.417968 5.589847,9.980468 1.16406,2.867188 2.01562,5.820313 2.39843,8.894532 0.25,2.011718 0.30079,4.03125 0.11719,6.058593 -0.24219,2.640625 -0.79297,5.195313 -1.74609,7.667969 -1.29688,3.36328 -3.300784,6.22656 -5.972659,8.63281 -2.429687,2.19141 -5.171875,3.90625 -8.109375,5.3125 -2.695312,1.29297 -5.464843,2.40235 -8.34375,3.20313 -1.953125,0.54687 -3.945312,0.8789 -5.949218,1.15625 -3.035157,0.41797 -6.085938,0.48828 -9.132813,0.3125 -5.328125,-0.3125 -10.476562,-1.46094 -15.410156,-3.52344 -3.449219,-1.44141 -6.691406,-3.25781 -9.757813,-5.39453 -0.183593,-0.12891 -0.378906,-0.25 -0.53125,-0.41016 -0.07031,-0.0703 -0.05859,-0.22656 -0.08203,-0.34375 z m 0,0' id='path4175' /%3E%3Cpath style='fill:%23333f48;fill-opacity:1;fill-rule:nonzero;stroke:none' d='M 94.699219,29.390625 C 94.089844,29.21875 93.476563,29.054688 92.867188,28.875 90.183594,28.085938 87.46875,27.441406 84.703125,27.046875 c -3.976562,-0.566406 -7.945312,-0.59375 -11.863281,0.402344 -7.535156,1.914062 -12.386719,6.71875 -14.878906,13.996094 -0.894532,2.617187 -1.179688,5.328125 -0.953125,8.078125 0.203125,2.484375 0.867187,4.859375 1.816406,7.160156 0.933594,2.261719 2.117187,4.390625 3.4375,6.449219 1.4375,2.25 3.050781,4.371093 4.640625,6.511718 1.4375,1.933594 2.867187,3.871094 4.261719,5.835938 1.230468,1.730469 2.316406,3.546875 3.273437,5.445312 1.324219,2.625 2.265625,5.378907 2.703125,8.292969 0.433594,2.902344 0.292969,5.765625 -0.660156,8.5625 -0.9375,2.74609 -2.574219,5.00781 -4.777344,6.875 -2.417969,2.04688 -5.203125,3.39844 -8.246094,4.22266 -1.835937,0.5 -3.703125,0.75781 -5.609375,0.82031 -3.886718,0.13281 -7.679687,-0.47266 -11.421875,-1.46094 -2.261718,-0.59765 -4.488281,-1.33203 -6.695312,-2.11328 -0.207031,-0.0742 -0.40625,-0.16797 -0.597656,-0.25 -0.02344,-0.24609 0.148437,-0.19141 0.25,-0.20703 1.96875,-0.30469 3.921875,-0.67969 5.804687,-1.34766 1.367188,-0.48437 2.671875,-1.10156 3.855469,-1.94922 2.25,-1.61328 3.65625,-3.765621 4.0625,-6.515621 0.273437,-1.867188 0.09375,-3.710938 -0.429688,-5.527344 -0.472656,-1.648437 -1.171875,-3.199219 -2.109375,-4.628906 -0.792968,-1.207031 -1.636718,-2.382813 -2.523437,-3.519531 -0.921875,-1.195313 -1.921875,-2.328125 -2.890625,-3.484375 -2.753906,-3.273438 -5.351563,-6.660157 -7.523438,-10.355469 -2.042968,-3.480469 -3.667968,-7.136719 -4.597656,-11.078125 -0.640625,-2.699219 -0.980469,-5.4375 -0.832031,-8.214844 0.238281,-4.53125 1.476562,-8.78125 3.824219,-12.6875 1.082031,-1.800781 2.445312,-3.375 3.988281,-4.800781 2.742187,-2.527344 5.863281,-4.480469 9.257812,-5.992188 3.746094,-1.667968 7.652344,-2.769531 11.707032,-3.394531 3.152343,-0.488281 6.324218,-0.671875 9.507812,-0.519531 8.632813,0.410156 16.671875,2.792969 24,7.433594 0.08203,0.05078 0.152344,0.109375 0.230469,0.167968 -0.0039,0.04297 -0.0078,0.08984 -0.01563,0.136719' id='path4177' /%3E%3Cpath style='fill:%23333f48;fill-opacity:1;fill-rule:nonzero;stroke:none' d='m 31.699219,38.75 c -0.07813,0.238281 -0.152344,0.476563 -0.238281,0.710938 -1.460938,4.074218 -2.066407,8.28125 -1.808594,12.59375 0.4375,7.304687 2.808594,13.925781 7.277344,19.753906 3.714843,4.84375 7.441406,9.671875 11.167968,14.503906 1.113282,1.441406 1.953125,3.007813 2.414063,4.777344 0.332031,1.257812 0.425781,2.539062 0.273437,3.820312 -0.214843,1.832032 -1.070312,3.34375 -2.464843,4.546875 -0.984375,0.851559 -2.113282,1.449219 -3.316407,1.925779 -1.378906,0.54297 -2.8125,0.89063 -4.273437,1.1211 -2.226563,0.35547 -4.46875,0.46093 -6.722656,0.41015 -0.589844,-0.0156 -1.046875,-0.18359 -1.433594,-0.625 -0.636719,-0.72265 -1.335938,-1.39062 -1.9375,-2.14062 C 25.574219,93.800781 22.300781,86.621094 20.84375,78.636719 20.152344,74.835938 19.917969,71 20.15625,67.128906 20.796875,56.773438 24.390625,47.574219 30.859375,39.480469 c 0.21875,-0.273438 0.453125,-0.53125 0.679688,-0.796875 0.05469,0.02344 0.109375,0.04297 0.160156,0.06641' id='path4179' /%3E%3Cpath style='fill:%23333f48;fill-opacity:1;fill-rule:nonzero;stroke:none' d='m 105.41016,101.30078 c -0.13282,-0.3125 0.0234,-0.5039 0.0977,-0.69922 1.38672,-3.749997 1.98047,-7.628904 1.89844,-11.621091 -0.14453,-6.84375 -2.08594,-13.144531 -5.73437,-18.925781 C 99.890625,67.226563 97.917969,64.53125 95.835938,61.917969 94.4375,60.160156 92.988281,58.4375 91.582031,56.6875 90.632813,55.511719 89.6875,54.335938 88.792969,53.121094 c -0.835938,-1.144531 -1.488281,-2.398438 -1.953125,-3.742188 -0.523438,-1.515625 -0.695313,-3.070312 -0.511719,-4.652343 0.21875,-1.839844 1.082031,-3.339844 2.476563,-4.542969 1.039062,-0.890625 2.230468,-1.507813 3.503906,-1.980469 1.632812,-0.609375 3.320312,-0.960937 5.046875,-1.175781 1.917969,-0.238281 3.839841,-0.269531 5.769531,-0.230469 0.52734,0.01172 0.89453,0.203125 1.23828,0.585938 5.50391,6.113281 9.26172,13.144531 11.21875,21.132812 1.11719,4.554688 1.5625,9.179688 1.30469,13.855469 -0.58203,10.625 -4.23438,20.082031 -10.96094,28.339846 -0.15625,0.1914 -0.32812,0.375 -0.51562,0.58984' id='path4181' /%3E%3Cpath style='fill:%23333f48;fill-opacity:1;fill-rule:nonzero;stroke:none' d='m 39.796875,108.63281 c -0.05859,0.0117 -0.117187,0.0234 -0.175781,0.0352 0.05469,-0.0156 0.113281,-0.0312 0.167969,-0.0469 z m 0,0' id='path4183' /%3E%3C/g%3E%3C/svg%3E)
 Play animation
 Play step-by-step
 Repeat (toggle)
 Full Screen
 Pause
Pause Stop
Stop
Drill 1 (5 mins)
Topic: Defending with a lone striker, withdrawn striker, and midfield 4
Initials Representation: B1= Block 1. B2= Block 2. B3 = Block 3
Drill 1: Formation 7v6
Blues (Attacking team): 1-4-2
Goalkeeper, 2 center back, 2 fullbacks, 1 defending midfielder, 1 striker
Reds (Defending team): 4-1-1
2 wide midfielders, 2 center midfield, 1 withdrawn striker, 1 lone striker
Blues (9v9) would be 4-2-2
(11v11) would be 4-4-2
Reds (9v9) would be 2-4-1-1
(11v11) would be 4-4-1-1
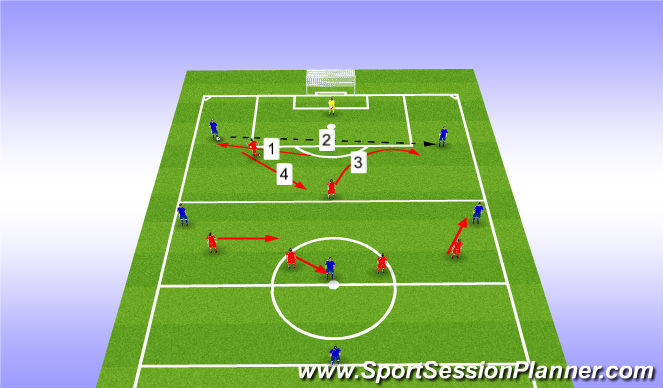
Session Description: Drill 1 (4 mins play)
Red team will be defending from the front using the lone striker (9) as the trigger player to engage, following by the withdrawn striker (10) rotating when necessary. Blue team will try to play out from the back with the intention to break through midfield to complete a pass to their striker who is restricted in the shaded area (only for the first drill).
Three different scenarios will be introduced and demonstrated throughout the whole session.
- First scenario. The goalkeeper passes the ball to the left or right center back which will set the trigger for the lone striker (9) to press and showing the defender outside forcing him to play wide. When that happens, the midfield four should tuck in nice and compact within the direction of the ball, whilst be screening opposition's player positions to prevent any gaps for through balls.
Conditions:
BlueTeam:
-Must always play out from the back starting with the goalkeeper.
-Players must stay inside their Blocked area (B1,B2,B3)
-Fullback must stay inside the channel of B2, and B1
- Center back must stay in B3
Reds
-Specific Players must stay inside their Blocked area (B1,B2,B3) when out of possession
-Midfield 4 must stay inside B2
-Lone striker and Withdrawn striker must stay inside B3
- 8 seconds to score when you win the ball back
- Shadow defense
Pedagogy:
-3 different match realistic scenarios
-Timing & planning
-1 minutes of session introduction
-1 minutes coaching process
-4 minutes play for each drill session (x3)
-15 minutes of Small Sided Game