Football/Soccer Session (Academy Sessions): SSE - Tactical Session - DP1 Low-Block Protection

Southside Eagles Football Club
Sam Gahan
Description
Key Aims of Session:
- Improve defensive compactness in a low-block structure.
- Force opposition play into wide areas to limit central penetration.
- Enhance communication and coordination between defensive units.
- Develop structured pressing triggers and reactions.
Cycle: 2
Week: 10
Session: 21
See the guidance at the top of this page to understand why you are not seeing interactive Football/Soccer images.
See the guidance at the top of this page to understand why you are not seeing interactive Football/Soccer images.
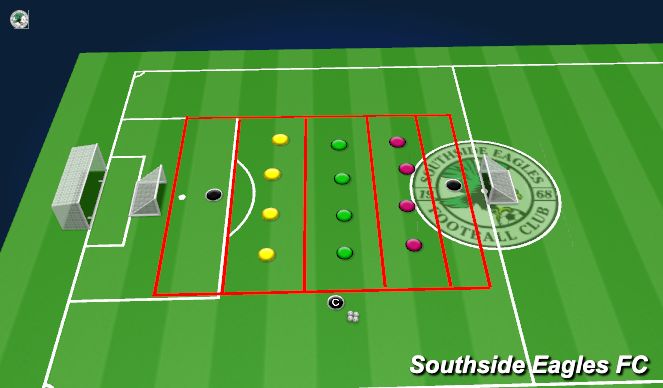
Drill 2 – 4v4v4+2 Defensive Transition Drill
Phase of Play: Defensive Phase
Main Principle: DP1 - Protection
Sub-Principle: Defensive Low Block Structure & Shape
Objective:
- Develop defensive shape and pressing triggers while maintaining compactness in a low block.
- Force play wide and prevent split passes through central areas.
Organisation:
- Teams: Three teams of four + 2 extras
- Area Size: 20m x 30m.
- Time: 1.5 minutes per team in the middle.
- Sets: Each team rotates into the middle twice.
- Equipment:
- Flat discs.
- Balls.
- Bibs (3 x 4 sets).
- Cones.
Explanation:
Progression 1 – Fixed Zones
- Three teams split into three zones (defensive third, middle third, attacking third).
- The team in possession must complete four passes, including one to the goalkeeper, before switching play to the opposite end.
- The defensive team in the middle third aims to block passing lanes and shift as a compact unit to deny penetration.
Progression 2 – Pressing Allowed
- Middle third defenders can now press into the attacking zone to try and win possession.
- If they win the ball, they must find their teammate in the middle third and attempt to score in a mini goal.
- The goalkeeper’s zone is a safe zone for the team in possession.
Scoring System:
- 1 point: Switching the ball via a wide pass.
- 2 points: Splitting two defenders in the middle third with a central pass.
- 5 points: Defensive team winning possession and scoring in the mini goal.
Coaching Adjustments:
- If defenders win the ball too easily, widen the area to make ball retention easier.
- If switching is too easy, reduce the width to create more defensive pressure.
- If middle defenders stretch too much, introduce four defensive zones in the middle to improve compactness and positioning.
Coaching Points:
- Defensive shape and shuffling – Middle defenders must move as a unit, staying compact and blocking passing lanes.
- Body positioning – Defenders should show play wide and be ready to press when the ball is in motion.
- Compactness – Maintain depth when shifting to avoid becoming square.
- Communication – Defenders must talk and adjust positions together to prevent gaps.
- Deny central access – Priority is to force play wide and prevent split passes through the defensive block.
See the guidance at the top of this page to understand why you are not seeing interactive Football/Soccer images.
10 mins
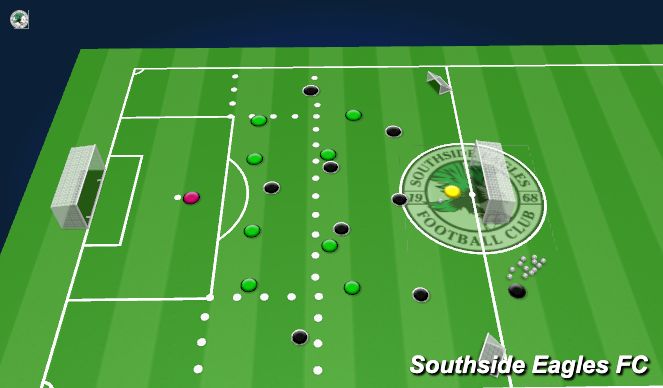
Training Game – Defending the Final Third
Phase of Play: Defensive Phase
Main Principle: DP1 - Protection
Sub-Principle: Defensive Low Block Structure & Shape
Objective:
- Develop defensive compactness in the final third.
- Prevent central penetration, force play wide, and stop crosses.
- Improve defensive transitions and counter-attacking opportunities.
Organisation:
- Teams: 8v8 (including goalkeepers).
- Formations:
- Greens (Defensive Team): 4-4-2.
- Blacks (Attacking Team): 4-3-3.
- Area Size: ¾ pitch.
- Zones Marked:
- Zone 14 (central attacking area).
- Zones 13 & 15 (wide entry zones).
- Zones 16 & 18 (crossing areas).
- Goals: 2 full-size goals + 2 mini goals.
- Balls: 20 balls stationed with the assistant coach.
- Timings: 2 x 4-minute periods with 1-minute intervals.
Explanation:
Starting Scenario:
- Play begins with the attacking team's goalkeeper, distributing to a full-back or central midfielder.
- The defensive team (Greens) must maintain shape, staying compact in Zone 14 and forcing play wide.
- The attacking team (Blacks) aims to break down the defensive block to create scoring opportunities.
Progressions:
- Progression 1 (First 4-Minute Block): Defending Zone 14, maintaining a compact shape, staying connected between midfield and defensive lines, and forcing play wide into Zones 13 & 15.
- Progression 2 (Second 4-Minute Block): Defending crosses from Zones 16 & 18, pressing the ball aggressively with the nearest defender while preventing deliveries into the penalty area.
Scoring System:
- Attacking Team (IP): Goals scored in the large goal.
- Defending Team (OP): Successfully clearing a cross or winning possession and transitioning to score in the mini goals within 8 seconds.
Coaching Points:
Out of Possession:
- Maintain narrow shape and force play wide, leaving the furthest player unmarked.
- Protect space between defensive and midfield lines.
- Prevent through passes by blocking passing lanes in Zone 14.
- Lock onto central attackers early to deny them space.
- Press aggressively in Zones 16 & 18 to delay or block the cross.
- Show play into areas where the defensive team can create pressing traps.
In Possession (Transition to Attack):
- Break out quickly under pressure upon winning the ball.
- Identify the highest available target to progress the attack.
- Use the two mini goals or a forward pass to transition effectively.
- Move the ball with pace to exploit spaces left by the attacking team.
Conditions, Challenges & Targets:
- Conditions: Attacking team has a numerical overload to simulate game-like attacking pressure.
- Challenges:
- Can the defensive team lock onto central attackers early to deny them time on the ball?
- Can the defensive team win possession and transition within 8 seconds?
- Can defenders work as a unit to prevent service from wide areas?
- Progressions:
- First progression: Defend Zone 14, force play wide.
- Second progression: Defend and stop crosses in Zones 16 & 18.
See the guidance at the top of this page to understand why you are not seeing interactive Football/Soccer images.
15 mins
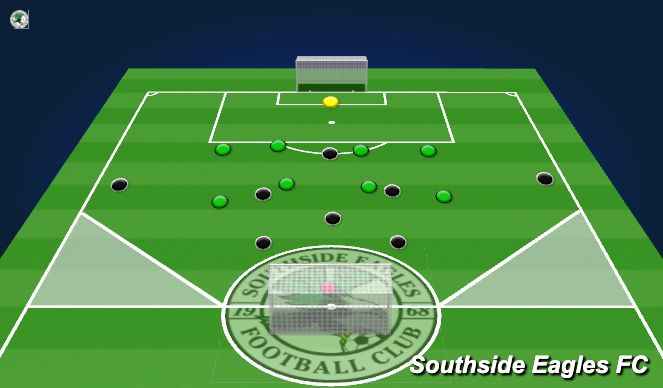
Tactical Game – Defending in Low Block
Phase of Play: Defensive Phase
Main Principle: DP1 - Protection
Sub-Principle: Defensive Low Block Structure & Shape
Objective:
- Improve compactness and central defensive structure.
- Force opposition into wide areas to limit central penetration.
- Ensure defensive unit moves as a connected block.
Organisation:
- Teams: 8v8
- Formations:
- Greens (Defensive Team): 4-4-2
- Blacks (Attacking Team): 4-3-3
- Area Size: Adjusted half-pitch with wide zones near the attacking goal cut off.
- Duration: 3 x 4-minute blocks with coaching interventions.
- Starting Scenario: Ball begins with the attacking team’s central midfielders (#6s).
Blocks & Coaching Focus:
Block 1 – Can we be compact and defend centrally?
- Allow the first pass to the opposition’s #6s to maintain compactness.
- Ensure narrow distances between the three central midfielders to prevent gaps.
Block 2 – Can the #10 lock the ball outside and force play wide?
- #10 must arc their run to force the ball outside, cutting off passes to the opposite #6 and goalkeeper.
- Ball-side full-back stays loose to the winger to encourage the pass before engaging 1v1.
- Ball-side CDM locks onto their #10 while the far-side CDM tucks over.
- Far-side winger tucks in, leaving the opposition’s far-side winger and CDM unmarked.
Block 3 – Check understanding and allow decision-making.
- Let players adjust their defensive movements based on live scenarios.
- Encourage problem-solving and real-time adaptations.
Roles & Responsibilities:
Goalkeeper:
- Provide constant communication on opposition positioning.
- Organise defensive line movements and ensure compact distances.
Centre-Backs:
- Track the opposition striker’s movement.
- Step the line up when a backwards pass occurs.
- Maintain defensive shape and provide vocal leadership.
Full-Backs:
- Stay close to the centre-backs to prevent gaps.
- Far-side full-back tucks inside to defend the back post when the ball is on the opposite side.
- Engage 1v1 in wide areas only when the opposition is forced outside.
Central Defensive Midfielders (CDMs):
- Maintain central compactness, shifting as a unit with ball movement.
- Disrupt passing lanes and time interceptions effectively.
- Focus on second-ball recovery and regaining possession.
Attacking Midfielder (CAM/#10):
- Shuffle across with the defensive block to prevent central penetration.
- Cover passing lanes into the opposition #10s.
- Press aggressively on poor touches to force turnovers.
Opposition Management:
- Encourage the attacking team to exploit central spaces where possible.
- Emphasise forward play to challenge the defensive structure.
Intervention Strategies & Coaching Position:
- Walkthrough: Initial defensive structure explanation using the ball.
- Tactics Board: Used to illustrate key adjustments before Block 2.

 Play animation
 Play step-by-step
 Repeat (toggle)
 Full Screen
 Pause
Pause Stop
Stop
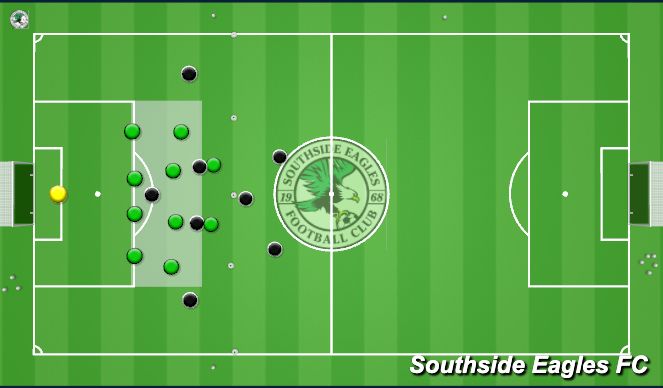
Warm-Up - Framing Drill
Phase of Play: Defensive Phase
Main Principle: DP1 - Protection
Sub-Principle: Defensive Low Block Structure & Shape
Objective:
To establish a structured defensive shape in a low block, focusing on compactness, shifting, and protecting the box when under pressure.
Set-Up:
Coaching Points:
Scenario-Based Solutions:
???? Problem 1: Opposition CBs switch play and deliver a cross into the box.
???? Problem 2: Opposition switches play, using half-space combinations to penetrate centrally.
This warm-up sets the defensive framework before transitioning into active defending under pressure in the next drill.