


Hockey Session (Under 18s): Moves like Jagger - FK, VO, CB

SportWays SUPER Academy
SportWays team
Profile Summary

| Name: | SportWays team |
|---|---|
| City: | Amsterdam |
| Country: | Netherlands |
| Membership: | Adult Member |
| Sport: | Hockey |
See the guidance at the top of this page to understand why you are not seeing interactive Hockey images.
See the guidance at the top of this page to understand why you are not seeing interactive Hockey images.
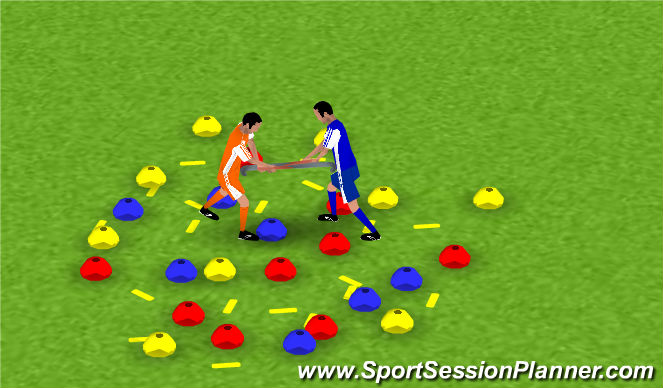
Warm-up
Essence:
Warming the body and mind for an Intense Clinic!
Structure:
Two player holding 1 stick in a field of cones, flaps and other stoft equipment. (enkle danger)
Objectieve is to not touch a cone with your feet and to pull/push the other player so (s)he steps on a cone.
First to 5 touches loses/ Winner after 20 sec. with the least amount of touches.
Pointers:
Variations:
See the guidance at the top of this page to understand why you are not seeing interactive Hockey images.
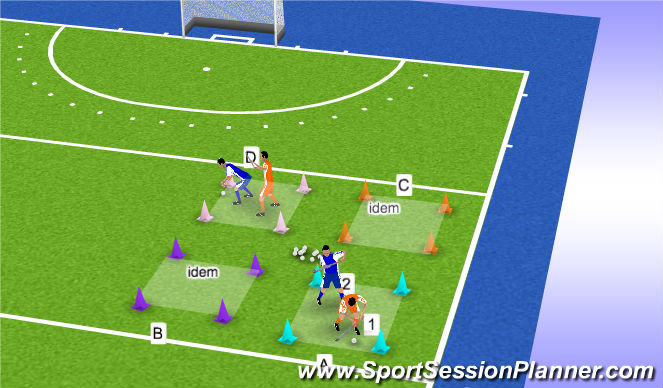
Happy Feet (15 mins)
Essence: Protect the ball
Move your body and feet the protect the ball from the opponent
Structure:
Size squares should be changed to size players. Distance between squares shouldn't be bigger then 2 stick lengths.
1) In every square are two players without stick.
Player 1 has a ball which he needs to keep in the square protect by keeping his body between the ball and the opponent, player 2. Objectieve is to hold the ball for 5 sec in the square. Succes? Then switch.
Player 2 need to put the ball out of the square.
When the ball is out the square throw in a new. Pushing is allowed. Kicking, hitting, grabbing and diving isn't allowed.
2) Both players have sticks.
Same objectieve but now player 1 needs to control with stick and player 2 plays with grip.
3) 2v1
Playing field: square A and B (or C and D)
In square A there is still player 1 vs player 2, but player 1 has an escape: he can pass the ball to square B where there is a teammate. This player has the same objectieve as player 1. Before able to pass to the other square, the player needs to hold the ball for at least 3 sec. (variates on level of players)
Objectieve is to keep the ball in the team for 10 sec.
Pointers:
1,2)
Stay low
Use hands to maneuver the ball
Keep the ball moving
Move the feet/body to block player 2 from getting the ball
3)
Use the escape when in trouble
Variations:
+/- change the time (3 sec/10 sec)
+/- larger/smaller square
+/- longer/shorter rest period between go's. (it's good if the players get a bit fatigued, then there needs to be a bigger focus on footwork!)
First two can be played with 8 kids at the same time (so a 1v1 in A, B, C and D)
Last form: playing field is free. So ball can go from A to B, but also to C and D.
See the guidance at the top of this page to understand why you are not seeing interactive Hockey images.
Step Up
Essence: High Speed Turning
Being able to turn and chance direction quick is essential in modern hockey. This goes for with and without the ball.
Speed --> Stop --> Speed Time is getting challenged!!
Structure:
1) Set up as many times as needed for the group. A player without ball (with stick) runs to the red gate and just before a player behind him yells left or right. The running player makes the turn around the cone and dribbles back, DON'T GO OUTSIDE THE YELLOW!
Do this max 2 min. Just to get startd with the turning and so you are able to give the first few pointers.
2) Three coness with different colours. Set-up twice and race!
BANG! Start signal and the players run towards the cones. Few meters before reaching the trainer yells a combination of colours and the players have to go around the cones in order. (e.g. BANG!.....YELLOW, RED, YELLOW!) First player of the two to go around the cones and score wins the race!
3) Pick up the cones. The two teams racing eachother give each one player who will throw cones at the other team (Cone-Thrower.) BANG! Startsignal and the two players run in the lane towards the goal. Everytime a Cone-Thrower throws/puts a cone on the ground, the player has to go around it.
The more cones, the more difficult!.
Cone goes outside the lane? Doesn't count anymore!
Player is closer to the goal then the Cone-Thrower? Player is done and can go to the goal. Cone-Thrower needs to throw faster!
Pointers:
- Small steps in and just before the corners
- Get low in the corners
- Adjust your body before the corner. So when e.g. turning left, don't start with turning your body left after the cone, do it before.
- Better to go slower with ball control the to go faster with little control. (Build from here!)
Variations:
- slow pace/ no race (bigger focus on the technique)
+/- smaller/bigger lane
+/- more/less cones
+ ball and body need to go around the cone
++ only forehand
See the guidance at the top of this page to understand why you are not seeing interactive Hockey images.
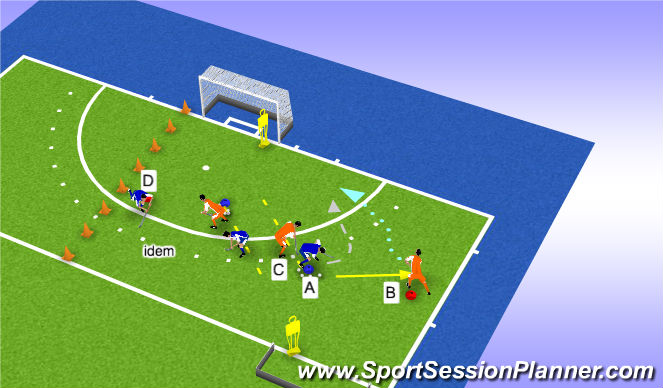
Baseline Shuffle
Essence:
Baseline Defence from outside to inside the D
How does the footwork outside the D changes when entering the D as a defender?
Focus on Defenders!
Structure:
1) Player A passes the ball to player B who makes a run towards the goal. A puts pressure on B.
Same counts for the other side (D,etc.)
2) Same start but B now has a teammate, C, who can only receive the ball between the yellow marks. B can only pass the ball when he is outside the D. So outside the D: 2v1. After entering: 1v1.
3) Rotator
Set up is the same, but when A gets the ball, he plays the ball to player D. D starts the 2v1 immediately towards the other goal.
Pointers:
- Keep distance to the ball outside the D
- Stay in the pass line of B-->C
- Ball on the feet ouside the D is fine/good
- Get closer when inside the D
- Protect the feet with the stick
Variations:
+/- chance the distance of the red cone to the blue cone
+/- chance size of the yellow lane
++ (3) when A gets the ball and passes to D, he joins in the yellow lane
+++ (3) when A gets the ball and passes to D, A and C/B join otherside to play 3v2
?Defend from the basline in the D? Let me know how you would aproach this and how this went!
See the guidance at the top of this page to understand why you are not seeing interactive Hockey images.
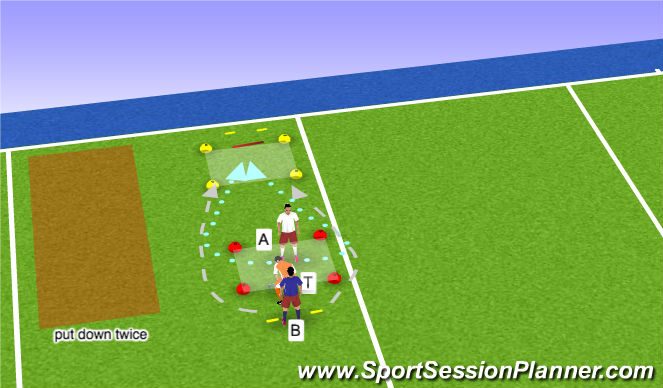
Turn Forrest Turn!
Essence:
180 degree turning from standing still and running. Make sure the squares are not to far from eachother, it's about turning and not conditioning!
Structure:
1) No sticks
Player A in the square with a ball in his hand and player B between the yellow marks. The trainer/another player (T) is crouched between them.
T points left or right. At that moment A needs to exit the square from that side and place the ball in the other square to win. B needs to go around the square on the same side and touch A to win. Rotate.
2) Ball stick
Same set up, both players have ball and stick. A needs to put the ball in the other square. B needs to get to ball. This only goes forward! So it's not aloud for player A to let B get between him and the square (he cannot cut back.)
3) Back to Back
Same set up and start only when A has placed the ball in the other square, he goes around (both) the yellow marks behind the square and start his tackle back. Because B takes the ball out the square, exits left or right and needs to put the ball in the first square again.
This can continue as long senisble, max. 2 turn overs!
Pointers:
- Turn your body (schoulders) at the same time/before turning the feet
- Get low in those corners
- Small steps --> front of the feet
- Cut of the other player if he gets to close
- Dribble the ball on your stick, but far in front of you
Variations:
- Make the squares closer to eachother for more turnovers and less sprinting
+/- chance the size of squares
+ Let player A start with a dribble/high knee/jumps before pointing
++ Let player A do a ladder towards the trainer. He can point at every moment in the ladder
See the guidance at the top of this page to understand why you are not seeing interactive Hockey images.
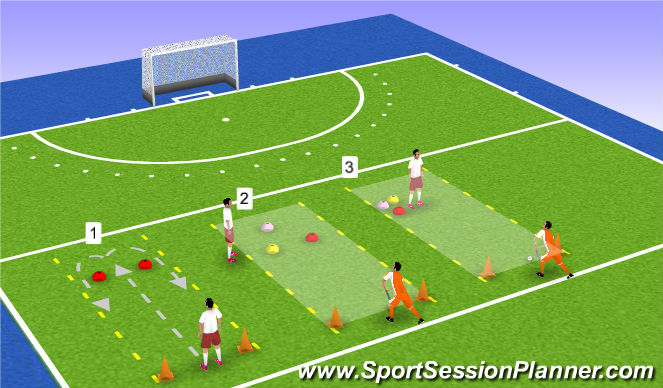
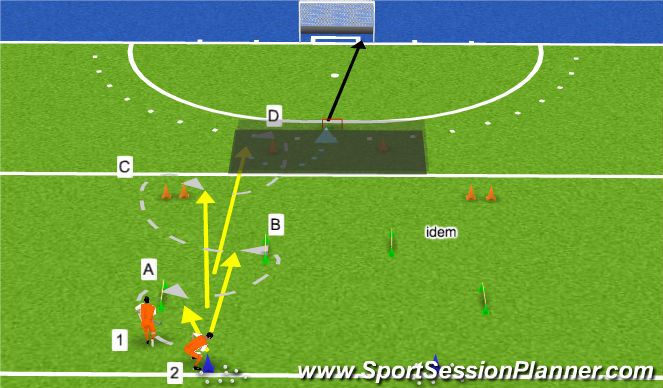
Don't you fall for the Slip
Essence:
Turning and receiving when the focus is on feet insted of the stick
Structure:
Player 1 drops the ball for player two. (A) 1 goes outside and jump over the bar (/cones/tournementbox/etc.) and just before landing 2 passes the ball and 1 receives in landing. Passes back and does the same at (B). At (C) player 1 put hand on the ground on the inside of the dubbel cones and walks around the outisde of the cones. 2 passes the ball and 1 receives with still one hand on the ground, low stick. After reception, 1 drops the ball and does the same at (D) with the forehand. Only at (D) 1 has to do it on a sliding mat! So extra focus!
After reception 1 goes around the cone with the ball and shoots!
Pointers:
- Player 2 needs to follow a bit so the pass is easier.
- The pass should be ferly quick after a cone or jump. Preferebly just before going around/ jump.
No strict pointers. It's trail and error. Instead of coaching the players, this is a good exersice to let them experience and help each other. Call them in a few times and share the findings.
Variations:
- no sliding mat
+/- instead of jumping over something, let them crawl under somthing and pass when they're standing up.
+/- faster or slower
-- if to hard: first start without ball or put static balls at every cone.
'%3E%3Cpath id='path4169' d='M 11.4375,70.25 C 11.457031,38.394531 37.277344,13.242188 68.253906,13.050781 99.78125,12.855469 125.73047,38.351563 125.8125,70.078125 125.89844,101.62109 100.43359,127.14063 69.148438,127.42188 37.582031,127.70703 11.464844,102.23438 11.4375,70.25 m 6.425781,-0.08984 c 0.03516,28.421871 23.027344,50.69922 50.519532,50.82031 C 96.433594,121.10156 119.30469,98.367188 119.38281,70.359375 119.45313,42.878906 97.382813,19.714844 69.015625,19.496094 40.75,19.277344 17.964844,42.035156 17.863281,70.160156' style='clip-rule:nonzero;fill:%23333f48;fill-opacity:1;fill-rule:nonzero;stroke:none' /%3E%3Cpath style='fill:%23333f48;fill-opacity:1;fill-rule:nonzero;stroke:none' d='m 39.789063,108.62109 c 0.28125,0.14454 0.550781,0.32032 0.839843,0.4336 2.734375,1.05469 5.554688,1.78125 8.453125,2.23047 2.734375,0.42578 5.484375,0.64453 8.25,0.54297 3.988282,-0.15625 7.832032,-0.94922 11.445313,-2.69532 1.683594,-0.8164 3.246094,-1.82422 4.640625,-3.07422 3.265625,-2.92578 5.171875,-6.582027 5.796875,-10.906246 0.546875,-3.761719 0.04687,-7.425781 -1.09375,-11.019531 -1.4375,-4.523438 -3.730469,-8.582032 -6.703125,-12.265625 -1.03125,-1.277344 -2.082031,-2.535157 -3.113281,-3.808594 C 66.789063,66.1875 65.332031,64.269531 64.0625,62.21875 c -1.601562,-2.582031 -2.835937,-5.316406 -3.613281,-8.261719 -0.683594,-2.574218 -0.902344,-5.1875 -0.6875,-7.828125 0.214844,-2.617187 0.910156,-5.117187 2.152344,-7.441406 2.164062,-4.050781 5.503906,-6.710937 9.816406,-8.179687 1.890625,-0.640625 3.835937,-1.058594 5.832031,-1.195313 1.121094,-0.07813 2.242188,-0.152344 3.363281,-0.164062 4.28125,-0.02734 8.4375,0.734375 12.453125,2.175781 1.871094,0.671875 3.6875,1.496094 5.523438,2.257812 0.226562,0.09375 0.4375,0.230469 0.664062,0.351563 -0.164062,0.25 -0.371093,0.160156 -0.539062,0.164062 -2.824219,0.101563 -5.535156,0.703125 -8.132813,1.804688 -1.335937,0.570312 -2.570312,1.316406 -3.648437,2.296875 -2.527344,2.296875 -3.605469,5.15625 -3.34375,8.550781 0.140625,1.855469 0.722656,3.574219 1.550781,5.222656 0.648438,1.296875 1.414063,2.523438 2.292969,3.675782 0.953125,1.25 1.929687,2.484375 2.929687,3.699218 2.085938,2.523438 4.164063,5.054688 6.050782,7.738282 2.203125,3.136718 4.140627,6.417968 5.589847,9.980468 1.16406,2.867188 2.01562,5.820313 2.39843,8.894532 0.25,2.011718 0.30079,4.03125 0.11719,6.058593 -0.24219,2.640625 -0.79297,5.195313 -1.74609,7.667969 -1.29688,3.36328 -3.300784,6.22656 -5.972659,8.63281 -2.429687,2.19141 -5.171875,3.90625 -8.109375,5.3125 -2.695312,1.29297 -5.464843,2.40235 -8.34375,3.20313 -1.953125,0.54687 -3.945312,0.8789 -5.949218,1.15625 -3.035157,0.41797 -6.085938,0.48828 -9.132813,0.3125 -5.328125,-0.3125 -10.476562,-1.46094 -15.410156,-3.52344 -3.449219,-1.44141 -6.691406,-3.25781 -9.757813,-5.39453 -0.183593,-0.12891 -0.378906,-0.25 -0.53125,-0.41016 -0.07031,-0.0703 -0.05859,-0.22656 -0.08203,-0.34375 z m 0,0' id='path4175' /%3E%3Cpath style='fill:%23333f48;fill-opacity:1;fill-rule:nonzero;stroke:none' d='M 94.699219,29.390625 C 94.089844,29.21875 93.476563,29.054688 92.867188,28.875 90.183594,28.085938 87.46875,27.441406 84.703125,27.046875 c -3.976562,-0.566406 -7.945312,-0.59375 -11.863281,0.402344 -7.535156,1.914062 -12.386719,6.71875 -14.878906,13.996094 -0.894532,2.617187 -1.179688,5.328125 -0.953125,8.078125 0.203125,2.484375 0.867187,4.859375 1.816406,7.160156 0.933594,2.261719 2.117187,4.390625 3.4375,6.449219 1.4375,2.25 3.050781,4.371093 4.640625,6.511718 1.4375,1.933594 2.867187,3.871094 4.261719,5.835938 1.230468,1.730469 2.316406,3.546875 3.273437,5.445312 1.324219,2.625 2.265625,5.378907 2.703125,8.292969 0.433594,2.902344 0.292969,5.765625 -0.660156,8.5625 -0.9375,2.74609 -2.574219,5.00781 -4.777344,6.875 -2.417969,2.04688 -5.203125,3.39844 -8.246094,4.22266 -1.835937,0.5 -3.703125,0.75781 -5.609375,0.82031 -3.886718,0.13281 -7.679687,-0.47266 -11.421875,-1.46094 -2.261718,-0.59765 -4.488281,-1.33203 -6.695312,-2.11328 -0.207031,-0.0742 -0.40625,-0.16797 -0.597656,-0.25 -0.02344,-0.24609 0.148437,-0.19141 0.25,-0.20703 1.96875,-0.30469 3.921875,-0.67969 5.804687,-1.34766 1.367188,-0.48437 2.671875,-1.10156 3.855469,-1.94922 2.25,-1.61328 3.65625,-3.765621 4.0625,-6.515621 0.273437,-1.867188 0.09375,-3.710938 -0.429688,-5.527344 -0.472656,-1.648437 -1.171875,-3.199219 -2.109375,-4.628906 -0.792968,-1.207031 -1.636718,-2.382813 -2.523437,-3.519531 -0.921875,-1.195313 -1.921875,-2.328125 -2.890625,-3.484375 -2.753906,-3.273438 -5.351563,-6.660157 -7.523438,-10.355469 -2.042968,-3.480469 -3.667968,-7.136719 -4.597656,-11.078125 -0.640625,-2.699219 -0.980469,-5.4375 -0.832031,-8.214844 0.238281,-4.53125 1.476562,-8.78125 3.824219,-12.6875 1.082031,-1.800781 2.445312,-3.375 3.988281,-4.800781 2.742187,-2.527344 5.863281,-4.480469 9.257812,-5.992188 3.746094,-1.667968 7.652344,-2.769531 11.707032,-3.394531 3.152343,-0.488281 6.324218,-0.671875 9.507812,-0.519531 8.632813,0.410156 16.671875,2.792969 24,7.433594 0.08203,0.05078 0.152344,0.109375 0.230469,0.167968 -0.0039,0.04297 -0.0078,0.08984 -0.01563,0.136719' id='path4177' /%3E%3Cpath style='fill:%23333f48;fill-opacity:1;fill-rule:nonzero;stroke:none' d='m 31.699219,38.75 c -0.07813,0.238281 -0.152344,0.476563 -0.238281,0.710938 -1.460938,4.074218 -2.066407,8.28125 -1.808594,12.59375 0.4375,7.304687 2.808594,13.925781 7.277344,19.753906 3.714843,4.84375 7.441406,9.671875 11.167968,14.503906 1.113282,1.441406 1.953125,3.007813 2.414063,4.777344 0.332031,1.257812 0.425781,2.539062 0.273437,3.820312 -0.214843,1.832032 -1.070312,3.34375 -2.464843,4.546875 -0.984375,0.851559 -2.113282,1.449219 -3.316407,1.925779 -1.378906,0.54297 -2.8125,0.89063 -4.273437,1.1211 -2.226563,0.35547 -4.46875,0.46093 -6.722656,0.41015 -0.589844,-0.0156 -1.046875,-0.18359 -1.433594,-0.625 -0.636719,-0.72265 -1.335938,-1.39062 -1.9375,-2.14062 C 25.574219,93.800781 22.300781,86.621094 20.84375,78.636719 20.152344,74.835938 19.917969,71 20.15625,67.128906 20.796875,56.773438 24.390625,47.574219 30.859375,39.480469 c 0.21875,-0.273438 0.453125,-0.53125 0.679688,-0.796875 0.05469,0.02344 0.109375,0.04297 0.160156,0.06641' id='path4179' /%3E%3Cpath style='fill:%23333f48;fill-opacity:1;fill-rule:nonzero;stroke:none' d='m 105.41016,101.30078 c -0.13282,-0.3125 0.0234,-0.5039 0.0977,-0.69922 1.38672,-3.749997 1.98047,-7.628904 1.89844,-11.621091 -0.14453,-6.84375 -2.08594,-13.144531 -5.73437,-18.925781 C 99.890625,67.226563 97.917969,64.53125 95.835938,61.917969 94.4375,60.160156 92.988281,58.4375 91.582031,56.6875 90.632813,55.511719 89.6875,54.335938 88.792969,53.121094 c -0.835938,-1.144531 -1.488281,-2.398438 -1.953125,-3.742188 -0.523438,-1.515625 -0.695313,-3.070312 -0.511719,-4.652343 0.21875,-1.839844 1.082031,-3.339844 2.476563,-4.542969 1.039062,-0.890625 2.230468,-1.507813 3.503906,-1.980469 1.632812,-0.609375 3.320312,-0.960937 5.046875,-1.175781 1.917969,-0.238281 3.839841,-0.269531 5.769531,-0.230469 0.52734,0.01172 0.89453,0.203125 1.23828,0.585938 5.50391,6.113281 9.26172,13.144531 11.21875,21.132812 1.11719,4.554688 1.5625,9.179688 1.30469,13.855469 -0.58203,10.625 -4.23438,20.082031 -10.96094,28.339846 -0.15625,0.1914 -0.32812,0.375 -0.51562,0.58984' id='path4181' /%3E%3Cpath style='fill:%23333f48;fill-opacity:1;fill-rule:nonzero;stroke:none' d='m 39.796875,108.63281 c -0.05859,0.0117 -0.117187,0.0234 -0.175781,0.0352 0.05469,-0.0156 0.113281,-0.0312 0.167969,-0.0469 z m 0,0' id='path4183' /%3E%3C/g%3E%3C/svg%3E)
 Play animation
 Play step-by-step
 Repeat (toggle)
 Full Screen
 Pause
Pause Stop
Stop
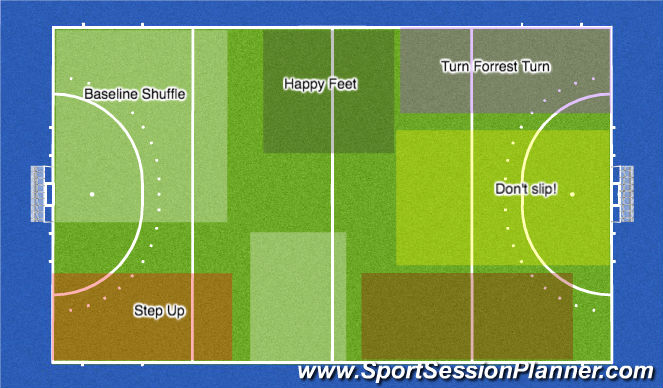
Overview
This Clinic is all about FOOTWORK!!
Higspeed Turning, Protecting the Ball, Baseline Defence! It's all in here!
Set up can be chaned, only "Baseline Shuffle" and "Don't Slip!" are advised to be at the D.
Looks like a lot of words, luckly it looks harder then it is.
.
.
.
Questions? Please connect.
Floris aFlo
floriskuiper.scot@gmail.com
+31 6 50 42 99 51