


Football/Soccer Session (Moderate): MSU-Billings Set Piece Set-Ups
Profile Summary

| Name: | Aaron Champenoy |
|---|---|
| City: | Durango |
| Country: | United States of America |
| Membership: | Adult Member |
| Sport: | Football/Soccer |
See the guidance at the top of this page to understand why you are not seeing interactive Football/Soccer images.
See the guidance at the top of this page to understand why you are not seeing interactive Football/Soccer images.
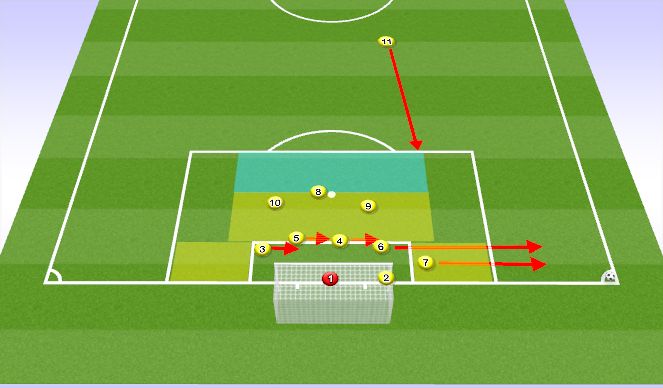
Attacking Corner 1
KEY POINTS:
As player 7 raises hand, player 4 runs hard at an angle towards near post. Player 8 drifts to back side.
While all the action is happening, players 5, 6, 9, 11 jockey for position as player 7 approaches ball, and then make hard runs into box to finish off driven service across goal mouth from player 7. Work to get advantage in front of defender.
Runs: Player 4 goes near post with player 7 following run. Player 8 runs to inside of far post but a bit more central. Player 9 is late and runs into center of 6 yard box.
Player 11 picks up garbage...looking to finish or get ball back out wide for another serve.
Players 2 & 3 are always defensive minded - properly defending together!
1 arm up is normal service, 2 arms up is short corner service

See the guidance at the top of this page to understand why you are not seeing interactive Football/Soccer images.
Wall Set-Up Defending Free Kick

See the guidance at the top of this page to understand why you are not seeing interactive Football/Soccer images.
Defending Free-kick in Def 1/3
Defending a Set Piece from a Scoring Position (Wide Area)
SET UP(Yellow Team):
GK(#1) calls out the number he wants in the wall (*see previous slide for wall recommendations)
* Place two players in the wall(#7, #8) to stop a direct shot at the near post.
- Players should be assigned during training, but GK calls out the wall.
* Four to six markers(#2, #3, #4, #5, #6) at back side of the penalty box. Good man markers and headers of the ball.
* One player(#10) between to prevent a run or shot from other attackers
Special Notes:
*Defensive line must not be too deep as to invite pressure.
*Defensive line must not drop before the ball is kicked.
- Markers must check back shoulder to not allow any unmarked runners to get free.
- Stay ball side and goalside of your runner.
*Should leave one to two players(#11) high to hold defenders back and allow for outlet and counter-attack.
See the guidance at the top of this page to understand why you are not seeing interactive Football/Soccer images.
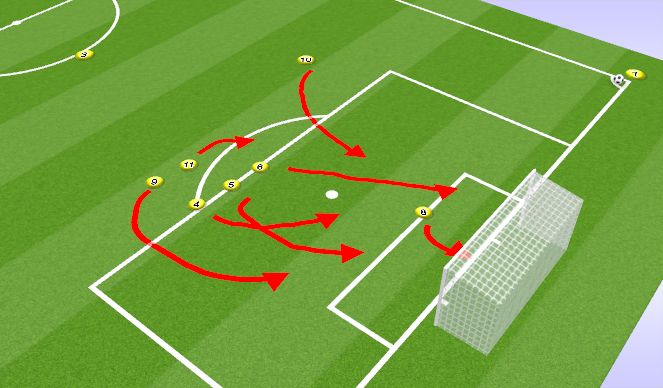
Attacking Set Piece from Wide Area
Attacking Set Piece from a Scoring Position (Wide Area)
SET UP(Yellow Team):
Back Post or Central Service
- #6(right footed): Once the player raises arm can either overlap or move into a central position. 1st option is to overlap, especially if the defense has moved into box to defend and there us only one person in the wall. 2nd option is to move centrally.
- #3(left footed): plays a driven weighted ball behind the defensive line but well in front of the GK, so he can not claim the cross.
- Players #4, #5, #7, #9 who are looking to knock it down in front of goal.
- Player #8 makes a bending run to the back post as initial runners pick defenders during their run into the box. Also, there to play the ball back across if it's overhit.
- Player #2 fronts the opponents outlet, while #11 stays back as safety
- #10: Positions about 24 yards out from goal, Can make run through gap to near post or fake run and stay at edge of box for any ball knocked out or to help prevent counter.
Special Notes:
- 30 yards to inside attacking half.
- Always 2 arms raised to signal back post or central service.
- General in swing: Ball on right side - Left foot; Ball on left side - Right foot.
- Service must be hit well (enough pace GK can't claim it, far enough away he can't punch it).
See the guidance at the top of this page to understand why you are not seeing interactive Football/Soccer images.
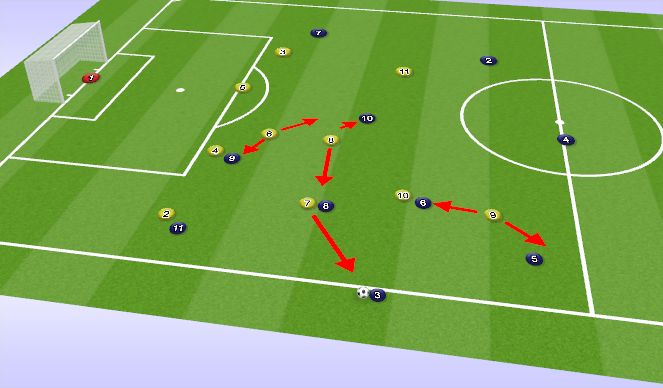
Defending Throw-In in Def 1/3
Defending Throw-Ins in Defensive 1/3
* First objective is to make the play predictable and thus easier to defend. Preferably forcing the back so we can press, or down the line where we can limit options and defend in the channel.
*trying to not allow opponent the opportunity to change the point of attach and switch the play.
* We want to keep a compact well organized shape to back side(Left Back #3 and Left Wing #11) will tuck in to the middle of the field to take away space initially
- #9 will pinch over and take away near CB for opposing team.
- #7 will tuck back and take way closest supporting Navy CM
- #2 will take away Navy LW and be ready as this is the likely target unless its a long throw.
- #4 will take away Navy ST, while #5 balances the open space in the middle and reads the play
- #6 will read play and can help double Navy ST,or step forward give support in the middle vs. Navy CMs.
- #8 will read play and can help double nearest Navy CM, or drop into the middle to take away free Navy CM.
- #10 pinches over to take away deeper lying Navy CM.
Notes:
- If the ball is bounced back to the thrower, #7 will shift to pressure ball, #6 and #8 will slide to take away open Navy CMs.
- Initially defenders must make sure not to be beaten over the top, so stay goal side
- Players must be aware of body shape on back side and know where runners are coming from.
- As ball is played in and possibly bounced, defending team must press together as a unit if the opportunity presents

See the guidance at the top of this page to understand why you are not seeing interactive Football/Soccer images.
Attacking Throw-In
Attacking Throw-Ins in Offensive 1/3(Medium Throw)
- Initial movement from #11 to create space for #10 to move into.
- #10 attempts to flick the ball onto the middle of the box.
- #9, #4, #7 make slashing runs in behind and attempt to finish
- #8 initially make run toward thrower and then recovers centrally to defend a possible counter to play ball back into box.
Notes:
- Throw must have enough pace to allow the flick on to be played into the center of the box.
'%3E%3Cpath id='path4169' d='M 11.4375,70.25 C 11.457031,38.394531 37.277344,13.242188 68.253906,13.050781 99.78125,12.855469 125.73047,38.351563 125.8125,70.078125 125.89844,101.62109 100.43359,127.14063 69.148438,127.42188 37.582031,127.70703 11.464844,102.23438 11.4375,70.25 m 6.425781,-0.08984 c 0.03516,28.421871 23.027344,50.69922 50.519532,50.82031 C 96.433594,121.10156 119.30469,98.367188 119.38281,70.359375 119.45313,42.878906 97.382813,19.714844 69.015625,19.496094 40.75,19.277344 17.964844,42.035156 17.863281,70.160156' style='clip-rule:nonzero;fill:%23333f48;fill-opacity:1;fill-rule:nonzero;stroke:none' /%3E%3Cpath style='fill:%23333f48;fill-opacity:1;fill-rule:nonzero;stroke:none' d='m 39.789063,108.62109 c 0.28125,0.14454 0.550781,0.32032 0.839843,0.4336 2.734375,1.05469 5.554688,1.78125 8.453125,2.23047 2.734375,0.42578 5.484375,0.64453 8.25,0.54297 3.988282,-0.15625 7.832032,-0.94922 11.445313,-2.69532 1.683594,-0.8164 3.246094,-1.82422 4.640625,-3.07422 3.265625,-2.92578 5.171875,-6.582027 5.796875,-10.906246 0.546875,-3.761719 0.04687,-7.425781 -1.09375,-11.019531 -1.4375,-4.523438 -3.730469,-8.582032 -6.703125,-12.265625 -1.03125,-1.277344 -2.082031,-2.535157 -3.113281,-3.808594 C 66.789063,66.1875 65.332031,64.269531 64.0625,62.21875 c -1.601562,-2.582031 -2.835937,-5.316406 -3.613281,-8.261719 -0.683594,-2.574218 -0.902344,-5.1875 -0.6875,-7.828125 0.214844,-2.617187 0.910156,-5.117187 2.152344,-7.441406 2.164062,-4.050781 5.503906,-6.710937 9.816406,-8.179687 1.890625,-0.640625 3.835937,-1.058594 5.832031,-1.195313 1.121094,-0.07813 2.242188,-0.152344 3.363281,-0.164062 4.28125,-0.02734 8.4375,0.734375 12.453125,2.175781 1.871094,0.671875 3.6875,1.496094 5.523438,2.257812 0.226562,0.09375 0.4375,0.230469 0.664062,0.351563 -0.164062,0.25 -0.371093,0.160156 -0.539062,0.164062 -2.824219,0.101563 -5.535156,0.703125 -8.132813,1.804688 -1.335937,0.570312 -2.570312,1.316406 -3.648437,2.296875 -2.527344,2.296875 -3.605469,5.15625 -3.34375,8.550781 0.140625,1.855469 0.722656,3.574219 1.550781,5.222656 0.648438,1.296875 1.414063,2.523438 2.292969,3.675782 0.953125,1.25 1.929687,2.484375 2.929687,3.699218 2.085938,2.523438 4.164063,5.054688 6.050782,7.738282 2.203125,3.136718 4.140627,6.417968 5.589847,9.980468 1.16406,2.867188 2.01562,5.820313 2.39843,8.894532 0.25,2.011718 0.30079,4.03125 0.11719,6.058593 -0.24219,2.640625 -0.79297,5.195313 -1.74609,7.667969 -1.29688,3.36328 -3.300784,6.22656 -5.972659,8.63281 -2.429687,2.19141 -5.171875,3.90625 -8.109375,5.3125 -2.695312,1.29297 -5.464843,2.40235 -8.34375,3.20313 -1.953125,0.54687 -3.945312,0.8789 -5.949218,1.15625 -3.035157,0.41797 -6.085938,0.48828 -9.132813,0.3125 -5.328125,-0.3125 -10.476562,-1.46094 -15.410156,-3.52344 -3.449219,-1.44141 -6.691406,-3.25781 -9.757813,-5.39453 -0.183593,-0.12891 -0.378906,-0.25 -0.53125,-0.41016 -0.07031,-0.0703 -0.05859,-0.22656 -0.08203,-0.34375 z m 0,0' id='path4175' /%3E%3Cpath style='fill:%23333f48;fill-opacity:1;fill-rule:nonzero;stroke:none' d='M 94.699219,29.390625 C 94.089844,29.21875 93.476563,29.054688 92.867188,28.875 90.183594,28.085938 87.46875,27.441406 84.703125,27.046875 c -3.976562,-0.566406 -7.945312,-0.59375 -11.863281,0.402344 -7.535156,1.914062 -12.386719,6.71875 -14.878906,13.996094 -0.894532,2.617187 -1.179688,5.328125 -0.953125,8.078125 0.203125,2.484375 0.867187,4.859375 1.816406,7.160156 0.933594,2.261719 2.117187,4.390625 3.4375,6.449219 1.4375,2.25 3.050781,4.371093 4.640625,6.511718 1.4375,1.933594 2.867187,3.871094 4.261719,5.835938 1.230468,1.730469 2.316406,3.546875 3.273437,5.445312 1.324219,2.625 2.265625,5.378907 2.703125,8.292969 0.433594,2.902344 0.292969,5.765625 -0.660156,8.5625 -0.9375,2.74609 -2.574219,5.00781 -4.777344,6.875 -2.417969,2.04688 -5.203125,3.39844 -8.246094,4.22266 -1.835937,0.5 -3.703125,0.75781 -5.609375,0.82031 -3.886718,0.13281 -7.679687,-0.47266 -11.421875,-1.46094 -2.261718,-0.59765 -4.488281,-1.33203 -6.695312,-2.11328 -0.207031,-0.0742 -0.40625,-0.16797 -0.597656,-0.25 -0.02344,-0.24609 0.148437,-0.19141 0.25,-0.20703 1.96875,-0.30469 3.921875,-0.67969 5.804687,-1.34766 1.367188,-0.48437 2.671875,-1.10156 3.855469,-1.94922 2.25,-1.61328 3.65625,-3.765621 4.0625,-6.515621 0.273437,-1.867188 0.09375,-3.710938 -0.429688,-5.527344 -0.472656,-1.648437 -1.171875,-3.199219 -2.109375,-4.628906 -0.792968,-1.207031 -1.636718,-2.382813 -2.523437,-3.519531 -0.921875,-1.195313 -1.921875,-2.328125 -2.890625,-3.484375 -2.753906,-3.273438 -5.351563,-6.660157 -7.523438,-10.355469 -2.042968,-3.480469 -3.667968,-7.136719 -4.597656,-11.078125 -0.640625,-2.699219 -0.980469,-5.4375 -0.832031,-8.214844 0.238281,-4.53125 1.476562,-8.78125 3.824219,-12.6875 1.082031,-1.800781 2.445312,-3.375 3.988281,-4.800781 2.742187,-2.527344 5.863281,-4.480469 9.257812,-5.992188 3.746094,-1.667968 7.652344,-2.769531 11.707032,-3.394531 3.152343,-0.488281 6.324218,-0.671875 9.507812,-0.519531 8.632813,0.410156 16.671875,2.792969 24,7.433594 0.08203,0.05078 0.152344,0.109375 0.230469,0.167968 -0.0039,0.04297 -0.0078,0.08984 -0.01563,0.136719' id='path4177' /%3E%3Cpath style='fill:%23333f48;fill-opacity:1;fill-rule:nonzero;stroke:none' d='m 31.699219,38.75 c -0.07813,0.238281 -0.152344,0.476563 -0.238281,0.710938 -1.460938,4.074218 -2.066407,8.28125 -1.808594,12.59375 0.4375,7.304687 2.808594,13.925781 7.277344,19.753906 3.714843,4.84375 7.441406,9.671875 11.167968,14.503906 1.113282,1.441406 1.953125,3.007813 2.414063,4.777344 0.332031,1.257812 0.425781,2.539062 0.273437,3.820312 -0.214843,1.832032 -1.070312,3.34375 -2.464843,4.546875 -0.984375,0.851559 -2.113282,1.449219 -3.316407,1.925779 -1.378906,0.54297 -2.8125,0.89063 -4.273437,1.1211 -2.226563,0.35547 -4.46875,0.46093 -6.722656,0.41015 -0.589844,-0.0156 -1.046875,-0.18359 -1.433594,-0.625 -0.636719,-0.72265 -1.335938,-1.39062 -1.9375,-2.14062 C 25.574219,93.800781 22.300781,86.621094 20.84375,78.636719 20.152344,74.835938 19.917969,71 20.15625,67.128906 20.796875,56.773438 24.390625,47.574219 30.859375,39.480469 c 0.21875,-0.273438 0.453125,-0.53125 0.679688,-0.796875 0.05469,0.02344 0.109375,0.04297 0.160156,0.06641' id='path4179' /%3E%3Cpath style='fill:%23333f48;fill-opacity:1;fill-rule:nonzero;stroke:none' d='m 105.41016,101.30078 c -0.13282,-0.3125 0.0234,-0.5039 0.0977,-0.69922 1.38672,-3.749997 1.98047,-7.628904 1.89844,-11.621091 -0.14453,-6.84375 -2.08594,-13.144531 -5.73437,-18.925781 C 99.890625,67.226563 97.917969,64.53125 95.835938,61.917969 94.4375,60.160156 92.988281,58.4375 91.582031,56.6875 90.632813,55.511719 89.6875,54.335938 88.792969,53.121094 c -0.835938,-1.144531 -1.488281,-2.398438 -1.953125,-3.742188 -0.523438,-1.515625 -0.695313,-3.070312 -0.511719,-4.652343 0.21875,-1.839844 1.082031,-3.339844 2.476563,-4.542969 1.039062,-0.890625 2.230468,-1.507813 3.503906,-1.980469 1.632812,-0.609375 3.320312,-0.960937 5.046875,-1.175781 1.917969,-0.238281 3.839841,-0.269531 5.769531,-0.230469 0.52734,0.01172 0.89453,0.203125 1.23828,0.585938 5.50391,6.113281 9.26172,13.144531 11.21875,21.132812 1.11719,4.554688 1.5625,9.179688 1.30469,13.855469 -0.58203,10.625 -4.23438,20.082031 -10.96094,28.339846 -0.15625,0.1914 -0.32812,0.375 -0.51562,0.58984' id='path4181' /%3E%3Cpath style='fill:%23333f48;fill-opacity:1;fill-rule:nonzero;stroke:none' d='m 39.796875,108.63281 c -0.05859,0.0117 -0.117187,0.0234 -0.175781,0.0352 0.05469,-0.0156 0.113281,-0.0312 0.167969,-0.0469 z m 0,0' id='path4183' /%3E%3C/g%3E%3C/svg%3E)
 Play animation
 Play step-by-step
 Repeat (toggle)
 Full Screen
 Pause
Pause Stop
Stop
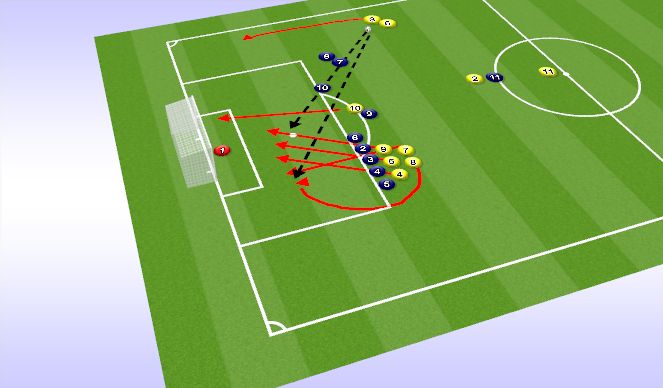
Defensive Corner
Set-Up Player Responsibility by #
GK first step should rarely be forward toward the ball but step back, judge flight, and attack the ball at highest point to catch or punch.GK(#1) must control and own the 6 yard box.
GK must be vocal with team commands, "Keeper, Away, Step, etc."
All players should be near 45deg angle toward ball and midfield directing clearance up and out toward midfield flag on same side of the field.All Players need to take up proper body positioning.
Players 7,4,5, & 6: are Ball Winners
They will be chosen by strength in air, judgment, and bravery.
One and only responsibility is to win the ball in the air.
Responsible for the area in front of their position.
Any ball flighted past their position is the player's responsibility immediately behind.
Attack the area in front.
Players 8, 9, 10: are Man-Markers/Bumpers
Find the opposing team’s best headers and get in their way(bump them) and then stay with them, allowing no free headers
2 & 3: Win anything around posts while listening to goalkeeper
2 stays inside near post
3 covers back side of 6 yard box outside the post initially and slides inside post if no runs into his space.
11: is an outlet
Start on the side of the corner kick and make run diagonally across the field when ball is won.
*Red arrows are adjustments for a short corner.- EVERYONE MUST TAKE RESPONSIBILITY