


Football/Soccer Session (Academy Sessions): Creativity in the final third (Start Time: 2022-05-05 18:30:00)

FAW Coach Ed
Ryan Hassett
Profile Summary

| Name: | Ryan Hassett |
|---|---|
| City: | Rhyl |
| Country: | United Kingdom |
| Membership: | Adult Member |
| Sport: | Football/Soccer |

See the guidance at the top of this page to understand why you are not seeing interactive Football/Soccer images.
See the guidance at the top of this page to understand why you are not seeing interactive Football/Soccer images.
All Players ... Cont
- Once the ball has been switchedthe blues should look to attack the reds with intensity and look to score.
- The red full backs can nowanticipate the switch and look to put fast pressure on the ball, if the redswin the ball they then have 10 seconds to break lines and travel into the endzone.
- The blue fullbacks can nowplay free and look to join the attack, depending on the first touch of the wideplayer or the pressure applied to on the ball, for example if the wide playersfirst touch is inside then look to overlap, if first touch is forwardlook to support from behind or inside.
Points scoring
· Bluesawarded 1 goal for a switch of play
· Blues awarded 3 goals for aswitch in play and scoring in the fixed goal
· Reds awarded 3 goals forbreaking lines into the end zone
· Reds awarded 1 goal forfinding the goal keeper/feeder in the end zone on the full
·
Conditions, Challenges & Targets
Conditions are half pitch with 2 wide zones, 1 end zone and a full size goal,the targets for the blues are the wide zones and the full size goal.
Red team target is the end zone or the hands of the goalkeeper/feeder stoodin the end zone.
Challenges are the blue team must switch play beforescoring, the red team out of possession must fill 2 of the 3 zones whendefending, leaving the furthest player and challenge the back 4 to maintain a 3m distance apart.
The reds are also challenged with scoring on thecounterattack by breaking lines.
Targets to gain as many points as possible within each 4 minute period.
Key Technical/ Tactical points
In Possession
· Play through, around, or overthe opposition
· Make the pitch as big aspossible, maintain width.
· Ball speed
· Weight of pass, Direction ofpass.
· Movement and body shape toreceive.
· Decision making when toswitch/ who can switch.
· Exploit the space.
Out of possession
· Force direction of play wide
· Defend Narrow and Compact.
· Leave the furthest player/s
· Stop the switch
· Work as a unit including distances between them.
· Block passing lines
Coaching Interventions
Concurrent
Terminal
Walk Through
Coaching Process
See the guidance at the top of this page to understand why you are not seeing interactive Football/Soccer images.
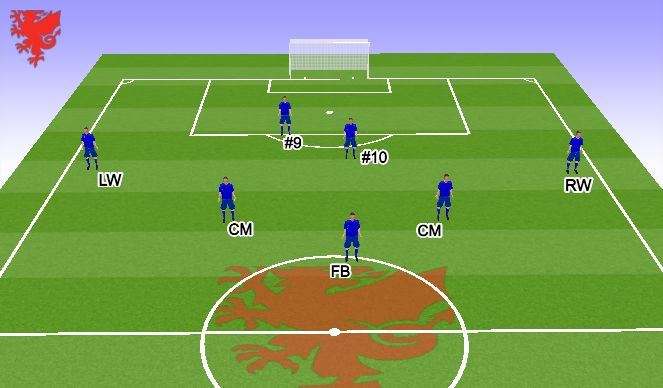
Attack Formation
LB-RB
CM
LW-RW
#10
#9
See the guidance at the top of this page to understand why you are not seeing interactive Football/Soccer images.
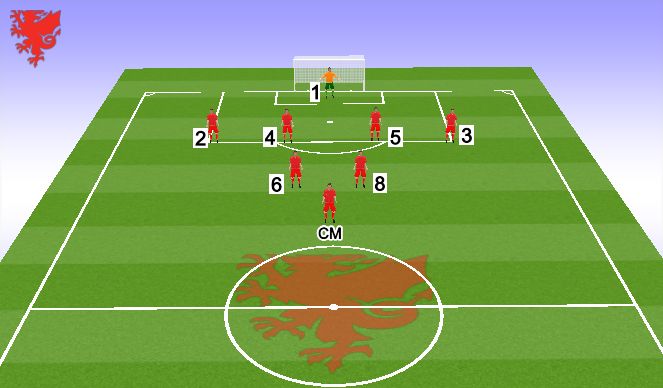
Defence Formation
LB-CB-CB-RB
CDM-CDM
CM
See the guidance at the top of this page to understand why you are not seeing interactive Football/Soccer images.
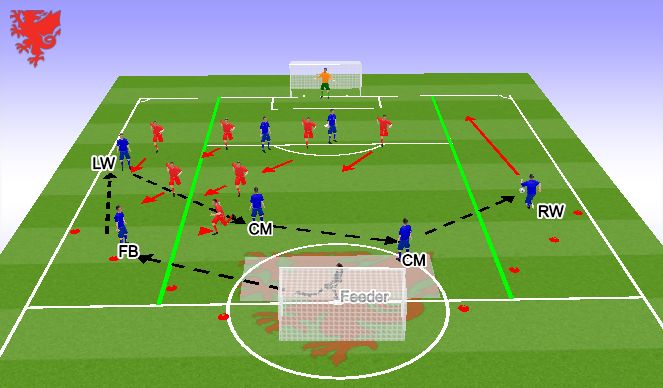
Switched Play
Switch of Play - Example
Ball passed from server to full back and onto LW. Red team defend this by moving across the pitch as a unit to close down the players in the wide areas.
LW recognises that the CM has created an angle for him to make the pass back into him allowing him to switch the play to the furthest player on the RW.
RW then to attack down the channel and either supplying the cross or attack the Red FB and creating a chance to shoot.
Coaching points to focus on is body shape (see 3 corners) receive ball on back foot, decision making and speed of pass when switching play.
See the guidance at the top of this page to understand why you are not seeing interactive Football/Soccer images.
SSG - 15 Mins (15 mins)
Small sided game (SSG) 18 players
Organisation
Use a full width pitch meaning approximately 60mX50m, (this may vary depending on the age/ability of the players and the physical demands required from the session)
Full size goal now 60m opposite fixed goal
Play 9v9 including 2 GKs
Play 15 minute period
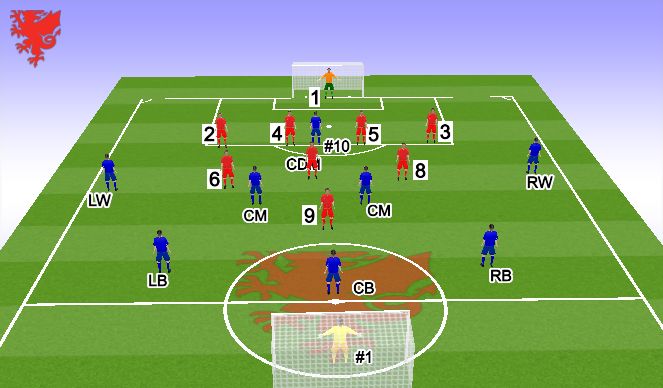
The blues will be working back from a GK-4-4-1-1 missing 1 CB and 1 CM so will consist of CB-LB-RB-CM-CM- LW-RW-#10
The reds will be working back from a GK-4-2-3-1 missing both wide central midfield players so will consist of LB-RB-CB-CB-CDM-CM-CM-#9
- The coach will continue to work only with ONE team (Blues) on the in possession principles of switching play, whilst also looking to coach the in possession principles of creating and exploiting overloads and final third play.
- Opposition will be managed in order to maintain realism and create problems to coach in the practice, if available the second coach will be utilised to reinforce the defensive principles requested by the main coach.
- Opposition to defend deep and narrow and leave the furthest player, can the blue 10 look to exploit the space in behind the red full back
- Opposition to put pressure on the ball and look to force play wide, blues fullbacks look to join the attack and create overload
- Play will always restart with the blue goalkeeper, (unless the coach decides otherwise)
- Blue team must switch play at least once before they can look to attack the final third and score a goal
- If the reds win possession they look to attack the blues and have 20 seconds to get a shot on goal, if the reds are having too much success the coach may wish to place restrictions such as reduced touches on the ball.
- Blues continue to try to switch play in order to progress into the final third and make crosses or take shots at the Reds keeper. Principles remain the same as in the specific practice -
- Red back 4 are to defend deep and narrow maintaining a distance of 2-3m between them, while the red midfield players prevent passes into the blue #10, this will give the opportunity to work on the principles of switching play, who can switch play whilst also giving the blues success in doing so.
- As play progresses manage the reds to push the back 4 higher and look to put pressure on the ball and force play wide, this will create the problem and give the opportunity for the players to utilise the principles of quick ball, who can switch and when to switch which were emphasised during the specific part of the practice.
Points scoring
· Blues awarded 1 goal for a switch of play
· Blues awarded 3 goals for a switch in play and scoring in the fixed goal
· Reds awarded 3 goals forbreaking lines and scoring past the blue goal keeper
See the guidance at the top of this page to understand why you are not seeing interactive Football/Soccer images.
Problems/Solutions
Key Factors
Possible Problem and Solutions
Play starts with the blue CM who plays the ball out to the LW, the reds have now been managed to defend narrow and compact protecting the middle with their back 4, 20m from goal, told to still prevent the ball into the blue 10 and 9 and to put pressure on the blue LB. The blue CF will threaten to exploit the space left by the red RB which will pull the redback 4 further across giving them more ground to cover once play is switched, the blue#10 will look to position himself between the 2 red CDMs, enabling his movement towards the ball to cause a reaction to follow him by the red CDM. The trigger to show for the ball will be once the pass is played from the LB to the LW. With the full back now marked, the blue #10 and 9 threatening to join play and exploit the space behind it becomes up to the blue CM to create a passing line for the LW, once he is found, he receives the ball on the back foot and plays the ball directly over to the opposite winger, the RB now looks support the attack to create a 2V1 against the red full back and creating something in the final third.
The ball is played to either to the blue CB or FB, once the ball arrives with the wide player the CB looks to create the angle to receive the ball, the left fullback will support from behind, while the right full back tucks around towards the centre of the pitch, the CM, #10 and CF will move to this side of the pitch to help drag the opposition players across whilst leaving the wide player on the opposite in space, the ball should be switched once the players recognise that the reds are all across to the possession side of the pitch, who can switch will depend on the pressure placed on the ball by the opposition. The right full back should look to support the wide player from behind and his trigger to over lap, support behind or inside will depend on the quality of the pass out to them, the pressure applied by the opposition or the 1st touch of the wide player, for example if the wide players first touch is inside then look to overlap, if first touch is forward look to support from behind or inside, if the defender arrives to press as the ball arrives with the wide player, the full back should support inside or from behind while the wide player should draw the full back higher up the pitch to create space behind.
As a follow on the ball has now been switched from left to right, the blue RW takes a good first touch but fast pressure was applied by the red full back, the blue wide player turns back to goal and waits for support while drawing the red full back out to create the space in behind, the blue FB supports inside, he receives the pass from the wide player who then spins onto the space behind, the blue full back then plays to the wide player in behind the red full back creating the opportunity to create in the final third. The blue CF should look to play between the red CB and opposite FB, the #10 should attack the space between both red CBs while the opposite wide player should attack the back post. The blue CM should look to occupy the edge of the 18 yard box.
Defensively the blue CB will move central while the blue FB on the opposite side should cover around.
'%3E%3Cpath id='path4169' d='M 11.4375,70.25 C 11.457031,38.394531 37.277344,13.242188 68.253906,13.050781 99.78125,12.855469 125.73047,38.351563 125.8125,70.078125 125.89844,101.62109 100.43359,127.14063 69.148438,127.42188 37.582031,127.70703 11.464844,102.23438 11.4375,70.25 m 6.425781,-0.08984 c 0.03516,28.421871 23.027344,50.69922 50.519532,50.82031 C 96.433594,121.10156 119.30469,98.367188 119.38281,70.359375 119.45313,42.878906 97.382813,19.714844 69.015625,19.496094 40.75,19.277344 17.964844,42.035156 17.863281,70.160156' style='clip-rule:nonzero;fill:%23333f48;fill-opacity:1;fill-rule:nonzero;stroke:none' /%3E%3Cpath style='fill:%23333f48;fill-opacity:1;fill-rule:nonzero;stroke:none' d='m 39.789063,108.62109 c 0.28125,0.14454 0.550781,0.32032 0.839843,0.4336 2.734375,1.05469 5.554688,1.78125 8.453125,2.23047 2.734375,0.42578 5.484375,0.64453 8.25,0.54297 3.988282,-0.15625 7.832032,-0.94922 11.445313,-2.69532 1.683594,-0.8164 3.246094,-1.82422 4.640625,-3.07422 3.265625,-2.92578 5.171875,-6.582027 5.796875,-10.906246 0.546875,-3.761719 0.04687,-7.425781 -1.09375,-11.019531 -1.4375,-4.523438 -3.730469,-8.582032 -6.703125,-12.265625 -1.03125,-1.277344 -2.082031,-2.535157 -3.113281,-3.808594 C 66.789063,66.1875 65.332031,64.269531 64.0625,62.21875 c -1.601562,-2.582031 -2.835937,-5.316406 -3.613281,-8.261719 -0.683594,-2.574218 -0.902344,-5.1875 -0.6875,-7.828125 0.214844,-2.617187 0.910156,-5.117187 2.152344,-7.441406 2.164062,-4.050781 5.503906,-6.710937 9.816406,-8.179687 1.890625,-0.640625 3.835937,-1.058594 5.832031,-1.195313 1.121094,-0.07813 2.242188,-0.152344 3.363281,-0.164062 4.28125,-0.02734 8.4375,0.734375 12.453125,2.175781 1.871094,0.671875 3.6875,1.496094 5.523438,2.257812 0.226562,0.09375 0.4375,0.230469 0.664062,0.351563 -0.164062,0.25 -0.371093,0.160156 -0.539062,0.164062 -2.824219,0.101563 -5.535156,0.703125 -8.132813,1.804688 -1.335937,0.570312 -2.570312,1.316406 -3.648437,2.296875 -2.527344,2.296875 -3.605469,5.15625 -3.34375,8.550781 0.140625,1.855469 0.722656,3.574219 1.550781,5.222656 0.648438,1.296875 1.414063,2.523438 2.292969,3.675782 0.953125,1.25 1.929687,2.484375 2.929687,3.699218 2.085938,2.523438 4.164063,5.054688 6.050782,7.738282 2.203125,3.136718 4.140627,6.417968 5.589847,9.980468 1.16406,2.867188 2.01562,5.820313 2.39843,8.894532 0.25,2.011718 0.30079,4.03125 0.11719,6.058593 -0.24219,2.640625 -0.79297,5.195313 -1.74609,7.667969 -1.29688,3.36328 -3.300784,6.22656 -5.972659,8.63281 -2.429687,2.19141 -5.171875,3.90625 -8.109375,5.3125 -2.695312,1.29297 -5.464843,2.40235 -8.34375,3.20313 -1.953125,0.54687 -3.945312,0.8789 -5.949218,1.15625 -3.035157,0.41797 -6.085938,0.48828 -9.132813,0.3125 -5.328125,-0.3125 -10.476562,-1.46094 -15.410156,-3.52344 -3.449219,-1.44141 -6.691406,-3.25781 -9.757813,-5.39453 -0.183593,-0.12891 -0.378906,-0.25 -0.53125,-0.41016 -0.07031,-0.0703 -0.05859,-0.22656 -0.08203,-0.34375 z m 0,0' id='path4175' /%3E%3Cpath style='fill:%23333f48;fill-opacity:1;fill-rule:nonzero;stroke:none' d='M 94.699219,29.390625 C 94.089844,29.21875 93.476563,29.054688 92.867188,28.875 90.183594,28.085938 87.46875,27.441406 84.703125,27.046875 c -3.976562,-0.566406 -7.945312,-0.59375 -11.863281,0.402344 -7.535156,1.914062 -12.386719,6.71875 -14.878906,13.996094 -0.894532,2.617187 -1.179688,5.328125 -0.953125,8.078125 0.203125,2.484375 0.867187,4.859375 1.816406,7.160156 0.933594,2.261719 2.117187,4.390625 3.4375,6.449219 1.4375,2.25 3.050781,4.371093 4.640625,6.511718 1.4375,1.933594 2.867187,3.871094 4.261719,5.835938 1.230468,1.730469 2.316406,3.546875 3.273437,5.445312 1.324219,2.625 2.265625,5.378907 2.703125,8.292969 0.433594,2.902344 0.292969,5.765625 -0.660156,8.5625 -0.9375,2.74609 -2.574219,5.00781 -4.777344,6.875 -2.417969,2.04688 -5.203125,3.39844 -8.246094,4.22266 -1.835937,0.5 -3.703125,0.75781 -5.609375,0.82031 -3.886718,0.13281 -7.679687,-0.47266 -11.421875,-1.46094 -2.261718,-0.59765 -4.488281,-1.33203 -6.695312,-2.11328 -0.207031,-0.0742 -0.40625,-0.16797 -0.597656,-0.25 -0.02344,-0.24609 0.148437,-0.19141 0.25,-0.20703 1.96875,-0.30469 3.921875,-0.67969 5.804687,-1.34766 1.367188,-0.48437 2.671875,-1.10156 3.855469,-1.94922 2.25,-1.61328 3.65625,-3.765621 4.0625,-6.515621 0.273437,-1.867188 0.09375,-3.710938 -0.429688,-5.527344 -0.472656,-1.648437 -1.171875,-3.199219 -2.109375,-4.628906 -0.792968,-1.207031 -1.636718,-2.382813 -2.523437,-3.519531 -0.921875,-1.195313 -1.921875,-2.328125 -2.890625,-3.484375 -2.753906,-3.273438 -5.351563,-6.660157 -7.523438,-10.355469 -2.042968,-3.480469 -3.667968,-7.136719 -4.597656,-11.078125 -0.640625,-2.699219 -0.980469,-5.4375 -0.832031,-8.214844 0.238281,-4.53125 1.476562,-8.78125 3.824219,-12.6875 1.082031,-1.800781 2.445312,-3.375 3.988281,-4.800781 2.742187,-2.527344 5.863281,-4.480469 9.257812,-5.992188 3.746094,-1.667968 7.652344,-2.769531 11.707032,-3.394531 3.152343,-0.488281 6.324218,-0.671875 9.507812,-0.519531 8.632813,0.410156 16.671875,2.792969 24,7.433594 0.08203,0.05078 0.152344,0.109375 0.230469,0.167968 -0.0039,0.04297 -0.0078,0.08984 -0.01563,0.136719' id='path4177' /%3E%3Cpath style='fill:%23333f48;fill-opacity:1;fill-rule:nonzero;stroke:none' d='m 31.699219,38.75 c -0.07813,0.238281 -0.152344,0.476563 -0.238281,0.710938 -1.460938,4.074218 -2.066407,8.28125 -1.808594,12.59375 0.4375,7.304687 2.808594,13.925781 7.277344,19.753906 3.714843,4.84375 7.441406,9.671875 11.167968,14.503906 1.113282,1.441406 1.953125,3.007813 2.414063,4.777344 0.332031,1.257812 0.425781,2.539062 0.273437,3.820312 -0.214843,1.832032 -1.070312,3.34375 -2.464843,4.546875 -0.984375,0.851559 -2.113282,1.449219 -3.316407,1.925779 -1.378906,0.54297 -2.8125,0.89063 -4.273437,1.1211 -2.226563,0.35547 -4.46875,0.46093 -6.722656,0.41015 -0.589844,-0.0156 -1.046875,-0.18359 -1.433594,-0.625 -0.636719,-0.72265 -1.335938,-1.39062 -1.9375,-2.14062 C 25.574219,93.800781 22.300781,86.621094 20.84375,78.636719 20.152344,74.835938 19.917969,71 20.15625,67.128906 20.796875,56.773438 24.390625,47.574219 30.859375,39.480469 c 0.21875,-0.273438 0.453125,-0.53125 0.679688,-0.796875 0.05469,0.02344 0.109375,0.04297 0.160156,0.06641' id='path4179' /%3E%3Cpath style='fill:%23333f48;fill-opacity:1;fill-rule:nonzero;stroke:none' d='m 105.41016,101.30078 c -0.13282,-0.3125 0.0234,-0.5039 0.0977,-0.69922 1.38672,-3.749997 1.98047,-7.628904 1.89844,-11.621091 -0.14453,-6.84375 -2.08594,-13.144531 -5.73437,-18.925781 C 99.890625,67.226563 97.917969,64.53125 95.835938,61.917969 94.4375,60.160156 92.988281,58.4375 91.582031,56.6875 90.632813,55.511719 89.6875,54.335938 88.792969,53.121094 c -0.835938,-1.144531 -1.488281,-2.398438 -1.953125,-3.742188 -0.523438,-1.515625 -0.695313,-3.070312 -0.511719,-4.652343 0.21875,-1.839844 1.082031,-3.339844 2.476563,-4.542969 1.039062,-0.890625 2.230468,-1.507813 3.503906,-1.980469 1.632812,-0.609375 3.320312,-0.960937 5.046875,-1.175781 1.917969,-0.238281 3.839841,-0.269531 5.769531,-0.230469 0.52734,0.01172 0.89453,0.203125 1.23828,0.585938 5.50391,6.113281 9.26172,13.144531 11.21875,21.132812 1.11719,4.554688 1.5625,9.179688 1.30469,13.855469 -0.58203,10.625 -4.23438,20.082031 -10.96094,28.339846 -0.15625,0.1914 -0.32812,0.375 -0.51562,0.58984' id='path4181' /%3E%3Cpath style='fill:%23333f48;fill-opacity:1;fill-rule:nonzero;stroke:none' d='m 39.796875,108.63281 c -0.05859,0.0117 -0.117187,0.0234 -0.175781,0.0352 0.05469,-0.0156 0.113281,-0.0312 0.167969,-0.0469 z m 0,0' id='path4183' /%3E%3C/g%3E%3C/svg%3E)
 Play animation
 Play step-by-step
 Repeat (toggle)
 Full Screen
 Pause
Pause Stop
Stop
All Players -Specific/SSG (20 mins)
Organisation
Use 60mX50m area (this may vary due to the age/ability of the players and also the physical demands required from the session)
2 wide zones in line with the 18 yard box marked out using flats.
20mX40m End zone for the out of possession team to attack upon winning possession.
Spare balls in end zone.
A large goal will be in place behind the end zone and the tapered lines in also in place ready for the transition into the SSG.
7V8, the red team (Defending) with 8 including a goalkeeper Utilise a second goalkeeper in the end zone to feed the ball into the blues (Feeder only).
The blue team will be the coached in possession team and will be and consist of FB-CM-CM- LW-RW-#10-#9, they will attack the full size goal.
The reds will be the managed team and will consist of LB-CB-CB-RB-CDM-CDM-CM.
Timings
Play 2X4 minute blocks with a 1-2 minute break between blocks for drinks and terminal feedback.
1-4 mins, manage reds to defend deep and narrow and protect the middle, encourage the blues to create angles in order to switch play.
4-8 mins manage reds to force play wide and protect the middle, giving the opportunity for more intensity in the play, therefore making quick ball vital in order to switch play for the blues (attacking side).
Coach Attacking Side (Blues)
Welsh way principles of switching play (Blue Team)
Ball speed- Weight of pass -Use of depth- Direction of pass -Movement to receive Support away from ball -Switch in as few passes as possible- How to receive - furthest foot.
Make the pitch big, Maintain width, decision making when to switch play, who can switch play, exploit the space, ball speed.
Manage Defending Team (Reds)
If the reds win the ball back they will follow the in possession principles of breaking lines but will not be coached on the these.
Reds will be managed by coach 2 to ensure realism in the practice, if the red team are having too much success, the coach will restrict touches or time they have on the ball.
Use 2nd coach (where possible) to help manage the opposition by reinforcing the defensive principles and providing concurrent feedback. Force wide, keep play predictable, press quickly, protect middle, leave the furthest players.
Organisation (Including Walk Through)
Play always starts from the end zone, either by the coach playing a ball in or a player retrieving a ball from inside the end zone.
The blues in possession have to switch play at least once before they can attack the reds final third and score, the blue full backs must only support from behind (no over lapping runs).
First 4 mins the red back 4 are to defend deep and narrow maintaining a distance of approx 2m between them, while the red midfield players prevent passes into the blue CF and #10.
Red full backs can only cross into the wide zone once the blue wide player has received the ball, this will give the opportunity to work on the principles of switching play whilst also giving the blues success in doing so.
In Second 4 mins the reds back 4 to defend higher, approx 5 metres in front of the 18 yard box.
Reds to put pressure on the ball, and force Blue play wide.
Blue players to look to move the reds onto one side of the pitch in order for the blue team to switch play and exploit the space.
Blue wide players look to receive wide and deliver crosses into the box for the #9/#10 or drive into the area and shoot.