


Football/Soccer Session (Moderate): Defensive Shape Session - 30/8/21 (Start Time: 2021-08-30 18:00:00)

Premier Users' Club
Mark Williams
Profile Summary

| Name: | Mark Williams |
|---|---|
| City: | Swansea |
| Country: | United Kingdom |
| Membership: | Adult Member |
| Sport: | Football/Soccer |
Description
A reminder of basic defensive orgainsation for our back four and defensive screens

See the guidance at the top of this page to understand why you are not seeing interactive Football/Soccer images.
See the guidance at the top of this page to understand why you are not seeing interactive Football/Soccer images.
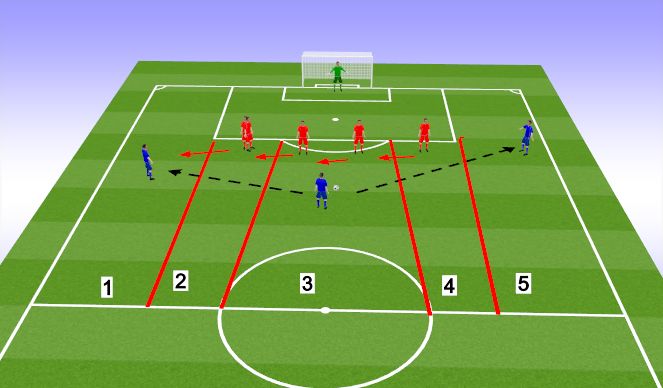
Drill - with Back Four (5 mins)
Introduction
We now have our back four faced by three attackers
- place the full-backs in Zones 2 & 4, centre-backs in Zone 3
- place the attackers in Zones 1, 3 & 5
This will seem unusual (particularly) to the full-backs but expain the importance of Moving as the ball moves
Basic Practice
Start with the ball with the central striker and get him to pass to the left wing
As the ball moves, the back four shuffle across and the full-back engages the winger by:
- closing him down; to within 2 metres
- slow down and angle your body to show him outside
- in this way, the full-back ATTACKS THE BALL
At the same time, the nearest centre-back moves in to the vacated Zone 2 to provide COVER
Also, our left full-back and the other centre-back shuffle over (in Zone 3) to provide BALANCE
Progression
1) Play to other wing
- Return the ball to the central striker and play out to the right wing. The same sliding across occurs
2) What if play remains central?
- the key concept of ATTACK - BALANCE - COVER remains
- the difference is that now, one of the centre-backs attacks the ball
- the other centre-back provides cover
- the balance comes from the two full-backs on either side
See the guidance at the top of this page to understand why you are not seeing interactive Football/Soccer images.
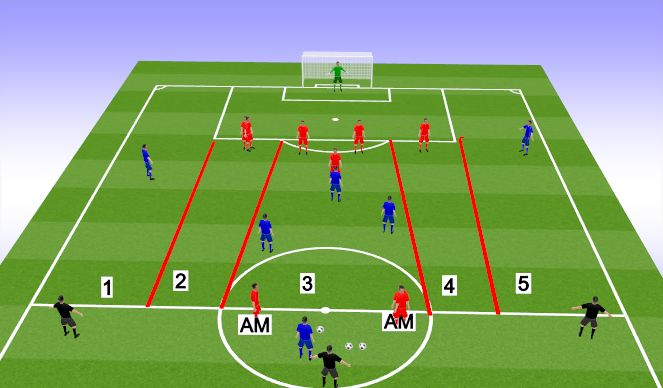
Phase of Play- Back Four & Screens (10 mins)
Introduction
We now structure the practice to better reflect our actual playing shape which is ostensibly 4-2-3-1
However, we allow one of the Defensive midfileds to join the attack, so more often we will resemble 4-1-4-1 so we have to practice defending in this shape and using DELAY to give time for our midfield to recover
Drill
Requires:
7 Defenders + GK
6 Attackers
3 Target players (in black) or can use mini goals
We now have two extra attackers (making a total of 5) faced by our back 4 and the one defensive screen
The principle is still the same; ATTACK but this time we can use the screen player to help the back four fulfil these roles. On occasions, he will be the one attacking the ball, on others he will drop into the channels to provide cover & balance
Rather than demonstrate this in shadow play, we can go straight into a Phase of Play exercise where:
Blues are attacking the big goal and start from the centre circle
As soon as the ball is touched by a second blue player, the red attacking midfielders can retreat to support the defence
Offside is in play.
No corners
Scoring
Blues score in the large goals as usual
Reds score 0.25 of a goal by passing to one of the black players (or mini goals if used)
See the guidance at the top of this page to understand why you are not seeing interactive Football/Soccer images.
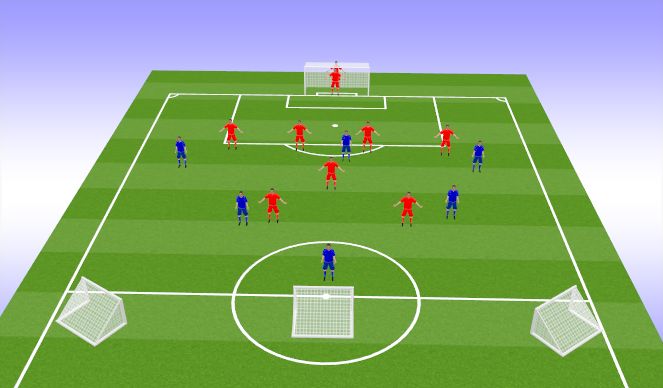
SSG (10 mins)
Objective
We now take away the zones and play a Small Sided Game along the same lines as the phase of play
Ideally, the set up will be 7 + GK vs. 6
Ensure we use all players and occasionally switch teams around to give all players a chance to defend the large goals
Coaching Points
We are concentrating on how Reds play because they have the numbers and the shape to do this properly
Are they covering 3/5 of the pitch?
Are they moving as a unit and showing outside?
Are we seeing ATTACK, BALANCE, COVER?
Are we hearing good communication?
'%3E%3Cpath id='path4169' d='M 11.4375,70.25 C 11.457031,38.394531 37.277344,13.242188 68.253906,13.050781 99.78125,12.855469 125.73047,38.351563 125.8125,70.078125 125.89844,101.62109 100.43359,127.14063 69.148438,127.42188 37.582031,127.70703 11.464844,102.23438 11.4375,70.25 m 6.425781,-0.08984 c 0.03516,28.421871 23.027344,50.69922 50.519532,50.82031 C 96.433594,121.10156 119.30469,98.367188 119.38281,70.359375 119.45313,42.878906 97.382813,19.714844 69.015625,19.496094 40.75,19.277344 17.964844,42.035156 17.863281,70.160156' style='clip-rule:nonzero;fill:%23333f48;fill-opacity:1;fill-rule:nonzero;stroke:none' /%3E%3Cpath style='fill:%23333f48;fill-opacity:1;fill-rule:nonzero;stroke:none' d='m 39.789063,108.62109 c 0.28125,0.14454 0.550781,0.32032 0.839843,0.4336 2.734375,1.05469 5.554688,1.78125 8.453125,2.23047 2.734375,0.42578 5.484375,0.64453 8.25,0.54297 3.988282,-0.15625 7.832032,-0.94922 11.445313,-2.69532 1.683594,-0.8164 3.246094,-1.82422 4.640625,-3.07422 3.265625,-2.92578 5.171875,-6.582027 5.796875,-10.906246 0.546875,-3.761719 0.04687,-7.425781 -1.09375,-11.019531 -1.4375,-4.523438 -3.730469,-8.582032 -6.703125,-12.265625 -1.03125,-1.277344 -2.082031,-2.535157 -3.113281,-3.808594 C 66.789063,66.1875 65.332031,64.269531 64.0625,62.21875 c -1.601562,-2.582031 -2.835937,-5.316406 -3.613281,-8.261719 -0.683594,-2.574218 -0.902344,-5.1875 -0.6875,-7.828125 0.214844,-2.617187 0.910156,-5.117187 2.152344,-7.441406 2.164062,-4.050781 5.503906,-6.710937 9.816406,-8.179687 1.890625,-0.640625 3.835937,-1.058594 5.832031,-1.195313 1.121094,-0.07813 2.242188,-0.152344 3.363281,-0.164062 4.28125,-0.02734 8.4375,0.734375 12.453125,2.175781 1.871094,0.671875 3.6875,1.496094 5.523438,2.257812 0.226562,0.09375 0.4375,0.230469 0.664062,0.351563 -0.164062,0.25 -0.371093,0.160156 -0.539062,0.164062 -2.824219,0.101563 -5.535156,0.703125 -8.132813,1.804688 -1.335937,0.570312 -2.570312,1.316406 -3.648437,2.296875 -2.527344,2.296875 -3.605469,5.15625 -3.34375,8.550781 0.140625,1.855469 0.722656,3.574219 1.550781,5.222656 0.648438,1.296875 1.414063,2.523438 2.292969,3.675782 0.953125,1.25 1.929687,2.484375 2.929687,3.699218 2.085938,2.523438 4.164063,5.054688 6.050782,7.738282 2.203125,3.136718 4.140627,6.417968 5.589847,9.980468 1.16406,2.867188 2.01562,5.820313 2.39843,8.894532 0.25,2.011718 0.30079,4.03125 0.11719,6.058593 -0.24219,2.640625 -0.79297,5.195313 -1.74609,7.667969 -1.29688,3.36328 -3.300784,6.22656 -5.972659,8.63281 -2.429687,2.19141 -5.171875,3.90625 -8.109375,5.3125 -2.695312,1.29297 -5.464843,2.40235 -8.34375,3.20313 -1.953125,0.54687 -3.945312,0.8789 -5.949218,1.15625 -3.035157,0.41797 -6.085938,0.48828 -9.132813,0.3125 -5.328125,-0.3125 -10.476562,-1.46094 -15.410156,-3.52344 -3.449219,-1.44141 -6.691406,-3.25781 -9.757813,-5.39453 -0.183593,-0.12891 -0.378906,-0.25 -0.53125,-0.41016 -0.07031,-0.0703 -0.05859,-0.22656 -0.08203,-0.34375 z m 0,0' id='path4175' /%3E%3Cpath style='fill:%23333f48;fill-opacity:1;fill-rule:nonzero;stroke:none' d='M 94.699219,29.390625 C 94.089844,29.21875 93.476563,29.054688 92.867188,28.875 90.183594,28.085938 87.46875,27.441406 84.703125,27.046875 c -3.976562,-0.566406 -7.945312,-0.59375 -11.863281,0.402344 -7.535156,1.914062 -12.386719,6.71875 -14.878906,13.996094 -0.894532,2.617187 -1.179688,5.328125 -0.953125,8.078125 0.203125,2.484375 0.867187,4.859375 1.816406,7.160156 0.933594,2.261719 2.117187,4.390625 3.4375,6.449219 1.4375,2.25 3.050781,4.371093 4.640625,6.511718 1.4375,1.933594 2.867187,3.871094 4.261719,5.835938 1.230468,1.730469 2.316406,3.546875 3.273437,5.445312 1.324219,2.625 2.265625,5.378907 2.703125,8.292969 0.433594,2.902344 0.292969,5.765625 -0.660156,8.5625 -0.9375,2.74609 -2.574219,5.00781 -4.777344,6.875 -2.417969,2.04688 -5.203125,3.39844 -8.246094,4.22266 -1.835937,0.5 -3.703125,0.75781 -5.609375,0.82031 -3.886718,0.13281 -7.679687,-0.47266 -11.421875,-1.46094 -2.261718,-0.59765 -4.488281,-1.33203 -6.695312,-2.11328 -0.207031,-0.0742 -0.40625,-0.16797 -0.597656,-0.25 -0.02344,-0.24609 0.148437,-0.19141 0.25,-0.20703 1.96875,-0.30469 3.921875,-0.67969 5.804687,-1.34766 1.367188,-0.48437 2.671875,-1.10156 3.855469,-1.94922 2.25,-1.61328 3.65625,-3.765621 4.0625,-6.515621 0.273437,-1.867188 0.09375,-3.710938 -0.429688,-5.527344 -0.472656,-1.648437 -1.171875,-3.199219 -2.109375,-4.628906 -0.792968,-1.207031 -1.636718,-2.382813 -2.523437,-3.519531 -0.921875,-1.195313 -1.921875,-2.328125 -2.890625,-3.484375 -2.753906,-3.273438 -5.351563,-6.660157 -7.523438,-10.355469 -2.042968,-3.480469 -3.667968,-7.136719 -4.597656,-11.078125 -0.640625,-2.699219 -0.980469,-5.4375 -0.832031,-8.214844 0.238281,-4.53125 1.476562,-8.78125 3.824219,-12.6875 1.082031,-1.800781 2.445312,-3.375 3.988281,-4.800781 2.742187,-2.527344 5.863281,-4.480469 9.257812,-5.992188 3.746094,-1.667968 7.652344,-2.769531 11.707032,-3.394531 3.152343,-0.488281 6.324218,-0.671875 9.507812,-0.519531 8.632813,0.410156 16.671875,2.792969 24,7.433594 0.08203,0.05078 0.152344,0.109375 0.230469,0.167968 -0.0039,0.04297 -0.0078,0.08984 -0.01563,0.136719' id='path4177' /%3E%3Cpath style='fill:%23333f48;fill-opacity:1;fill-rule:nonzero;stroke:none' d='m 31.699219,38.75 c -0.07813,0.238281 -0.152344,0.476563 -0.238281,0.710938 -1.460938,4.074218 -2.066407,8.28125 -1.808594,12.59375 0.4375,7.304687 2.808594,13.925781 7.277344,19.753906 3.714843,4.84375 7.441406,9.671875 11.167968,14.503906 1.113282,1.441406 1.953125,3.007813 2.414063,4.777344 0.332031,1.257812 0.425781,2.539062 0.273437,3.820312 -0.214843,1.832032 -1.070312,3.34375 -2.464843,4.546875 -0.984375,0.851559 -2.113282,1.449219 -3.316407,1.925779 -1.378906,0.54297 -2.8125,0.89063 -4.273437,1.1211 -2.226563,0.35547 -4.46875,0.46093 -6.722656,0.41015 -0.589844,-0.0156 -1.046875,-0.18359 -1.433594,-0.625 -0.636719,-0.72265 -1.335938,-1.39062 -1.9375,-2.14062 C 25.574219,93.800781 22.300781,86.621094 20.84375,78.636719 20.152344,74.835938 19.917969,71 20.15625,67.128906 20.796875,56.773438 24.390625,47.574219 30.859375,39.480469 c 0.21875,-0.273438 0.453125,-0.53125 0.679688,-0.796875 0.05469,0.02344 0.109375,0.04297 0.160156,0.06641' id='path4179' /%3E%3Cpath style='fill:%23333f48;fill-opacity:1;fill-rule:nonzero;stroke:none' d='m 105.41016,101.30078 c -0.13282,-0.3125 0.0234,-0.5039 0.0977,-0.69922 1.38672,-3.749997 1.98047,-7.628904 1.89844,-11.621091 -0.14453,-6.84375 -2.08594,-13.144531 -5.73437,-18.925781 C 99.890625,67.226563 97.917969,64.53125 95.835938,61.917969 94.4375,60.160156 92.988281,58.4375 91.582031,56.6875 90.632813,55.511719 89.6875,54.335938 88.792969,53.121094 c -0.835938,-1.144531 -1.488281,-2.398438 -1.953125,-3.742188 -0.523438,-1.515625 -0.695313,-3.070312 -0.511719,-4.652343 0.21875,-1.839844 1.082031,-3.339844 2.476563,-4.542969 1.039062,-0.890625 2.230468,-1.507813 3.503906,-1.980469 1.632812,-0.609375 3.320312,-0.960937 5.046875,-1.175781 1.917969,-0.238281 3.839841,-0.269531 5.769531,-0.230469 0.52734,0.01172 0.89453,0.203125 1.23828,0.585938 5.50391,6.113281 9.26172,13.144531 11.21875,21.132812 1.11719,4.554688 1.5625,9.179688 1.30469,13.855469 -0.58203,10.625 -4.23438,20.082031 -10.96094,28.339846 -0.15625,0.1914 -0.32812,0.375 -0.51562,0.58984' id='path4181' /%3E%3Cpath style='fill:%23333f48;fill-opacity:1;fill-rule:nonzero;stroke:none' d='m 39.796875,108.63281 c -0.05859,0.0117 -0.117187,0.0234 -0.175781,0.0352 0.05469,-0.0156 0.113281,-0.0312 0.167969,-0.0469 z m 0,0' id='path4183' /%3E%3C/g%3E%3C/svg%3E)
 Play animation
 Play step-by-step
 Repeat (toggle)
 Full Screen
 Pause
Pause Stop
Stop
Basic Concepts (5 mins)
Introduction
Explain a few basic concepts that highlight the key areas we need to understand in order to defend effectively
What is Defending and How Many Players Do it?
The number one aim of defending is to stop the opposition scoring
- if you asked the question of the team and they said To win the ball back etc. explain that tackling/winning the ball is only a means of stopping them scoring.
The prime aim is not to concede a goal
If we play 4-2-3-1, how many defenders do we have when the opposition have the ball?
- the answer, of course, is 10 or 11. It is everyone's responsibility to stop the opposition scoring
POMO
a) The red box immediately in front of the goal represents POMO - Position of Maximum Opportunity
Basically, if an attacker finds themselves in that area with even only a modicum of space, they are expected to score
(As an aside, most goals in this area are scored first time hence, we play some training games with the condition One Touch Finish)
It follows therefore we need to be most vigilant about keeping the ball and our opponents away from this area
Corridor of Uncertainty
b) The white shaded area is the so-called Corridor of Uncertainty
The name arises from the fact that, when an attacker gets around the back of our defence and crosses (especially a low cross) into that area, there can be uncertainty whether the outfield defender or the goalkeeper should deal with it.
This uncertainty (and hence hesitation) - however fleeting - creates an opportunity for the attacker
Defending the near-post area of this corridor and clear communication from the keeper is essential
Defend 3/5 of the PItch
c) The red lines, which create 5 vertical zones are a visual cue for our defensive organisation
It is clear that Zones 2,3 & 4 are the key areas to defend when the ball is played centrally.
However, if the opposition have two very wide wingers based on each touch line, the temptation is for defenders to mark them (i.e. occupy Zones 1 & 5) even when the ball is central.
This is a mistake as it creates gaps in the central areas. The defence must learn to take the positioning cues from the location of the ball and shuffle left and right (as appropriate) when the ball is moving.
At any one time, the best the defence can hope for (until reinforcements arrive) is to defend 3/5 (ie 60%) of the pitch
Goal Side/Ball Side
When man-marking an opponent it is essential to be goal-side i.e. between the opponent and our goal
You should also aim to have a clear view of the ball (ball side)
An ideal position is therefore goal side, ball side