


Football/Soccer Session (Difficult): Lloyd_Griffin_FAW UEFA B_IP_Specific_Switching_Play_Into_SSG_(8) (Start Time: 2023-01-15 09:00:00)

FAW Coach Ed
Lloyd Griffin
Profile Summary

| Name: | Lloyd Griffin |
|---|---|
| City: | Newport |
| Country: | United Kingdom |
| Membership: | Adult Member |
| Sport: | Football/Soccer |

See the guidance at the top of this page to understand why you are not seeing interactive Football/Soccer images.
See the guidance at the top of this page to understand why you are not seeing interactive Football/Soccer images.
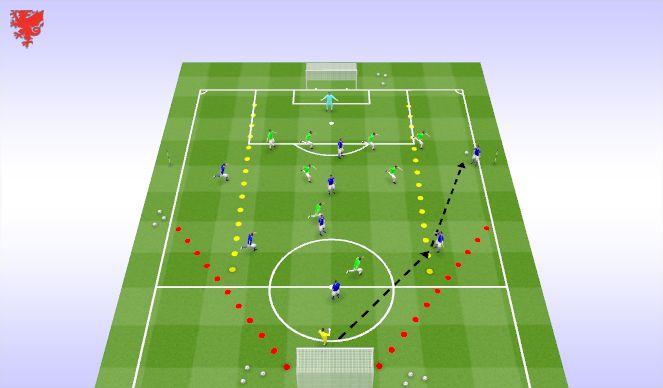
Specific Framing
SPECIFIC into SSG Practice
Framing "The Welsh Way Principles" – IN POSSESSION
In Possession Team – Blues (Coached)
Set up in a 2 (FBs)-2-3 formation (representative of a 1-4-3-3)
Out of Possession Team – Greens (Managed)Set up in a (GK) 1-4-2-1 formation (representative of a 1-4-2-3-1)
Explanation- Blues are set up with two fullbacks, two midfielders (One deep-lying (6) and One advanced (10)) and a front 3.
- Greens are set up with a goalkeeper, a back four, a twin midfield screen and a #10.
- Play will start (and restart) from the two Black servers operating in the shaded zone behind the halfway line to build the attack.
- If Greens win possession a managed countdown of 6 seconds will be implemented for them to counter-attack and score by scoring into the mini goals.
HOW?
- The coach will work with the BLUES IN POSSESSION on how to switch the play.
Structure
- 2 x 4-minute blocks
- 8 minutes ball rolling time
- 2 x 1-minute active recovery – feedback / walkthrough / coaching process opportunities
KEY COACHING POINTS IN POSSESSION – EMPHASISE…
- Make the pitch big by stretching the pitch horizontally and vertically (Width and depth).- Movement to receive - create separation away from marker, use of double movements.
- Body position to receive - open hips facing forwards, looking to take first touch on furthest foot to set up next action to be forwards.
- Use limited touches to move the ball quickly and switch in as few passes as possible.
- Identify who might be positioned to switch the ball and how - through, around, over...
- Pass detail - Understand the weight and speed needed to reach intended receiver.
- Provide angles of support - beyond, beside, below the ball.
Conditions
1. Full width of the pitch (Greens can go and engage).
2. The two Black servers are locked into the shaded zone and cannot join in. Also can you try to limit touches to maintain realism. Communicate between to know who is offering support.
3. Initially Blue FB's focus is to provide support from below.
4. Greens have a managed 6 second timer upon regaining the ball to counter-attack and score into the mini goals.
5. Offside rule applies to maintain game realism.
Challenges
1. Greens (Managed) are looking to force the opposition into a wide area and steal the ball. Reward with 2 goals if they can break lines and counter-attack upon regaining possession and score into any of the mini goals.
2. When the ball travels into a wide position, the Greens (Managed) should try to occupy two out of the three channels, leaving the furthest.
Targets
1. Blue must get the ball into either wide zone and then switch play before scoring. Reward with 1 goal for achieving switch of play.
2. Reward with 3 goals if a goal is scored following a switch of play being made.
3. Any regular goal scored by Blue = 1 goal.
See the guidance at the top of this page to understand why you are not seeing interactive Football/Soccer images.
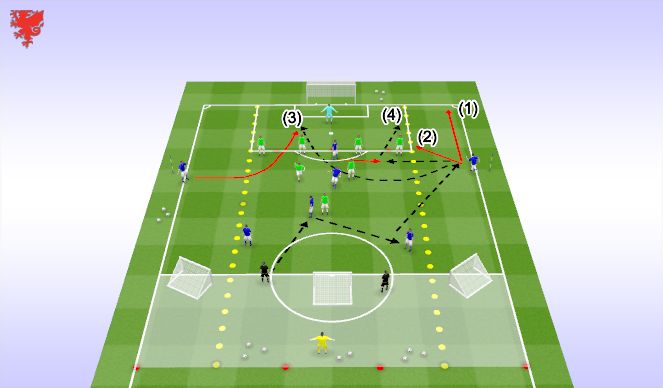
Specific Roles & Responsibilities
In Possession Roles & Responsibilities
Starting positions relative to the ball...
Ball Side Winger (7 or 11) – Maintain maximum width, create separation away from marker by using double movements. Keep open hips to allow first touch on furthest foot and set up next action to be forward, threatening to exploit the space behind.
ST (9) – Stretch the pitch vertically, try to pin the ball side CB by pulling on to their blind side shoulder. Aim to attack near post from crosses.
Attacking Midfielder (10) – Provide support away from the ball by playing on the blind side of the Green 6 & 8, occupying the space in front of the opposite side CB to pin them. Try to provide attacking support and make runs across the middle of the box to attack any crosses.
Central Midfielder (6) – Provide support from beside or below the ball, ensuring body shape allows protection from pressure and to move the ball quickly in limited touches. Aim to lock the edge of the box off in the final third and be in a position to shoot if the ball is cleared.
Ball Side FB – Provide support from below the ball, ensuring body shape facilitates moving the ball quickly out to the other side. Maintain distance of at least 6 yards to minimise the chance of opposition midfielder intercepting or blocking passing lane.
Opposite Side FB – First movement is to tuck around using centre circle lines as a reference point. As ball is circulated laterally or backwards, recognise cue to make movement away towards the wide channel. Important not to be on same line as player on the ball so that any pass received is angled in the forward direction.
Opposite Side Winger – Hold position as wide as possible when ball is on opposite side to create problem for the Green FB in case of a quick switch. Aim to maximise the space available in 1v1 situations and have confidence to attempt take-ons. Try to make movement to get inside the back post if ball side winger shapes to go down the line for a crossing opportunity.
See the guidance at the top of this page to understand why you are not seeing interactive Football/Soccer images.
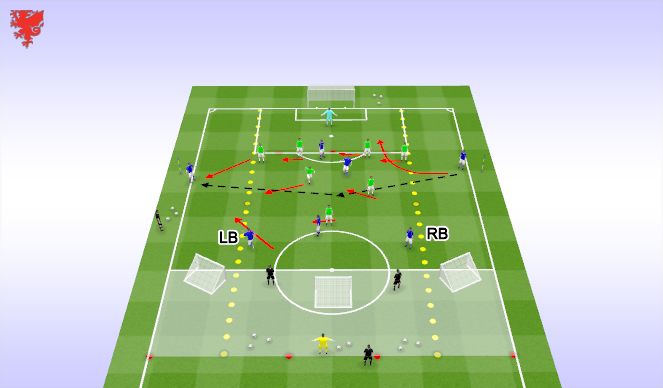
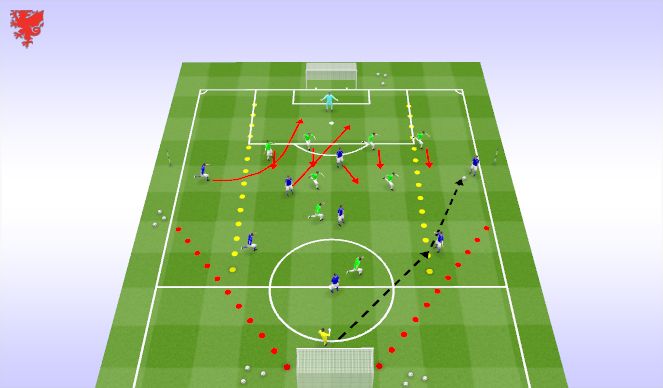
Problem 1 (Lloyd Lead) (5 mins)
Problem 1
Green team defending FB's steps out to engage and apply aggressive pressure to Blue wide players (7 or 11) as they receive the ball, forcing play backwards.
KEY COACHING POINTS OUT OF POSSESSION (Greens Managed not coached) – EMPHASISE…
- Angle of approach run - always aim to show the opposition backwards first, outside second.
- Intensity of press - Apply pressure fast, be aggressive.
- Distances between each other. Provide cover and balance.
Solution 1
Blue wide 7 or 11 circulates ball laterally or backwards to supporting Blue midfielder (8) or ball side FB who look to switch the play using quick ball speed to disrupt Green opposition's compactness.
Blues are allowed to use Black servers who are limited to two touches.
Key Coaching Point (1): Make the pitch as big as possible so it is difficult for the opposition FB to get out and apply pressure. 7 and 11 stay touchline wide, 9 to stretch the pitch vertically. CM to push forward and be available for a wall pass. Ball side FB to provide support from below the ball.
Key Coaching Point (2): Use limited touches to move the ball quickly.
See the guidance at the top of this page to understand why you are not seeing interactive Football/Soccer images.
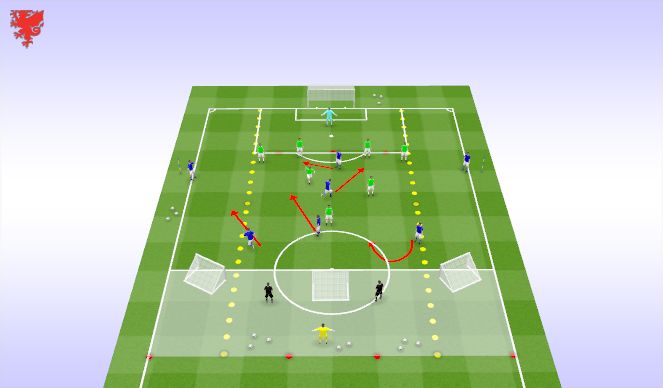
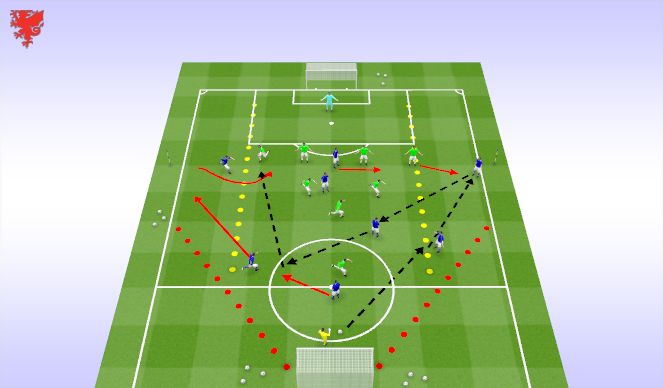
Problem 2 (Chris Lead) (5 mins)
Problem 2
The Green back four defend the width of the 18-yard box with the two defensive central midfielders in front of them narrow and compact to prevent any split passes into Blue 9.
This allows Blue 7 or 11 to receive the ball with open hips on the back foot and attack the space in the wide channel as the Green FB comes out to engage them and the Green defensive unit slides across to remain narrow and compact.
Solution 2The ball side Blue winger having stretched the field as wide as possible receives the ball from a deep or lateral player. This triggers the opposite side Blue winger to narrow off and tuck in 15-20 yards to create a threat behind the defence and to give the Blue ST (9) a teammate to combine with.
Option (1): Blue 7 attacks the space and challenges the Green FB 1v1.
Option (2): Blue 7 cuts in diagonally into the box again isolating and challenging the Green FB 1v1.
Option (3): Blue 7 makes an early diagonal cross behind the defence for the opposite side Blue wide player making a run to the back post.
Option (4): Use a wall pass with the Blue ST (9) to combine to create a 2v1 situation, then attacking the byline or travelling into or across the penalty box.
Key Coaching Point (1): Pass detail into wingers – aim for back foot to set up next action to be forward.
Key Coaching Point (2): Body shape to receive – Open hips facing forwards to encourage positive attacking play.
See the guidance at the top of this page to understand why you are not seeing interactive Football/Soccer images.
SSG Framing
SSG
9 vs 9 Small Sided Game
In Possession Team – Blues (Managed)
Set up in a (GK) 1-3-2-3 (representative of a 1-4-3-3)
Out of Possession Team – Greens (Coached)Set up in a (GK) 1-4-2-1-1 (representative of a 1-4-2-3-1)
- Pitch will be tapered off (Blue IP missing 1 CB and 1 CM and Green OP Wingers not required)
Structure
- 2 x 4-minute blocks
- 8 minutes ball rolling
- 2 x 1-minute active rest – feedback / interventions (coaching process & walkthrough opportunities)
*Apply same challenges and conditions as previous*
Explanation
- The ball will start with the attacking Blue GK after setting and applying the challenges, conditions and targets for both teams.
KEY QUESTIONS:
HOW? – WHERE? – WHEN? – WHAT? – WHO? – WHY? – WHAT IF?
WHAT IS HAPPENING…
- ON the ball
- AROUND the ball
- AWAY FROM the ball
Conditions
1. Continue to manage the time spent on the ball with the defending Green team to ensure maximum opportunity to coach Blue team IP - 6 second timer.
2. At least ONE Blue defender and ONE Green player should stay in the tapered area in the Blue defensive third. Green ST to use centre circle lines as reference point and try to stop switch of play by blocking passing lanes out to the other side and forcing direction.
3. Blue wingers should always stretch the pitch as high and wide as possible within the final third and against the defensive line.
Targets
1. Blue to concentrate on trying to play around and through the Green defence to create shooting opportunities.
Blue IP - Encourage quick ball speed to switch the play as quickly as possible
Every switch = 1 goal.
A regular goal = 1 goal.
A switch resulting in a goal = 3 goals.
A direct switch from wide channel to opposite wide channel = 5 goals. Try to encourage switch as quickly as possible, if opportunity is available. Recognise there may be occasions to play directly over.
Green OP - (Managed not coached) - Communication, distances & maintain concentration
2. Greens have 6 seconds upon regaining possession to counter-attack and score = 2 goals.
Potential Interventions
- Concurrent
- Terminal
- Walk Through
- Coaching Process
See the guidance at the top of this page to understand why you are not seeing interactive Football/Soccer images.
Problem 3 (Chris Lead) (5 mins)
Problem 3
The Green defensive line steps up to the edge of the final third using the poles on side of pitch as a reference point. This forces the Blue front three to take up deeper positions but leaves space behind the defensive line to exploit.
Solution 3
Encourage the Blue 9 ST to drop in to receive the ball. This acts as a cue for the Blue 10 to run beyond and rotate into the 9's position to maintain depth and threaten to exploit space in behind. This can also be a cue for the wingers to make diagonal runs inside.
Key Coaching Point (1): Movement to receive, create separation from marker and positional rotation.
Key Coaching Point (2): Pass detail – weight and speed of pass.
See the guidance at the top of this page to understand why you are not seeing interactive Football/Soccer images.
Problem 4 (Lloyd Lead) (5 mins)
Problem 4
Continue to manage Greens Out of Possession team to maintain a high defensive line using the poles as a reference point, leaving space in behind for In Possession team to exploit.
Solution 4
Encourage FBs to provide angles of support with: (a) an overlap; (b) an underlap. This has the potential to create overload opportunities (2v1’s) in wide areas and increase probability of success in achieving the final pass.
Key Coaching Point (1): Ball side FB to provide supporting angle depending on wingers’ movement. If winger rolls inside, movement outside to maintain width. If winger stays wide, move inside to provide supporting angle beside ball and option of a one-two wall pass.
Key Coaching Point (2): Timing of movement to receive. Opposite side FB to recognise cue and begin movement away as ball is passed laterally or backwards. Blue 9 to slide across to Green ball side CB to pin.
'%3E%3Cpath id='path4169' d='M 11.4375,70.25 C 11.457031,38.394531 37.277344,13.242188 68.253906,13.050781 99.78125,12.855469 125.73047,38.351563 125.8125,70.078125 125.89844,101.62109 100.43359,127.14063 69.148438,127.42188 37.582031,127.70703 11.464844,102.23438 11.4375,70.25 m 6.425781,-0.08984 c 0.03516,28.421871 23.027344,50.69922 50.519532,50.82031 C 96.433594,121.10156 119.30469,98.367188 119.38281,70.359375 119.45313,42.878906 97.382813,19.714844 69.015625,19.496094 40.75,19.277344 17.964844,42.035156 17.863281,70.160156' style='clip-rule:nonzero;fill:%23333f48;fill-opacity:1;fill-rule:nonzero;stroke:none' /%3E%3Cpath style='fill:%23333f48;fill-opacity:1;fill-rule:nonzero;stroke:none' d='m 39.789063,108.62109 c 0.28125,0.14454 0.550781,0.32032 0.839843,0.4336 2.734375,1.05469 5.554688,1.78125 8.453125,2.23047 2.734375,0.42578 5.484375,0.64453 8.25,0.54297 3.988282,-0.15625 7.832032,-0.94922 11.445313,-2.69532 1.683594,-0.8164 3.246094,-1.82422 4.640625,-3.07422 3.265625,-2.92578 5.171875,-6.582027 5.796875,-10.906246 0.546875,-3.761719 0.04687,-7.425781 -1.09375,-11.019531 -1.4375,-4.523438 -3.730469,-8.582032 -6.703125,-12.265625 -1.03125,-1.277344 -2.082031,-2.535157 -3.113281,-3.808594 C 66.789063,66.1875 65.332031,64.269531 64.0625,62.21875 c -1.601562,-2.582031 -2.835937,-5.316406 -3.613281,-8.261719 -0.683594,-2.574218 -0.902344,-5.1875 -0.6875,-7.828125 0.214844,-2.617187 0.910156,-5.117187 2.152344,-7.441406 2.164062,-4.050781 5.503906,-6.710937 9.816406,-8.179687 1.890625,-0.640625 3.835937,-1.058594 5.832031,-1.195313 1.121094,-0.07813 2.242188,-0.152344 3.363281,-0.164062 4.28125,-0.02734 8.4375,0.734375 12.453125,2.175781 1.871094,0.671875 3.6875,1.496094 5.523438,2.257812 0.226562,0.09375 0.4375,0.230469 0.664062,0.351563 -0.164062,0.25 -0.371093,0.160156 -0.539062,0.164062 -2.824219,0.101563 -5.535156,0.703125 -8.132813,1.804688 -1.335937,0.570312 -2.570312,1.316406 -3.648437,2.296875 -2.527344,2.296875 -3.605469,5.15625 -3.34375,8.550781 0.140625,1.855469 0.722656,3.574219 1.550781,5.222656 0.648438,1.296875 1.414063,2.523438 2.292969,3.675782 0.953125,1.25 1.929687,2.484375 2.929687,3.699218 2.085938,2.523438 4.164063,5.054688 6.050782,7.738282 2.203125,3.136718 4.140627,6.417968 5.589847,9.980468 1.16406,2.867188 2.01562,5.820313 2.39843,8.894532 0.25,2.011718 0.30079,4.03125 0.11719,6.058593 -0.24219,2.640625 -0.79297,5.195313 -1.74609,7.667969 -1.29688,3.36328 -3.300784,6.22656 -5.972659,8.63281 -2.429687,2.19141 -5.171875,3.90625 -8.109375,5.3125 -2.695312,1.29297 -5.464843,2.40235 -8.34375,3.20313 -1.953125,0.54687 -3.945312,0.8789 -5.949218,1.15625 -3.035157,0.41797 -6.085938,0.48828 -9.132813,0.3125 -5.328125,-0.3125 -10.476562,-1.46094 -15.410156,-3.52344 -3.449219,-1.44141 -6.691406,-3.25781 -9.757813,-5.39453 -0.183593,-0.12891 -0.378906,-0.25 -0.53125,-0.41016 -0.07031,-0.0703 -0.05859,-0.22656 -0.08203,-0.34375 z m 0,0' id='path4175' /%3E%3Cpath style='fill:%23333f48;fill-opacity:1;fill-rule:nonzero;stroke:none' d='M 94.699219,29.390625 C 94.089844,29.21875 93.476563,29.054688 92.867188,28.875 90.183594,28.085938 87.46875,27.441406 84.703125,27.046875 c -3.976562,-0.566406 -7.945312,-0.59375 -11.863281,0.402344 -7.535156,1.914062 -12.386719,6.71875 -14.878906,13.996094 -0.894532,2.617187 -1.179688,5.328125 -0.953125,8.078125 0.203125,2.484375 0.867187,4.859375 1.816406,7.160156 0.933594,2.261719 2.117187,4.390625 3.4375,6.449219 1.4375,2.25 3.050781,4.371093 4.640625,6.511718 1.4375,1.933594 2.867187,3.871094 4.261719,5.835938 1.230468,1.730469 2.316406,3.546875 3.273437,5.445312 1.324219,2.625 2.265625,5.378907 2.703125,8.292969 0.433594,2.902344 0.292969,5.765625 -0.660156,8.5625 -0.9375,2.74609 -2.574219,5.00781 -4.777344,6.875 -2.417969,2.04688 -5.203125,3.39844 -8.246094,4.22266 -1.835937,0.5 -3.703125,0.75781 -5.609375,0.82031 -3.886718,0.13281 -7.679687,-0.47266 -11.421875,-1.46094 -2.261718,-0.59765 -4.488281,-1.33203 -6.695312,-2.11328 -0.207031,-0.0742 -0.40625,-0.16797 -0.597656,-0.25 -0.02344,-0.24609 0.148437,-0.19141 0.25,-0.20703 1.96875,-0.30469 3.921875,-0.67969 5.804687,-1.34766 1.367188,-0.48437 2.671875,-1.10156 3.855469,-1.94922 2.25,-1.61328 3.65625,-3.765621 4.0625,-6.515621 0.273437,-1.867188 0.09375,-3.710938 -0.429688,-5.527344 -0.472656,-1.648437 -1.171875,-3.199219 -2.109375,-4.628906 -0.792968,-1.207031 -1.636718,-2.382813 -2.523437,-3.519531 -0.921875,-1.195313 -1.921875,-2.328125 -2.890625,-3.484375 -2.753906,-3.273438 -5.351563,-6.660157 -7.523438,-10.355469 -2.042968,-3.480469 -3.667968,-7.136719 -4.597656,-11.078125 -0.640625,-2.699219 -0.980469,-5.4375 -0.832031,-8.214844 0.238281,-4.53125 1.476562,-8.78125 3.824219,-12.6875 1.082031,-1.800781 2.445312,-3.375 3.988281,-4.800781 2.742187,-2.527344 5.863281,-4.480469 9.257812,-5.992188 3.746094,-1.667968 7.652344,-2.769531 11.707032,-3.394531 3.152343,-0.488281 6.324218,-0.671875 9.507812,-0.519531 8.632813,0.410156 16.671875,2.792969 24,7.433594 0.08203,0.05078 0.152344,0.109375 0.230469,0.167968 -0.0039,0.04297 -0.0078,0.08984 -0.01563,0.136719' id='path4177' /%3E%3Cpath style='fill:%23333f48;fill-opacity:1;fill-rule:nonzero;stroke:none' d='m 31.699219,38.75 c -0.07813,0.238281 -0.152344,0.476563 -0.238281,0.710938 -1.460938,4.074218 -2.066407,8.28125 -1.808594,12.59375 0.4375,7.304687 2.808594,13.925781 7.277344,19.753906 3.714843,4.84375 7.441406,9.671875 11.167968,14.503906 1.113282,1.441406 1.953125,3.007813 2.414063,4.777344 0.332031,1.257812 0.425781,2.539062 0.273437,3.820312 -0.214843,1.832032 -1.070312,3.34375 -2.464843,4.546875 -0.984375,0.851559 -2.113282,1.449219 -3.316407,1.925779 -1.378906,0.54297 -2.8125,0.89063 -4.273437,1.1211 -2.226563,0.35547 -4.46875,0.46093 -6.722656,0.41015 -0.589844,-0.0156 -1.046875,-0.18359 -1.433594,-0.625 -0.636719,-0.72265 -1.335938,-1.39062 -1.9375,-2.14062 C 25.574219,93.800781 22.300781,86.621094 20.84375,78.636719 20.152344,74.835938 19.917969,71 20.15625,67.128906 20.796875,56.773438 24.390625,47.574219 30.859375,39.480469 c 0.21875,-0.273438 0.453125,-0.53125 0.679688,-0.796875 0.05469,0.02344 0.109375,0.04297 0.160156,0.06641' id='path4179' /%3E%3Cpath style='fill:%23333f48;fill-opacity:1;fill-rule:nonzero;stroke:none' d='m 105.41016,101.30078 c -0.13282,-0.3125 0.0234,-0.5039 0.0977,-0.69922 1.38672,-3.749997 1.98047,-7.628904 1.89844,-11.621091 -0.14453,-6.84375 -2.08594,-13.144531 -5.73437,-18.925781 C 99.890625,67.226563 97.917969,64.53125 95.835938,61.917969 94.4375,60.160156 92.988281,58.4375 91.582031,56.6875 90.632813,55.511719 89.6875,54.335938 88.792969,53.121094 c -0.835938,-1.144531 -1.488281,-2.398438 -1.953125,-3.742188 -0.523438,-1.515625 -0.695313,-3.070312 -0.511719,-4.652343 0.21875,-1.839844 1.082031,-3.339844 2.476563,-4.542969 1.039062,-0.890625 2.230468,-1.507813 3.503906,-1.980469 1.632812,-0.609375 3.320312,-0.960937 5.046875,-1.175781 1.917969,-0.238281 3.839841,-0.269531 5.769531,-0.230469 0.52734,0.01172 0.89453,0.203125 1.23828,0.585938 5.50391,6.113281 9.26172,13.144531 11.21875,21.132812 1.11719,4.554688 1.5625,9.179688 1.30469,13.855469 -0.58203,10.625 -4.23438,20.082031 -10.96094,28.339846 -0.15625,0.1914 -0.32812,0.375 -0.51562,0.58984' id='path4181' /%3E%3Cpath style='fill:%23333f48;fill-opacity:1;fill-rule:nonzero;stroke:none' d='m 39.796875,108.63281 c -0.05859,0.0117 -0.117187,0.0234 -0.175781,0.0352 0.05469,-0.0156 0.113281,-0.0312 0.167969,-0.0469 z m 0,0' id='path4183' /%3E%3C/g%3E%3C/svg%3E)
 Play animation
 Play step-by-step
 Repeat (toggle)
 Full Screen
 Pause
Pause Stop
Stop
Practice Layout
SPECIFIC into SSG Practice
Framing ‘The Welsh Way Principles’ – IN POSSESSION
Focus: Switching Play
Objectives: Make the pitch big (width and depth) / Quick ball speed / Identify who can switch play / Final pass
Organisation
- Session planned for 18 players in total (Specific = 17, SSG = 18)
- Players will be bibbed accordingly on arrival
- Area size (total) = 3-quarter pitch practice
Note: Coaching positions may alter.