


Football/Soccer Session (Academy Sessions): Midfield and

Premier Users' Club
Stuart Goldie
Profile Summary

| Name: | Stuart Goldie |
|---|---|
| City: | Glenrothes |
| Country: | United Kingdom |
| Membership: | Adult Member |
| Sport: | Football/Soccer |
Description
Helping players to develop the understanding of overloading the midfield area by using the current midfield 4 and introducing 2 full backs

See the guidance at the top of this page to understand why you are not seeing interactive Football/Soccer images.
Learning Objectives

|
Technical Body Position, 1st Touch, Quality of Pass |

|
Tactical Positioning, Angles of Support |

|
Physical Agility, Balance, Co-ordination |

|
Psychological Decision Making |

|
Social Communication |
See the guidance at the top of this page to understand why you are not seeing interactive Football/Soccer images.
Learning Objectives
|
|
Technical Body Position, 1st Touch, Quality of Pass |
|
|
Tactical Positioning, Angles of Support |
|
|
Physical Agility, Balance co-ordination |
|
|
Psychological Decision Making |
|
|
Social Communication |
Small-sided Game (9v9) (15 mins)
Organisation
Pitch size - box-to-box, full width
Full size goals at each end
Goalkeepers in each goals
Reds(focused team) 1-3-4-1
Blues 1-2-4-1-1
2 large cones as a marker for the FB to go to when the keeper has the ball (trigger)
Challenges/Targets/Conditions
Both teams look to score at the opposition goals.
Blues play direct and have 8 seconds to score when in possession
Coaching Point
- AM drops deep into a central role to support the overload.
- Wingers are inverted to support the DLM and AM in the central areas.
- Fullbacks go high to become support in the wide areas.
Key Technical/Tactical Points
- Movement to create space
- Movement to recieve the ball
- Communication
- Quality of pass
- Body position to recieve
- Angle to recieve
- Width and depth
Coaching Process
- Observe
- Diagnose
- Recreate
- Feedback
- Demostration
- Rehearse
- Play Live
Extra coaching points
- Trigger for everyone to get into position is when the keeper has the ball
- CB drops and creates an angle left or right to receive the ball from the keeper
- DLM will also drop to the edge to the 6yrd box halfway between the 18yrd box and the middle 3rd and go to the other side of the CB to be an extra option for the keeper
- FB's go no further than the marked-out cones on the touch line (high and wide)
- One of the MF would drop into the vacant space left by the DLM to be another option.
- As the DLM drops, the 10 drops on the edge of the centre circle in line with the penalty spot
- Positive touch - Back foot (FB)
- Mini tangent in wide areas (WMF and FB)
- DLM will remain in their position during the attack and the remaining midfield 3 and FB's can roam
- FB's can ONLY role inside if a player from midfield has gone in their area.
Progression:
- 3rd man runner: MF plays the ball to the ST who is pinning the furthest CB, who then lays the ball back to the 10 who can either shoot or play the in the wide MF who runs in behind the ball sided CB to have a shot on goal
Pedagogy
- Problem Based Learning
- Scenario Based Learning - Last 5 mins Juventus vs Real Madrid CL Final 2017
- Scaffolding
See the guidance at the top of this page to understand why you are not seeing interactive Football/Soccer images.
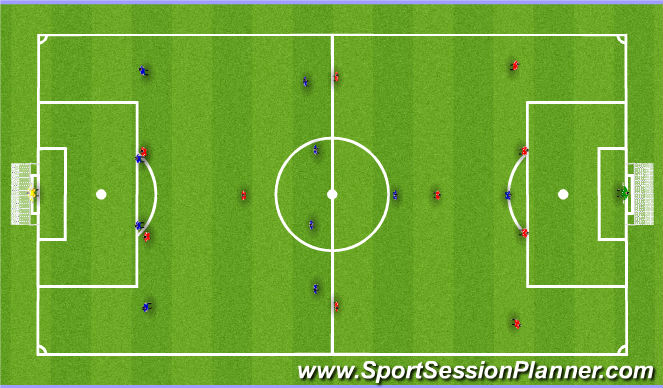
11 vs 11
Patterns
P1: Ball into the WMF plays a 1-2 pass with the FB and can either score or assist the 10
P2: If the ball is on one side the furthest FB can roll inside and the furtherst MF goes central or near the 10 position. This can only happen if the 10 goes wide.
P3: As the ball is being played from the DLM, the 10 drops and the WMF goes into the 10 position and plays a 1-2 pass with FB
P4: If P3 is not an option the 10 can drive ONLY if there's a gap between the blues midfield.
P5: If options from the wide area is locked off, FB looks to switch the ball to the other FB, as that happens the 9 goes to the near post, 10 goes either central or far post and the furthest MF goes central or near post. FB rolls inside and acts a MF
Organisation
Red team (Focused team) = 4-4-2
Blue team = 4-4-1-1
'%3E%3Cpath id='path4169' d='M 11.4375,70.25 C 11.457031,38.394531 37.277344,13.242188 68.253906,13.050781 99.78125,12.855469 125.73047,38.351563 125.8125,70.078125 125.89844,101.62109 100.43359,127.14063 69.148438,127.42188 37.582031,127.70703 11.464844,102.23438 11.4375,70.25 m 6.425781,-0.08984 c 0.03516,28.421871 23.027344,50.69922 50.519532,50.82031 C 96.433594,121.10156 119.30469,98.367188 119.38281,70.359375 119.45313,42.878906 97.382813,19.714844 69.015625,19.496094 40.75,19.277344 17.964844,42.035156 17.863281,70.160156' style='clip-rule:nonzero;fill:%23333f48;fill-opacity:1;fill-rule:nonzero;stroke:none' /%3E%3Cpath style='fill:%23333f48;fill-opacity:1;fill-rule:nonzero;stroke:none' d='m 39.789063,108.62109 c 0.28125,0.14454 0.550781,0.32032 0.839843,0.4336 2.734375,1.05469 5.554688,1.78125 8.453125,2.23047 2.734375,0.42578 5.484375,0.64453 8.25,0.54297 3.988282,-0.15625 7.832032,-0.94922 11.445313,-2.69532 1.683594,-0.8164 3.246094,-1.82422 4.640625,-3.07422 3.265625,-2.92578 5.171875,-6.582027 5.796875,-10.906246 0.546875,-3.761719 0.04687,-7.425781 -1.09375,-11.019531 -1.4375,-4.523438 -3.730469,-8.582032 -6.703125,-12.265625 -1.03125,-1.277344 -2.082031,-2.535157 -3.113281,-3.808594 C 66.789063,66.1875 65.332031,64.269531 64.0625,62.21875 c -1.601562,-2.582031 -2.835937,-5.316406 -3.613281,-8.261719 -0.683594,-2.574218 -0.902344,-5.1875 -0.6875,-7.828125 0.214844,-2.617187 0.910156,-5.117187 2.152344,-7.441406 2.164062,-4.050781 5.503906,-6.710937 9.816406,-8.179687 1.890625,-0.640625 3.835937,-1.058594 5.832031,-1.195313 1.121094,-0.07813 2.242188,-0.152344 3.363281,-0.164062 4.28125,-0.02734 8.4375,0.734375 12.453125,2.175781 1.871094,0.671875 3.6875,1.496094 5.523438,2.257812 0.226562,0.09375 0.4375,0.230469 0.664062,0.351563 -0.164062,0.25 -0.371093,0.160156 -0.539062,0.164062 -2.824219,0.101563 -5.535156,0.703125 -8.132813,1.804688 -1.335937,0.570312 -2.570312,1.316406 -3.648437,2.296875 -2.527344,2.296875 -3.605469,5.15625 -3.34375,8.550781 0.140625,1.855469 0.722656,3.574219 1.550781,5.222656 0.648438,1.296875 1.414063,2.523438 2.292969,3.675782 0.953125,1.25 1.929687,2.484375 2.929687,3.699218 2.085938,2.523438 4.164063,5.054688 6.050782,7.738282 2.203125,3.136718 4.140627,6.417968 5.589847,9.980468 1.16406,2.867188 2.01562,5.820313 2.39843,8.894532 0.25,2.011718 0.30079,4.03125 0.11719,6.058593 -0.24219,2.640625 -0.79297,5.195313 -1.74609,7.667969 -1.29688,3.36328 -3.300784,6.22656 -5.972659,8.63281 -2.429687,2.19141 -5.171875,3.90625 -8.109375,5.3125 -2.695312,1.29297 -5.464843,2.40235 -8.34375,3.20313 -1.953125,0.54687 -3.945312,0.8789 -5.949218,1.15625 -3.035157,0.41797 -6.085938,0.48828 -9.132813,0.3125 -5.328125,-0.3125 -10.476562,-1.46094 -15.410156,-3.52344 -3.449219,-1.44141 -6.691406,-3.25781 -9.757813,-5.39453 -0.183593,-0.12891 -0.378906,-0.25 -0.53125,-0.41016 -0.07031,-0.0703 -0.05859,-0.22656 -0.08203,-0.34375 z m 0,0' id='path4175' /%3E%3Cpath style='fill:%23333f48;fill-opacity:1;fill-rule:nonzero;stroke:none' d='M 94.699219,29.390625 C 94.089844,29.21875 93.476563,29.054688 92.867188,28.875 90.183594,28.085938 87.46875,27.441406 84.703125,27.046875 c -3.976562,-0.566406 -7.945312,-0.59375 -11.863281,0.402344 -7.535156,1.914062 -12.386719,6.71875 -14.878906,13.996094 -0.894532,2.617187 -1.179688,5.328125 -0.953125,8.078125 0.203125,2.484375 0.867187,4.859375 1.816406,7.160156 0.933594,2.261719 2.117187,4.390625 3.4375,6.449219 1.4375,2.25 3.050781,4.371093 4.640625,6.511718 1.4375,1.933594 2.867187,3.871094 4.261719,5.835938 1.230468,1.730469 2.316406,3.546875 3.273437,5.445312 1.324219,2.625 2.265625,5.378907 2.703125,8.292969 0.433594,2.902344 0.292969,5.765625 -0.660156,8.5625 -0.9375,2.74609 -2.574219,5.00781 -4.777344,6.875 -2.417969,2.04688 -5.203125,3.39844 -8.246094,4.22266 -1.835937,0.5 -3.703125,0.75781 -5.609375,0.82031 -3.886718,0.13281 -7.679687,-0.47266 -11.421875,-1.46094 -2.261718,-0.59765 -4.488281,-1.33203 -6.695312,-2.11328 -0.207031,-0.0742 -0.40625,-0.16797 -0.597656,-0.25 -0.02344,-0.24609 0.148437,-0.19141 0.25,-0.20703 1.96875,-0.30469 3.921875,-0.67969 5.804687,-1.34766 1.367188,-0.48437 2.671875,-1.10156 3.855469,-1.94922 2.25,-1.61328 3.65625,-3.765621 4.0625,-6.515621 0.273437,-1.867188 0.09375,-3.710938 -0.429688,-5.527344 -0.472656,-1.648437 -1.171875,-3.199219 -2.109375,-4.628906 -0.792968,-1.207031 -1.636718,-2.382813 -2.523437,-3.519531 -0.921875,-1.195313 -1.921875,-2.328125 -2.890625,-3.484375 -2.753906,-3.273438 -5.351563,-6.660157 -7.523438,-10.355469 -2.042968,-3.480469 -3.667968,-7.136719 -4.597656,-11.078125 -0.640625,-2.699219 -0.980469,-5.4375 -0.832031,-8.214844 0.238281,-4.53125 1.476562,-8.78125 3.824219,-12.6875 1.082031,-1.800781 2.445312,-3.375 3.988281,-4.800781 2.742187,-2.527344 5.863281,-4.480469 9.257812,-5.992188 3.746094,-1.667968 7.652344,-2.769531 11.707032,-3.394531 3.152343,-0.488281 6.324218,-0.671875 9.507812,-0.519531 8.632813,0.410156 16.671875,2.792969 24,7.433594 0.08203,0.05078 0.152344,0.109375 0.230469,0.167968 -0.0039,0.04297 -0.0078,0.08984 -0.01563,0.136719' id='path4177' /%3E%3Cpath style='fill:%23333f48;fill-opacity:1;fill-rule:nonzero;stroke:none' d='m 31.699219,38.75 c -0.07813,0.238281 -0.152344,0.476563 -0.238281,0.710938 -1.460938,4.074218 -2.066407,8.28125 -1.808594,12.59375 0.4375,7.304687 2.808594,13.925781 7.277344,19.753906 3.714843,4.84375 7.441406,9.671875 11.167968,14.503906 1.113282,1.441406 1.953125,3.007813 2.414063,4.777344 0.332031,1.257812 0.425781,2.539062 0.273437,3.820312 -0.214843,1.832032 -1.070312,3.34375 -2.464843,4.546875 -0.984375,0.851559 -2.113282,1.449219 -3.316407,1.925779 -1.378906,0.54297 -2.8125,0.89063 -4.273437,1.1211 -2.226563,0.35547 -4.46875,0.46093 -6.722656,0.41015 -0.589844,-0.0156 -1.046875,-0.18359 -1.433594,-0.625 -0.636719,-0.72265 -1.335938,-1.39062 -1.9375,-2.14062 C 25.574219,93.800781 22.300781,86.621094 20.84375,78.636719 20.152344,74.835938 19.917969,71 20.15625,67.128906 20.796875,56.773438 24.390625,47.574219 30.859375,39.480469 c 0.21875,-0.273438 0.453125,-0.53125 0.679688,-0.796875 0.05469,0.02344 0.109375,0.04297 0.160156,0.06641' id='path4179' /%3E%3Cpath style='fill:%23333f48;fill-opacity:1;fill-rule:nonzero;stroke:none' d='m 105.41016,101.30078 c -0.13282,-0.3125 0.0234,-0.5039 0.0977,-0.69922 1.38672,-3.749997 1.98047,-7.628904 1.89844,-11.621091 -0.14453,-6.84375 -2.08594,-13.144531 -5.73437,-18.925781 C 99.890625,67.226563 97.917969,64.53125 95.835938,61.917969 94.4375,60.160156 92.988281,58.4375 91.582031,56.6875 90.632813,55.511719 89.6875,54.335938 88.792969,53.121094 c -0.835938,-1.144531 -1.488281,-2.398438 -1.953125,-3.742188 -0.523438,-1.515625 -0.695313,-3.070312 -0.511719,-4.652343 0.21875,-1.839844 1.082031,-3.339844 2.476563,-4.542969 1.039062,-0.890625 2.230468,-1.507813 3.503906,-1.980469 1.632812,-0.609375 3.320312,-0.960937 5.046875,-1.175781 1.917969,-0.238281 3.839841,-0.269531 5.769531,-0.230469 0.52734,0.01172 0.89453,0.203125 1.23828,0.585938 5.50391,6.113281 9.26172,13.144531 11.21875,21.132812 1.11719,4.554688 1.5625,9.179688 1.30469,13.855469 -0.58203,10.625 -4.23438,20.082031 -10.96094,28.339846 -0.15625,0.1914 -0.32812,0.375 -0.51562,0.58984' id='path4181' /%3E%3Cpath style='fill:%23333f48;fill-opacity:1;fill-rule:nonzero;stroke:none' d='m 39.796875,108.63281 c -0.05859,0.0117 -0.117187,0.0234 -0.175781,0.0352 0.05469,-0.0156 0.113281,-0.0312 0.167969,-0.0469 z m 0,0' id='path4183' /%3E%3C/g%3E%3C/svg%3E)
 Play animation
 Play step-by-step
 Repeat (toggle)
 Full Screen
 Pause
Pause Stop
Stop
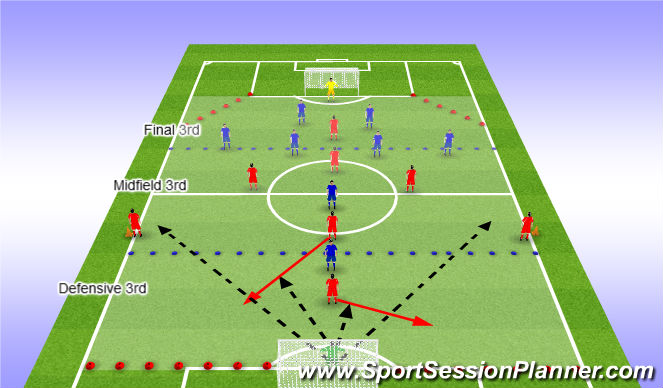
Drill (15 mins)
Organisation
- The ball starts with the server in the 18 yrd box. Originally the mdfield shape up in a diamond formation, however they can make a decision on who they want to set-up. The Fullbacks start high up .
- The Blue team will set-up in a narrow 4 and can set up however they like.
Key Technical/Tactical Points
- Movement to create space
- Movement to recieve the ball
- Communication
- Quality of pass
- Body position to recieve
- Angle to recieve
- Width and depth
Targets/Challenges
- Blue team once retrieved the ball has 5 seconds to get the server who also plays as a target man for the blues.
- Only 1 Fullback is allowed in the area at any one time.
Coaching Process
- Observe
- Diagnose
- Recreate
- Feedback
- Demostration
- Rehearse
- Play Live
Extra coaching points
- DLM drops to receive the ball from the server as it would be a CB
- FB's stay outside the marked area to show support
- One FB would come into the area to be an extra player ONLY if the ball is on the other side of the area.
- Once the FB rolls inside the furthest midfielder goes into the middle, so the diamond shape is kept but there is a extra player in the middle to receive and pass
- Blues are only to press passively and will become live 7 minutes into the drill
- Blues score in 6 seconds at the same time reds have to try and win the ball back in 6 seconds
- Full-backs play as a tangent
Pedagogy
- Scaffolding
- Zone of Proximal Developmnt
- Deep Level Learning
- Empowerment