


Football/Soccer Session (Academy Sessions): Match Prep - build with a 4-4-2-Diamond

FAW Coach Ed
Matthew Evans
Profile Summary

| Name: | Matthew Evans |
|---|---|
| City: | Windsor |
| Country: | United Kingdom |
| Membership: | Adult Member |
| Sport: | Football/Soccer |
Description
Set-Up:
Formation Match-Up: 4-4-2 Diamond (In Possession) vs 4-4-2 (Out of Possession)
Area: Central third to attacking third (can include final third entry zones depending on practice design)
Duration: 3 x 6-minute blocks
Intervention Windows: 2-minute breaks between blocks for tactical feedback, use of tactics board, and live corrections
Session Objective:
To create and exploit space in Zone 14 through coordinated runs from midfield, with an emphasis on:
Positional rotations to unbalance the defensive structure
Timing and angle of support runs
Quality of delivery to penetrate centrally and access the final third with control
Key Tactical Detail (In Possession – Diamond Midfield):
Use vertical and horizontal rotations within the diamond to manipulate opposition midfield shape
Encourage one midfielder to break lines, arriving in Zone 14 unmarked
Use the striker’s movement (drop or pin) to create gaps for late runners
Opposite CM or CAM must occupy blind spots and stretch the opposition’s midfield line
Core Coaching Points:
???? Creating Space for Others:
Use decoy runs to disrupt the opposition’s midfield block
Pull opposition central midfielders wide or deep to free up central access lanes
Encourage off-ball movement to clear the passing channel into Zone 14
???? Timing & Angle of the Run:
Midfielders must arrive after the ball is played, not before
Runs from inside-out or outside-in should bend into space behind opposition midfielders
Players should receive on the move, facing forward
???? Timing & Weight of Pass:
Pass must meet the runner — neither early nor late — and allow for forward play on the next touch
Quality of delivery should suit the type of movement (e.g., driven into feet vs lofted into space)
Disguise and speed of pass essential to beat compact units
???? Direction of Movement:
Movements should be purposeful, based on:
Position of the ball
Shape of the defensive line
Distance to opposition players
Coach Interventions:
“Can you create space for the 10 by dragging the opposition 6 wide?”
“Midfield — wait for the right trigger before making the run into Zone 14.”
“What kind of pass gives your teammate the best chance to play forward on the next touch?”
“Striker — can your movement create a lane for the midfielder to arrive into?”
Player Learning Outcomes:
Understand how to arrive in Zone 14 unopposed through intelligent movement and positional rotation
Demonstrate correct timing and angle of run to exploit gaps in a compact shape
Execute passes with the right weight, timing, and intent
Coordinate with teammates to manipulate defensive shape and unlock central space
See the guidance at the top of this page to understand why you are not seeing interactive Football/Soccer images.
See the guidance at the top of this page to understand why you are not seeing interactive Football/Soccer images.
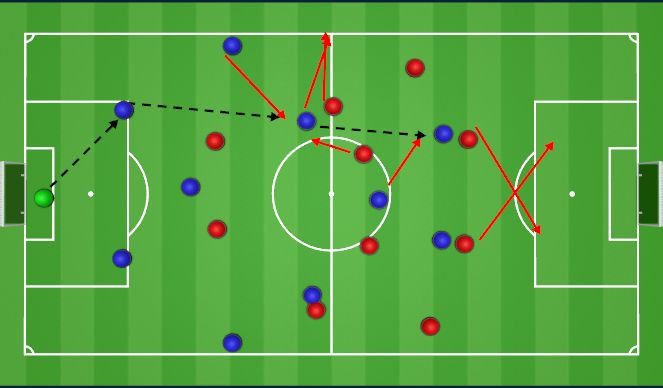
Block 2
Block 2
The opposition's midfield is applying aggressive man-oriented pressure: the opposing midfielder is tight to our diamond’s wide player, preventing any opportunity to turn, while the second midfielder is tracking our No.10 closely, restricting central progression.
Solution
To bypass the pressure, the wide player in the diamond plays a first-time pass into the CDM (No.6). Simultaneously, the No.10 executes a decoy movement to drag their marker deeper and away from the ball zone. This creates a passing lane for the opposite side of the diamond to make an incisive run into zone 14, exploiting the vacated space.
Key Coaching Detail
In the event of central turnover, immediate defensive transition (counter-press or recovery shape) is critical to protect against the counterattack and regain compactness centrally.
'%3E%3Cpath id='path4169' d='M 11.4375,70.25 C 11.457031,38.394531 37.277344,13.242188 68.253906,13.050781 99.78125,12.855469 125.73047,38.351563 125.8125,70.078125 125.89844,101.62109 100.43359,127.14063 69.148438,127.42188 37.582031,127.70703 11.464844,102.23438 11.4375,70.25 m 6.425781,-0.08984 c 0.03516,28.421871 23.027344,50.69922 50.519532,50.82031 C 96.433594,121.10156 119.30469,98.367188 119.38281,70.359375 119.45313,42.878906 97.382813,19.714844 69.015625,19.496094 40.75,19.277344 17.964844,42.035156 17.863281,70.160156' style='clip-rule:nonzero;fill:%23333f48;fill-opacity:1;fill-rule:nonzero;stroke:none' /%3E%3Cpath style='fill:%23333f48;fill-opacity:1;fill-rule:nonzero;stroke:none' d='m 39.789063,108.62109 c 0.28125,0.14454 0.550781,0.32032 0.839843,0.4336 2.734375,1.05469 5.554688,1.78125 8.453125,2.23047 2.734375,0.42578 5.484375,0.64453 8.25,0.54297 3.988282,-0.15625 7.832032,-0.94922 11.445313,-2.69532 1.683594,-0.8164 3.246094,-1.82422 4.640625,-3.07422 3.265625,-2.92578 5.171875,-6.582027 5.796875,-10.906246 0.546875,-3.761719 0.04687,-7.425781 -1.09375,-11.019531 -1.4375,-4.523438 -3.730469,-8.582032 -6.703125,-12.265625 -1.03125,-1.277344 -2.082031,-2.535157 -3.113281,-3.808594 C 66.789063,66.1875 65.332031,64.269531 64.0625,62.21875 c -1.601562,-2.582031 -2.835937,-5.316406 -3.613281,-8.261719 -0.683594,-2.574218 -0.902344,-5.1875 -0.6875,-7.828125 0.214844,-2.617187 0.910156,-5.117187 2.152344,-7.441406 2.164062,-4.050781 5.503906,-6.710937 9.816406,-8.179687 1.890625,-0.640625 3.835937,-1.058594 5.832031,-1.195313 1.121094,-0.07813 2.242188,-0.152344 3.363281,-0.164062 4.28125,-0.02734 8.4375,0.734375 12.453125,2.175781 1.871094,0.671875 3.6875,1.496094 5.523438,2.257812 0.226562,0.09375 0.4375,0.230469 0.664062,0.351563 -0.164062,0.25 -0.371093,0.160156 -0.539062,0.164062 -2.824219,0.101563 -5.535156,0.703125 -8.132813,1.804688 -1.335937,0.570312 -2.570312,1.316406 -3.648437,2.296875 -2.527344,2.296875 -3.605469,5.15625 -3.34375,8.550781 0.140625,1.855469 0.722656,3.574219 1.550781,5.222656 0.648438,1.296875 1.414063,2.523438 2.292969,3.675782 0.953125,1.25 1.929687,2.484375 2.929687,3.699218 2.085938,2.523438 4.164063,5.054688 6.050782,7.738282 2.203125,3.136718 4.140627,6.417968 5.589847,9.980468 1.16406,2.867188 2.01562,5.820313 2.39843,8.894532 0.25,2.011718 0.30079,4.03125 0.11719,6.058593 -0.24219,2.640625 -0.79297,5.195313 -1.74609,7.667969 -1.29688,3.36328 -3.300784,6.22656 -5.972659,8.63281 -2.429687,2.19141 -5.171875,3.90625 -8.109375,5.3125 -2.695312,1.29297 -5.464843,2.40235 -8.34375,3.20313 -1.953125,0.54687 -3.945312,0.8789 -5.949218,1.15625 -3.035157,0.41797 -6.085938,0.48828 -9.132813,0.3125 -5.328125,-0.3125 -10.476562,-1.46094 -15.410156,-3.52344 -3.449219,-1.44141 -6.691406,-3.25781 -9.757813,-5.39453 -0.183593,-0.12891 -0.378906,-0.25 -0.53125,-0.41016 -0.07031,-0.0703 -0.05859,-0.22656 -0.08203,-0.34375 z m 0,0' id='path4175' /%3E%3Cpath style='fill:%23333f48;fill-opacity:1;fill-rule:nonzero;stroke:none' d='M 94.699219,29.390625 C 94.089844,29.21875 93.476563,29.054688 92.867188,28.875 90.183594,28.085938 87.46875,27.441406 84.703125,27.046875 c -3.976562,-0.566406 -7.945312,-0.59375 -11.863281,0.402344 -7.535156,1.914062 -12.386719,6.71875 -14.878906,13.996094 -0.894532,2.617187 -1.179688,5.328125 -0.953125,8.078125 0.203125,2.484375 0.867187,4.859375 1.816406,7.160156 0.933594,2.261719 2.117187,4.390625 3.4375,6.449219 1.4375,2.25 3.050781,4.371093 4.640625,6.511718 1.4375,1.933594 2.867187,3.871094 4.261719,5.835938 1.230468,1.730469 2.316406,3.546875 3.273437,5.445312 1.324219,2.625 2.265625,5.378907 2.703125,8.292969 0.433594,2.902344 0.292969,5.765625 -0.660156,8.5625 -0.9375,2.74609 -2.574219,5.00781 -4.777344,6.875 -2.417969,2.04688 -5.203125,3.39844 -8.246094,4.22266 -1.835937,0.5 -3.703125,0.75781 -5.609375,0.82031 -3.886718,0.13281 -7.679687,-0.47266 -11.421875,-1.46094 -2.261718,-0.59765 -4.488281,-1.33203 -6.695312,-2.11328 -0.207031,-0.0742 -0.40625,-0.16797 -0.597656,-0.25 -0.02344,-0.24609 0.148437,-0.19141 0.25,-0.20703 1.96875,-0.30469 3.921875,-0.67969 5.804687,-1.34766 1.367188,-0.48437 2.671875,-1.10156 3.855469,-1.94922 2.25,-1.61328 3.65625,-3.765621 4.0625,-6.515621 0.273437,-1.867188 0.09375,-3.710938 -0.429688,-5.527344 -0.472656,-1.648437 -1.171875,-3.199219 -2.109375,-4.628906 -0.792968,-1.207031 -1.636718,-2.382813 -2.523437,-3.519531 -0.921875,-1.195313 -1.921875,-2.328125 -2.890625,-3.484375 -2.753906,-3.273438 -5.351563,-6.660157 -7.523438,-10.355469 -2.042968,-3.480469 -3.667968,-7.136719 -4.597656,-11.078125 -0.640625,-2.699219 -0.980469,-5.4375 -0.832031,-8.214844 0.238281,-4.53125 1.476562,-8.78125 3.824219,-12.6875 1.082031,-1.800781 2.445312,-3.375 3.988281,-4.800781 2.742187,-2.527344 5.863281,-4.480469 9.257812,-5.992188 3.746094,-1.667968 7.652344,-2.769531 11.707032,-3.394531 3.152343,-0.488281 6.324218,-0.671875 9.507812,-0.519531 8.632813,0.410156 16.671875,2.792969 24,7.433594 0.08203,0.05078 0.152344,0.109375 0.230469,0.167968 -0.0039,0.04297 -0.0078,0.08984 -0.01563,0.136719' id='path4177' /%3E%3Cpath style='fill:%23333f48;fill-opacity:1;fill-rule:nonzero;stroke:none' d='m 31.699219,38.75 c -0.07813,0.238281 -0.152344,0.476563 -0.238281,0.710938 -1.460938,4.074218 -2.066407,8.28125 -1.808594,12.59375 0.4375,7.304687 2.808594,13.925781 7.277344,19.753906 3.714843,4.84375 7.441406,9.671875 11.167968,14.503906 1.113282,1.441406 1.953125,3.007813 2.414063,4.777344 0.332031,1.257812 0.425781,2.539062 0.273437,3.820312 -0.214843,1.832032 -1.070312,3.34375 -2.464843,4.546875 -0.984375,0.851559 -2.113282,1.449219 -3.316407,1.925779 -1.378906,0.54297 -2.8125,0.89063 -4.273437,1.1211 -2.226563,0.35547 -4.46875,0.46093 -6.722656,0.41015 -0.589844,-0.0156 -1.046875,-0.18359 -1.433594,-0.625 -0.636719,-0.72265 -1.335938,-1.39062 -1.9375,-2.14062 C 25.574219,93.800781 22.300781,86.621094 20.84375,78.636719 20.152344,74.835938 19.917969,71 20.15625,67.128906 20.796875,56.773438 24.390625,47.574219 30.859375,39.480469 c 0.21875,-0.273438 0.453125,-0.53125 0.679688,-0.796875 0.05469,0.02344 0.109375,0.04297 0.160156,0.06641' id='path4179' /%3E%3Cpath style='fill:%23333f48;fill-opacity:1;fill-rule:nonzero;stroke:none' d='m 105.41016,101.30078 c -0.13282,-0.3125 0.0234,-0.5039 0.0977,-0.69922 1.38672,-3.749997 1.98047,-7.628904 1.89844,-11.621091 -0.14453,-6.84375 -2.08594,-13.144531 -5.73437,-18.925781 C 99.890625,67.226563 97.917969,64.53125 95.835938,61.917969 94.4375,60.160156 92.988281,58.4375 91.582031,56.6875 90.632813,55.511719 89.6875,54.335938 88.792969,53.121094 c -0.835938,-1.144531 -1.488281,-2.398438 -1.953125,-3.742188 -0.523438,-1.515625 -0.695313,-3.070312 -0.511719,-4.652343 0.21875,-1.839844 1.082031,-3.339844 2.476563,-4.542969 1.039062,-0.890625 2.230468,-1.507813 3.503906,-1.980469 1.632812,-0.609375 3.320312,-0.960937 5.046875,-1.175781 1.917969,-0.238281 3.839841,-0.269531 5.769531,-0.230469 0.52734,0.01172 0.89453,0.203125 1.23828,0.585938 5.50391,6.113281 9.26172,13.144531 11.21875,21.132812 1.11719,4.554688 1.5625,9.179688 1.30469,13.855469 -0.58203,10.625 -4.23438,20.082031 -10.96094,28.339846 -0.15625,0.1914 -0.32812,0.375 -0.51562,0.58984' id='path4181' /%3E%3Cpath style='fill:%23333f48;fill-opacity:1;fill-rule:nonzero;stroke:none' d='m 39.796875,108.63281 c -0.05859,0.0117 -0.117187,0.0234 -0.175781,0.0352 0.05469,-0.0156 0.113281,-0.0312 0.167969,-0.0469 z m 0,0' id='path4183' /%3E%3C/g%3E%3C/svg%3E)
 Play animation
 Play step-by-step
 Repeat (toggle)
 Full Screen
 Pause
Pause Stop
Stop
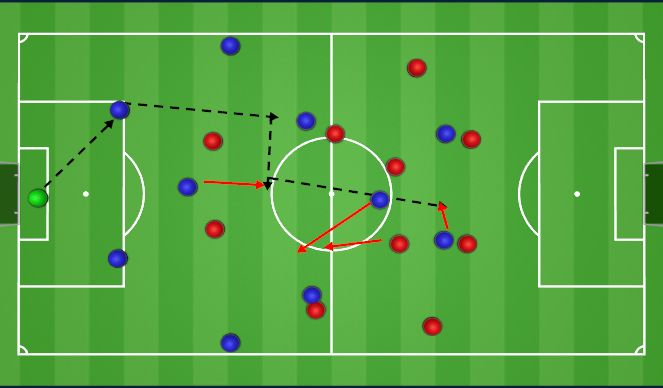
Block 1
Block 1: Manipulating the Back Line Through Positional Rotation and Forward Play
Tactical Objective:
To create and exploit central space (Zone 14) by provoking defensive shifts through coordinated movement between the diamond midfield and front two.
Key Principle:
Use double movements and timing triggers to displace centre-backs and isolate space for the attacking midfielder (10).
Pattern of Play:
Initial Play:
Ball is played into the side of the diamond (LCM/RCM).
Player receiving performs a double movement to create separation and receive on the half-turn.
Upon a secure first touch facing forward, this becomes the trigger for movement ahead.
Striker Movement:
Both centre-forwards begin on the outside shoulders of the opposition centre-backs.
On the trigger (CM facing forward), they split laterally — creating width across the defensive line.
This movement pulls centre-backs away from central areas, opening a lane for the No.10 to operate in Zone 14.
Role of the 10:
Recognises the created space centrally and moves into Zone 14 on the second phase.
Supports forward momentum with the intent to link play or attack directly.
What If – Press Blocks Access to Side of the Diamond?
If the opposing striker presses aggressively and prevents the initial pass into the wide midfielder:
Option 1: Play around the pressure — circulate the ball to the full-back on the same side to progress.
Option 2: Play over the press — deliver a direct clipped pass into one of the strikers who has peeled wide to exploit space behind the full-back or between defenders.
Coaching Points:
Trigger Recognition: Wide diamond midfielder must receive facing forward — this initiates vertical striker movement.
Double Movement: Encourage CMs to unbalance their marker before checking to receive.
Timing of Striker Split: Must coincide with the midfielder’s body orientation to exploit the vacated centre.
No.10 Awareness: Read centre-backs’ movement and arrive in Zone 14 as space opens.
Contingency Options: Teach players to recognise when to bypass or build around pressure.
Coach Interventions:
“Can we draw the centre-backs out to create central access for the 10?”
“Strikers — can you time your movement to stretch the line as soon as the diamond midfielder opens up?”
“If the pressing striker denies the central pass, what’s our next solution — around or over?”
“CMs — can you receive on the move and face forward quickly to trigger progression?”