


Football/Soccer Session (Academy Sessions): Defending with a back 3 and goal keeper

FAW Coach Ed
Lee Pope
Profile Summary

| Name: | Lee Pope |
|---|---|
| City: | ruthin |
| Country: | United Kingdom |
| Membership: | Adult Member |
| Sport: | Football/Soccer |
See the guidance at the top of this page to understand why you are not seeing interactive Football/Soccer images.
See the guidance at the top of this page to understand why you are not seeing interactive Football/Soccer images.
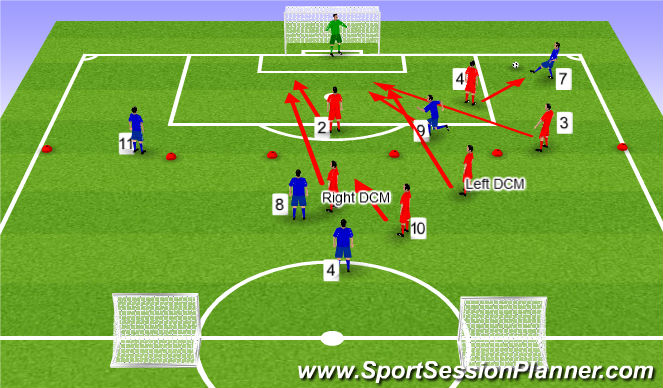
Screen 2
what if?
if the ball is played wide to the blue #7 and he beats the red #3?
the red #4 will now be closer to the man on the ball, so he should engage the blue #7 try to force wide and stop the cross.
red #3 should now make a recovery run twards the near post and will need to keep in mind the blue #9 and his positioning.
left dcm should make a recovery run into the box to aid the red #3 and deal with the blue #9 should he be too far for red #3 to mark.
red #2 should be aware of blue #11 running into box looking for cross but should look to position himself between the penalty spot and the far post.
red GK should retreat from his advanced position near penalty spot back to his goal line and should have an open body positon sp he may see the player on the ball but also players around the ball running in. a point of reference should be can GK see 3 corner flags (flag to his left, and 2 flags on opposite end of the field)
See the guidance at the top of this page to understand why you are not seeing interactive Football/Soccer images.
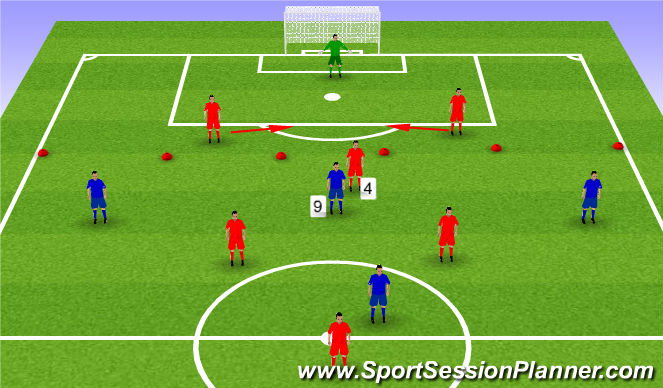
Screen 3
what if?
what if blue #9 drops deep to pick up ball in the area between defence and midfield?
closest cb will follow and close down or mark #9 tight to stop the turn and force play backwards
remaining cbs should move closer togther again defending middle of the goal and the a reference point would be closing the gap to the width of the goal inline with each post as a distance.
in the illustration it show the red #4 closing space as #9 in in a central area but the cb closest would engage th man on the ball depending on area of pitch.
dcm screens should attempt to stop ball being played up the centra of the pitch forcing play wide, in this instance the red #4 would drop back into his position and the players would shuffle left or right depending on the side of the pitch the ball is on.
See the guidance at the top of this page to understand why you are not seeing interactive Football/Soccer images.
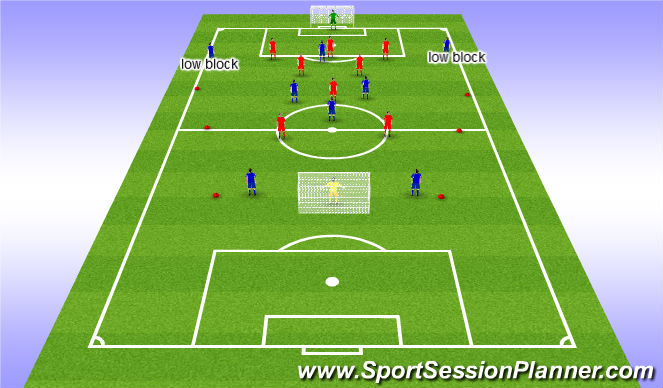
SSG (15 mins)
9v9 following on from drill.
blues 2-1-2-3 + goal keeper (attack)
reds 3-2-1-2 + goal keeper (defence)
rules as drill except now 5 passes have been removed for the blue team in attack.
key factors:
red back 3 stay compact and use pitch geography to slide and shuffle togther,
if ball goes wide 1 of the defensive screen should shuffle and look to help keep the ball away from goal and the other defensive screen should shuffle but stay more central blocking through ball.
when pressing reds should look to show wide or onto weaker foot, while supporting player blocks the inside ball and supporting runners.
wide players and come back to help to force the play backwards away from goal.
communication is key.
keep SSG realistic reds can score if they are in possesion but have 10 seconds to do so. ball will start from blue keeper and reds should reposition early when out of possession and defend in a mid and then low blow as ball comes forward.
See the guidance at the top of this page to understand why you are not seeing interactive Football/Soccer images.
Screen 5 (15 mins)
in order to dictate play we need to endure the 2 red #9s should engage defenders if playing from the back
if blue GK plays ball to RCB then the LCF should defend on the CB inside forcing him to play back or wide the free cf should cover the switch or the centre of the pitch incase the ball is played back to GK who tried to play into the blue dcm, RCF will block of this pass and force play to go wide again.
this will also happen if GK plays out to LCB, in which case RCF engages on LCB inside shoulder and RCF move to a central position to stop the ball being played into midfield central areas.
Blue team should always look to force ball into wide areas which will allow defenders to deal with the problems as discussed in previous screens.
'%3E%3Cpath id='path4169' d='M 11.4375,70.25 C 11.457031,38.394531 37.277344,13.242188 68.253906,13.050781 99.78125,12.855469 125.73047,38.351563 125.8125,70.078125 125.89844,101.62109 100.43359,127.14063 69.148438,127.42188 37.582031,127.70703 11.464844,102.23438 11.4375,70.25 m 6.425781,-0.08984 c 0.03516,28.421871 23.027344,50.69922 50.519532,50.82031 C 96.433594,121.10156 119.30469,98.367188 119.38281,70.359375 119.45313,42.878906 97.382813,19.714844 69.015625,19.496094 40.75,19.277344 17.964844,42.035156 17.863281,70.160156' style='clip-rule:nonzero;fill:%23333f48;fill-opacity:1;fill-rule:nonzero;stroke:none' /%3E%3Cpath style='fill:%23333f48;fill-opacity:1;fill-rule:nonzero;stroke:none' d='m 39.789063,108.62109 c 0.28125,0.14454 0.550781,0.32032 0.839843,0.4336 2.734375,1.05469 5.554688,1.78125 8.453125,2.23047 2.734375,0.42578 5.484375,0.64453 8.25,0.54297 3.988282,-0.15625 7.832032,-0.94922 11.445313,-2.69532 1.683594,-0.8164 3.246094,-1.82422 4.640625,-3.07422 3.265625,-2.92578 5.171875,-6.582027 5.796875,-10.906246 0.546875,-3.761719 0.04687,-7.425781 -1.09375,-11.019531 -1.4375,-4.523438 -3.730469,-8.582032 -6.703125,-12.265625 -1.03125,-1.277344 -2.082031,-2.535157 -3.113281,-3.808594 C 66.789063,66.1875 65.332031,64.269531 64.0625,62.21875 c -1.601562,-2.582031 -2.835937,-5.316406 -3.613281,-8.261719 -0.683594,-2.574218 -0.902344,-5.1875 -0.6875,-7.828125 0.214844,-2.617187 0.910156,-5.117187 2.152344,-7.441406 2.164062,-4.050781 5.503906,-6.710937 9.816406,-8.179687 1.890625,-0.640625 3.835937,-1.058594 5.832031,-1.195313 1.121094,-0.07813 2.242188,-0.152344 3.363281,-0.164062 4.28125,-0.02734 8.4375,0.734375 12.453125,2.175781 1.871094,0.671875 3.6875,1.496094 5.523438,2.257812 0.226562,0.09375 0.4375,0.230469 0.664062,0.351563 -0.164062,0.25 -0.371093,0.160156 -0.539062,0.164062 -2.824219,0.101563 -5.535156,0.703125 -8.132813,1.804688 -1.335937,0.570312 -2.570312,1.316406 -3.648437,2.296875 -2.527344,2.296875 -3.605469,5.15625 -3.34375,8.550781 0.140625,1.855469 0.722656,3.574219 1.550781,5.222656 0.648438,1.296875 1.414063,2.523438 2.292969,3.675782 0.953125,1.25 1.929687,2.484375 2.929687,3.699218 2.085938,2.523438 4.164063,5.054688 6.050782,7.738282 2.203125,3.136718 4.140627,6.417968 5.589847,9.980468 1.16406,2.867188 2.01562,5.820313 2.39843,8.894532 0.25,2.011718 0.30079,4.03125 0.11719,6.058593 -0.24219,2.640625 -0.79297,5.195313 -1.74609,7.667969 -1.29688,3.36328 -3.300784,6.22656 -5.972659,8.63281 -2.429687,2.19141 -5.171875,3.90625 -8.109375,5.3125 -2.695312,1.29297 -5.464843,2.40235 -8.34375,3.20313 -1.953125,0.54687 -3.945312,0.8789 -5.949218,1.15625 -3.035157,0.41797 -6.085938,0.48828 -9.132813,0.3125 -5.328125,-0.3125 -10.476562,-1.46094 -15.410156,-3.52344 -3.449219,-1.44141 -6.691406,-3.25781 -9.757813,-5.39453 -0.183593,-0.12891 -0.378906,-0.25 -0.53125,-0.41016 -0.07031,-0.0703 -0.05859,-0.22656 -0.08203,-0.34375 z m 0,0' id='path4175' /%3E%3Cpath style='fill:%23333f48;fill-opacity:1;fill-rule:nonzero;stroke:none' d='M 94.699219,29.390625 C 94.089844,29.21875 93.476563,29.054688 92.867188,28.875 90.183594,28.085938 87.46875,27.441406 84.703125,27.046875 c -3.976562,-0.566406 -7.945312,-0.59375 -11.863281,0.402344 -7.535156,1.914062 -12.386719,6.71875 -14.878906,13.996094 -0.894532,2.617187 -1.179688,5.328125 -0.953125,8.078125 0.203125,2.484375 0.867187,4.859375 1.816406,7.160156 0.933594,2.261719 2.117187,4.390625 3.4375,6.449219 1.4375,2.25 3.050781,4.371093 4.640625,6.511718 1.4375,1.933594 2.867187,3.871094 4.261719,5.835938 1.230468,1.730469 2.316406,3.546875 3.273437,5.445312 1.324219,2.625 2.265625,5.378907 2.703125,8.292969 0.433594,2.902344 0.292969,5.765625 -0.660156,8.5625 -0.9375,2.74609 -2.574219,5.00781 -4.777344,6.875 -2.417969,2.04688 -5.203125,3.39844 -8.246094,4.22266 -1.835937,0.5 -3.703125,0.75781 -5.609375,0.82031 -3.886718,0.13281 -7.679687,-0.47266 -11.421875,-1.46094 -2.261718,-0.59765 -4.488281,-1.33203 -6.695312,-2.11328 -0.207031,-0.0742 -0.40625,-0.16797 -0.597656,-0.25 -0.02344,-0.24609 0.148437,-0.19141 0.25,-0.20703 1.96875,-0.30469 3.921875,-0.67969 5.804687,-1.34766 1.367188,-0.48437 2.671875,-1.10156 3.855469,-1.94922 2.25,-1.61328 3.65625,-3.765621 4.0625,-6.515621 0.273437,-1.867188 0.09375,-3.710938 -0.429688,-5.527344 -0.472656,-1.648437 -1.171875,-3.199219 -2.109375,-4.628906 -0.792968,-1.207031 -1.636718,-2.382813 -2.523437,-3.519531 -0.921875,-1.195313 -1.921875,-2.328125 -2.890625,-3.484375 -2.753906,-3.273438 -5.351563,-6.660157 -7.523438,-10.355469 -2.042968,-3.480469 -3.667968,-7.136719 -4.597656,-11.078125 -0.640625,-2.699219 -0.980469,-5.4375 -0.832031,-8.214844 0.238281,-4.53125 1.476562,-8.78125 3.824219,-12.6875 1.082031,-1.800781 2.445312,-3.375 3.988281,-4.800781 2.742187,-2.527344 5.863281,-4.480469 9.257812,-5.992188 3.746094,-1.667968 7.652344,-2.769531 11.707032,-3.394531 3.152343,-0.488281 6.324218,-0.671875 9.507812,-0.519531 8.632813,0.410156 16.671875,2.792969 24,7.433594 0.08203,0.05078 0.152344,0.109375 0.230469,0.167968 -0.0039,0.04297 -0.0078,0.08984 -0.01563,0.136719' id='path4177' /%3E%3Cpath style='fill:%23333f48;fill-opacity:1;fill-rule:nonzero;stroke:none' d='m 31.699219,38.75 c -0.07813,0.238281 -0.152344,0.476563 -0.238281,0.710938 -1.460938,4.074218 -2.066407,8.28125 -1.808594,12.59375 0.4375,7.304687 2.808594,13.925781 7.277344,19.753906 3.714843,4.84375 7.441406,9.671875 11.167968,14.503906 1.113282,1.441406 1.953125,3.007813 2.414063,4.777344 0.332031,1.257812 0.425781,2.539062 0.273437,3.820312 -0.214843,1.832032 -1.070312,3.34375 -2.464843,4.546875 -0.984375,0.851559 -2.113282,1.449219 -3.316407,1.925779 -1.378906,0.54297 -2.8125,0.89063 -4.273437,1.1211 -2.226563,0.35547 -4.46875,0.46093 -6.722656,0.41015 -0.589844,-0.0156 -1.046875,-0.18359 -1.433594,-0.625 -0.636719,-0.72265 -1.335938,-1.39062 -1.9375,-2.14062 C 25.574219,93.800781 22.300781,86.621094 20.84375,78.636719 20.152344,74.835938 19.917969,71 20.15625,67.128906 20.796875,56.773438 24.390625,47.574219 30.859375,39.480469 c 0.21875,-0.273438 0.453125,-0.53125 0.679688,-0.796875 0.05469,0.02344 0.109375,0.04297 0.160156,0.06641' id='path4179' /%3E%3Cpath style='fill:%23333f48;fill-opacity:1;fill-rule:nonzero;stroke:none' d='m 105.41016,101.30078 c -0.13282,-0.3125 0.0234,-0.5039 0.0977,-0.69922 1.38672,-3.749997 1.98047,-7.628904 1.89844,-11.621091 -0.14453,-6.84375 -2.08594,-13.144531 -5.73437,-18.925781 C 99.890625,67.226563 97.917969,64.53125 95.835938,61.917969 94.4375,60.160156 92.988281,58.4375 91.582031,56.6875 90.632813,55.511719 89.6875,54.335938 88.792969,53.121094 c -0.835938,-1.144531 -1.488281,-2.398438 -1.953125,-3.742188 -0.523438,-1.515625 -0.695313,-3.070312 -0.511719,-4.652343 0.21875,-1.839844 1.082031,-3.339844 2.476563,-4.542969 1.039062,-0.890625 2.230468,-1.507813 3.503906,-1.980469 1.632812,-0.609375 3.320312,-0.960937 5.046875,-1.175781 1.917969,-0.238281 3.839841,-0.269531 5.769531,-0.230469 0.52734,0.01172 0.89453,0.203125 1.23828,0.585938 5.50391,6.113281 9.26172,13.144531 11.21875,21.132812 1.11719,4.554688 1.5625,9.179688 1.30469,13.855469 -0.58203,10.625 -4.23438,20.082031 -10.96094,28.339846 -0.15625,0.1914 -0.32812,0.375 -0.51562,0.58984' id='path4181' /%3E%3Cpath style='fill:%23333f48;fill-opacity:1;fill-rule:nonzero;stroke:none' d='m 39.796875,108.63281 c -0.05859,0.0117 -0.117187,0.0234 -0.175781,0.0352 0.05469,-0.0156 0.113281,-0.0312 0.167969,-0.0469 z m 0,0' id='path4183' /%3E%3C/g%3E%3C/svg%3E)
 Play animation
 Play step-by-step
 Repeat (toggle)
 Full Screen
 Pause
Pause Stop
Stop
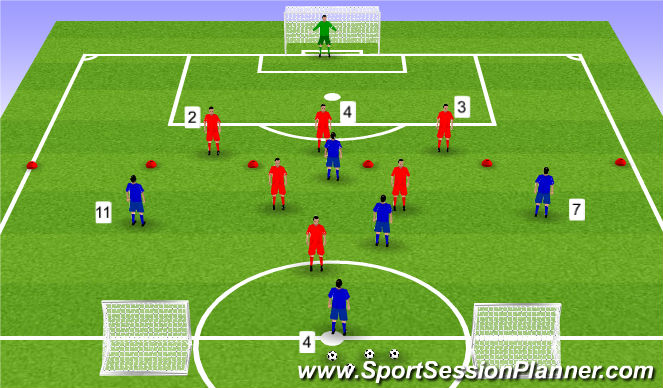
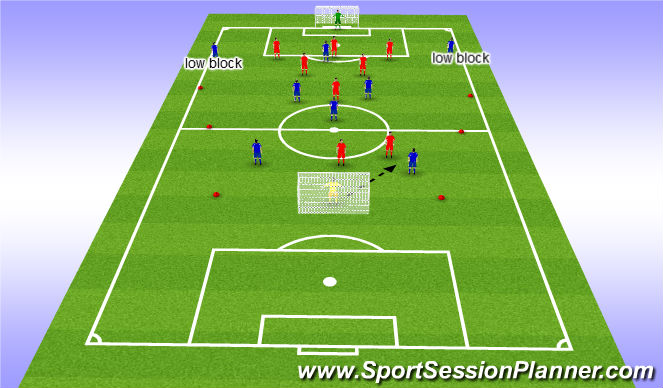
drill (15 mins)
Defending with a goalkeeper and back 3
set up:
half pitch drill
11v11 would line up:
red defensive team: - Gk- 3 - 4 - 1 - 2 (9v9= Gk - 3 - 2dcm - #10 - 2)
blue team in possession: - Gk - 4 - 1 - 2 -3 (9v9= Gk - 2 - 1 - 2 - 3)
Drill consists of:
red defending with a gk, back 3, 2 dcm and a #10
blue attacking with a cb/feeder, 3 cm and a 9
aims:
- blues looking to play over the red coned line, to begin play they must play 5 passes before they can play over the line. this is to get used to playing with the ball and being relaxed and patient in possession.
- red defender (2-3-4) can not enter beyond the red zone but may slide and shift along the zones to deny penetration while staying compact. (pitch split into 5 zones via red cones (low block) to allow understanding of pitch geography)
Red team if they win possession have 10 seconds to score goal in one of the 2 mini goals
EXPAIN THIS THEN ALLOW PLAY
first coaching point:
red back 3 defend inside the width of the 18 yard box and as far as red coned area (low block), defend the middle of the goal and force ball away from the goal.
GK should position themselves between the 6 yard box and 18 yard box (around penalty spot).
if blue team possession if poor or drill is slow, remove 5 pass rule and make it 3 passes.
WHAT IF?
if ball is moved into wide area for example into blue #7 then red 3 should shuffle across to engage player on the ball as quickly as possible and showing wide, position should be between edge of 18 yard box and touchline, red #4 shuffles across positioned between goalpost and edge of the 18 yard box but slightly deeper, red #2 shuffles to cover the middle of the goal.
left dcm to shuffle towards the ball to stop through ball played to the #9 and right dcm shuffle to middle to stop the switch in play and force play backwards.
red #10 should drop into a position to help stop switch and force back backwards
if the ball is with blue #11 then the movement is the same but on the opposite side of the pitch.
challenge 1
ball played into wide area to #7 or #11 forcing defence to shuffle and the blue #9 moves across to create 2v1 in wide area
solution
closest players engage players on and around the ball,left dcm shuffles to support and right dcm comes central to stop switch in play and force play backwards. defenders remember the key is to defend the goal and force play wide towards the touchlines or backwards.
coaching points
-stay compact as a unit
-good communication
-good body shape (side on showing away from goal and on toes)
-GK in good position to attack on any through ball or cross.
problem 2
blue #9 drops off into midfield playing in space between defence and midfield making him hard to pick up and a good attacking option.
solution
1 defender may need to follow the #9 and mark tight to stop the ball coming in and stopping the #9 from turning. if possible pass #9 on to a dcm who could pick up. if defender pulled out of position the remaining cbs shold close gaps and defend middle of the pitch/goal leaving players in wide areas.
coaching points
-good communication between units
-tight marking
-stop #9 turning
-force play backwards or into wide areas
-GK be aware of through ball or long shot.