


Hockey Session (Senior): Zone Manual
Profile Summary

| Name: | Joan Carol |
|---|---|
| City: | Oxford |
| Country: | United States of America |
| Membership: | Adult Member |
| Sport: | Hockey |
See the guidance at the top of this page to understand why you are not seeing interactive Hockey images.
See the guidance at the top of this page to understand why you are not seeing interactive Hockey images.
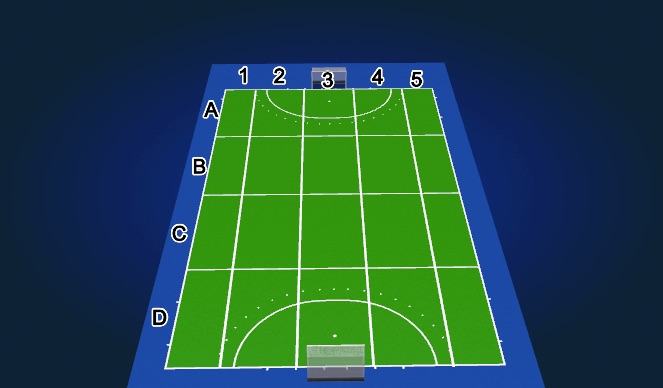
Lanes and Lines
Lanes are called 1,2,3,4 and 5. The reference is always our cage, with the left corner lane being named 1 and the right corner lane being lane 5
Lines are called A,B,C and D. Again, the reference is our cage. The 25 were we are defending is lane D(Deffense) and the one were we are scoring is A (Attacking)
See the guidance at the top of this page to understand why you are not seeing interactive Hockey images.
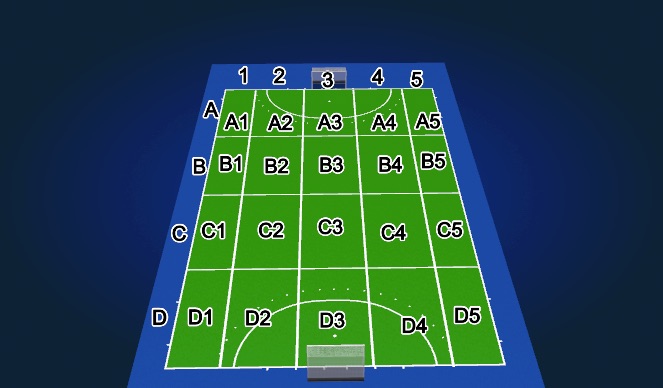
Field zones
Having those lanes and lines gives us a clear view of the field in different zones. Lane D line 1 is D1. Lane B line 4 is B4 ...
This is gonna help us understand which zone every player has to be responsible of and which influence zones every player has
See the guidance at the top of this page to understand why you are not seeing interactive Hockey images.
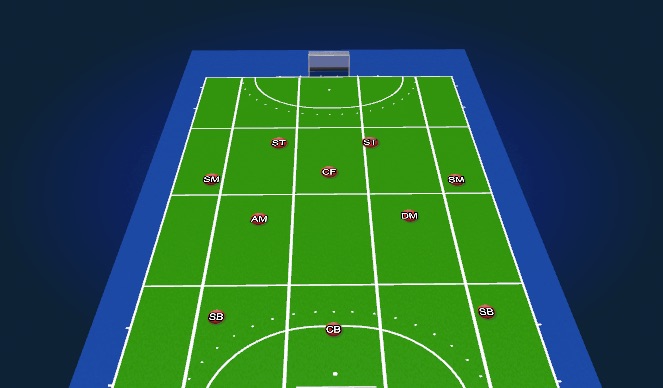
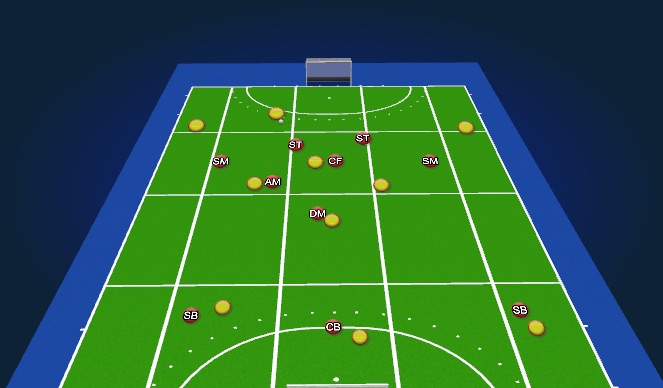
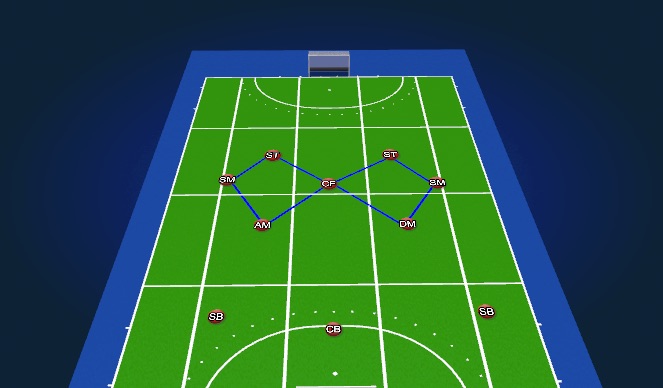
2-3 Zone
The 2-3 zone has the main goal of forcing the other team leftbacks to play the ball outside ( B1-B5) where our SM's are chanelling their leftbacks to go outside and try to steal them the ball
The ST's are in the interior limit of lanes 2 and 4 to create a triangle with the CF. They need to be sure that no one get's the ball in that triangle (B3) by cutting the passing lines. Once the ball gets past their line, they have to drop and cover spaces to keep cutting lines.
AM and DM start the press in B2/C2 and B4/C4 depending on the high of our press. If the other team plays with 4 in the back, they are pure sweepers. If they play with 3 in the back, DM and AM need to be more concerned about all the windows to be closed for the other team.
The only players with individual responsibilities are the SB's and the CB. Although they need to float they mark when it's possible to be in a better position.
As it's a zonal system, we don't care how the other team plays. Of course each system works better against a different type of team. But with zone, we are not worried about the players, our main focus are the passing lines and spaces.
When we get to line D, with a free hit or a long hit, everyone has individual responsibilities.
See the guidance at the top of this page to understand why you are not seeing interactive Hockey images.
2-3 ideal recuperation Zone
ST's are closing lane 3 with the CF so that they are covering all zone C3. They need to be sure not one of them is cutting the same line because they all have to be useful The SM of the opposite side closes the field either getting into the left limit of lane 3 or the right limit of itAM and DM have to be in the influence zone of their midfielders with a chance to play the ball so they are cutting the line of pass to them
In this case, we are cutting, so we are able to force their Side Back to play a 1v1 against our SM. She ends throwing the ball and if we are dropping and recovering spaces, when we get the ball back we are able to do an easy trasnfer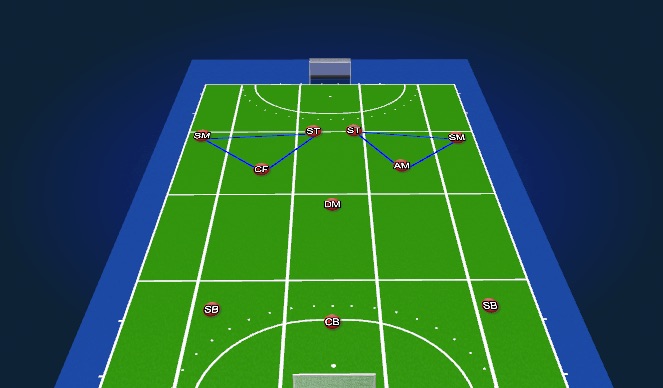
See the guidance at the top of this page to understand why you are not seeing interactive Hockey images.
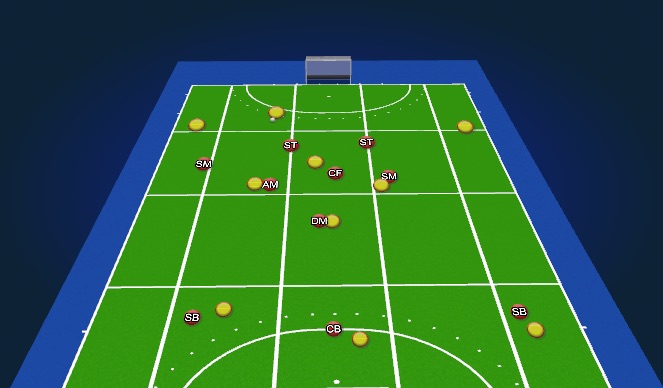
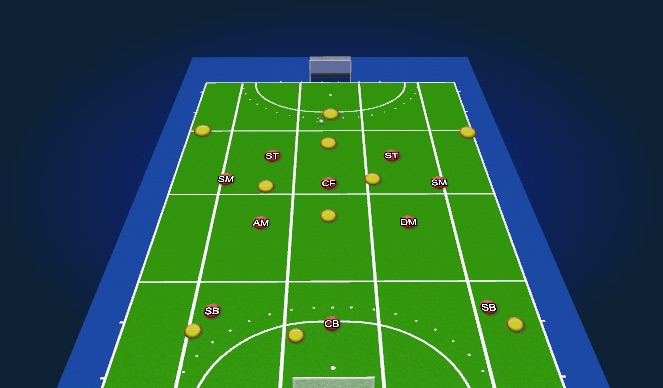
4-2 zone
The 4-2 zone has the main goal of forcing the other team leftbacks to play the ball inside ( B2-B4) where our CF,AM, DM and the ST that is dropping are creating number ups. That press is most successful if we use it against a system of 4 in the back and on line A
In the case we are not able to get the ball in that spot, as the SM's are drooping and with the help of the DM acting as a the free-player, we should be able to slown down the attack with our recovery lines.
The only players with individual responsibilities are the SB's and the CB. Although they need to float they mark when it's possible to be in a better position.
As it's a zonal system, we don't care how the other team plays. Of course each system works better against a different type of team. But with zone, we are not worried about the players, our main focus are the passing lines and spaces.
When we get to line D, with a free hit or a long hit, everyone has individual responsibilities.
See the guidance at the top of this page to understand why you are not seeing interactive Hockey images.
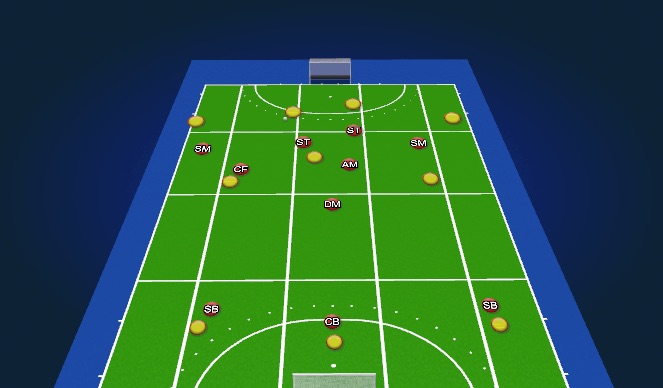
2-3 transfer
We can either chose to cut the field or not. If we are not cutting, the other team will be able to transfer the ball from lane 1 to lane 5. If that's the case, it's not a problem for us, but we need to be ready to react to that ball movementOnce the ball is going back to the center back; the SM starts dropping and closing - the ST's and CF grab the starting position again to cut the pass to the midfielder and ready to move to lane 1 or 5 - the SM will go to lane 1 or 5 to force their sideback to play outside, while the DM is dropping to be the sweeper - The ideal situation is the now change roles between CF and AM, so the AM creates the triangle with the Strilers and the CF closes the window between the ST and the SM
See the guidance at the top of this page to understand why you are not seeing interactive Hockey images.
4-2 ideal recuperation
With the 4-2 on line 1 we are looking to get the ball straight from the leftback, or even from the centerback if she just throws the ball
We need the ST in front of the ball to be cutting the passing line with one of their midfielders, and the other one to be close to cutting.
The SM closer to the ball is in front of their side back ready to jump, while the other one is closing the field on the other side
The CF (or the AM) is cutting the pass to their midfider in the lane of the ball, while AM (or CF) is closing the field being ready to cover a spot or play the fast break
The DM, acts as a pure sweeper, ready to jump for a 2v1 with the CF or AM - Also ready to be a reset pass when we get the ball back
See the guidance at the top of this page to understand why you are not seeing interactive Hockey images.
Double Sweeper
With a similar block than the one we use for 2-3, if we drop it and we close it, we can play with two pure sweepers
ST's, SM's and CF, alongside with the AM and DM have to work to keep the double diamong shape, trying to force the other team to play outside of it. If they manage to get the ball inside, the sweeper should jump and play a 1v2 with the CF. If they are advancing through lane 1 or 5, the closes sweeper will jump with the closest SM
ST's are holding the press letting the other team transfer the ball on the back. They are allowed to jump to cut, but we must keep the shape
SM's choose if they chanell outside to force a long pass, or inside to play a 1v2 with the closest sweeper
See the guidance at the top of this page to understand why you are not seeing interactive Hockey images.
Double Sweeper Ideal Recuperation
With a similar block than the one we use for 2-3, if we drop it and we close it, we can play with two pure sweepers
ST's, SM's and CF, alongside with the AM and DM have to work to keep the double diamond shape, trying to force the other team to play outside of it. If they manage to get the ball inside, the sweeper should jump and play a 1v2 with the CF. If they are advancing through lane 1 or 5, the closest sweeper will jump with the closest SM
ST's are holding the press letting the other team transfer the ball on the back. They are allowed to jump to cut, but we must keep the shape
SM's choose if they chanell outside to force a long pass, or inside to play a 1v2 with the closest sweeper
The double sweeper allows us to always be able to create a 1v2 situation. And in case we lose one of the sweepers because she has to jump to someone, we still have another one
'%3E%3Cpath id='path4169' d='M 11.4375,70.25 C 11.457031,38.394531 37.277344,13.242188 68.253906,13.050781 99.78125,12.855469 125.73047,38.351563 125.8125,70.078125 125.89844,101.62109 100.43359,127.14063 69.148438,127.42188 37.582031,127.70703 11.464844,102.23438 11.4375,70.25 m 6.425781,-0.08984 c 0.03516,28.421871 23.027344,50.69922 50.519532,50.82031 C 96.433594,121.10156 119.30469,98.367188 119.38281,70.359375 119.45313,42.878906 97.382813,19.714844 69.015625,19.496094 40.75,19.277344 17.964844,42.035156 17.863281,70.160156' style='clip-rule:nonzero;fill:%23333f48;fill-opacity:1;fill-rule:nonzero;stroke:none' /%3E%3Cpath style='fill:%23333f48;fill-opacity:1;fill-rule:nonzero;stroke:none' d='m 39.789063,108.62109 c 0.28125,0.14454 0.550781,0.32032 0.839843,0.4336 2.734375,1.05469 5.554688,1.78125 8.453125,2.23047 2.734375,0.42578 5.484375,0.64453 8.25,0.54297 3.988282,-0.15625 7.832032,-0.94922 11.445313,-2.69532 1.683594,-0.8164 3.246094,-1.82422 4.640625,-3.07422 3.265625,-2.92578 5.171875,-6.582027 5.796875,-10.906246 0.546875,-3.761719 0.04687,-7.425781 -1.09375,-11.019531 -1.4375,-4.523438 -3.730469,-8.582032 -6.703125,-12.265625 -1.03125,-1.277344 -2.082031,-2.535157 -3.113281,-3.808594 C 66.789063,66.1875 65.332031,64.269531 64.0625,62.21875 c -1.601562,-2.582031 -2.835937,-5.316406 -3.613281,-8.261719 -0.683594,-2.574218 -0.902344,-5.1875 -0.6875,-7.828125 0.214844,-2.617187 0.910156,-5.117187 2.152344,-7.441406 2.164062,-4.050781 5.503906,-6.710937 9.816406,-8.179687 1.890625,-0.640625 3.835937,-1.058594 5.832031,-1.195313 1.121094,-0.07813 2.242188,-0.152344 3.363281,-0.164062 4.28125,-0.02734 8.4375,0.734375 12.453125,2.175781 1.871094,0.671875 3.6875,1.496094 5.523438,2.257812 0.226562,0.09375 0.4375,0.230469 0.664062,0.351563 -0.164062,0.25 -0.371093,0.160156 -0.539062,0.164062 -2.824219,0.101563 -5.535156,0.703125 -8.132813,1.804688 -1.335937,0.570312 -2.570312,1.316406 -3.648437,2.296875 -2.527344,2.296875 -3.605469,5.15625 -3.34375,8.550781 0.140625,1.855469 0.722656,3.574219 1.550781,5.222656 0.648438,1.296875 1.414063,2.523438 2.292969,3.675782 0.953125,1.25 1.929687,2.484375 2.929687,3.699218 2.085938,2.523438 4.164063,5.054688 6.050782,7.738282 2.203125,3.136718 4.140627,6.417968 5.589847,9.980468 1.16406,2.867188 2.01562,5.820313 2.39843,8.894532 0.25,2.011718 0.30079,4.03125 0.11719,6.058593 -0.24219,2.640625 -0.79297,5.195313 -1.74609,7.667969 -1.29688,3.36328 -3.300784,6.22656 -5.972659,8.63281 -2.429687,2.19141 -5.171875,3.90625 -8.109375,5.3125 -2.695312,1.29297 -5.464843,2.40235 -8.34375,3.20313 -1.953125,0.54687 -3.945312,0.8789 -5.949218,1.15625 -3.035157,0.41797 -6.085938,0.48828 -9.132813,0.3125 -5.328125,-0.3125 -10.476562,-1.46094 -15.410156,-3.52344 -3.449219,-1.44141 -6.691406,-3.25781 -9.757813,-5.39453 -0.183593,-0.12891 -0.378906,-0.25 -0.53125,-0.41016 -0.07031,-0.0703 -0.05859,-0.22656 -0.08203,-0.34375 z m 0,0' id='path4175' /%3E%3Cpath style='fill:%23333f48;fill-opacity:1;fill-rule:nonzero;stroke:none' d='M 94.699219,29.390625 C 94.089844,29.21875 93.476563,29.054688 92.867188,28.875 90.183594,28.085938 87.46875,27.441406 84.703125,27.046875 c -3.976562,-0.566406 -7.945312,-0.59375 -11.863281,0.402344 -7.535156,1.914062 -12.386719,6.71875 -14.878906,13.996094 -0.894532,2.617187 -1.179688,5.328125 -0.953125,8.078125 0.203125,2.484375 0.867187,4.859375 1.816406,7.160156 0.933594,2.261719 2.117187,4.390625 3.4375,6.449219 1.4375,2.25 3.050781,4.371093 4.640625,6.511718 1.4375,1.933594 2.867187,3.871094 4.261719,5.835938 1.230468,1.730469 2.316406,3.546875 3.273437,5.445312 1.324219,2.625 2.265625,5.378907 2.703125,8.292969 0.433594,2.902344 0.292969,5.765625 -0.660156,8.5625 -0.9375,2.74609 -2.574219,5.00781 -4.777344,6.875 -2.417969,2.04688 -5.203125,3.39844 -8.246094,4.22266 -1.835937,0.5 -3.703125,0.75781 -5.609375,0.82031 -3.886718,0.13281 -7.679687,-0.47266 -11.421875,-1.46094 -2.261718,-0.59765 -4.488281,-1.33203 -6.695312,-2.11328 -0.207031,-0.0742 -0.40625,-0.16797 -0.597656,-0.25 -0.02344,-0.24609 0.148437,-0.19141 0.25,-0.20703 1.96875,-0.30469 3.921875,-0.67969 5.804687,-1.34766 1.367188,-0.48437 2.671875,-1.10156 3.855469,-1.94922 2.25,-1.61328 3.65625,-3.765621 4.0625,-6.515621 0.273437,-1.867188 0.09375,-3.710938 -0.429688,-5.527344 -0.472656,-1.648437 -1.171875,-3.199219 -2.109375,-4.628906 -0.792968,-1.207031 -1.636718,-2.382813 -2.523437,-3.519531 -0.921875,-1.195313 -1.921875,-2.328125 -2.890625,-3.484375 -2.753906,-3.273438 -5.351563,-6.660157 -7.523438,-10.355469 -2.042968,-3.480469 -3.667968,-7.136719 -4.597656,-11.078125 -0.640625,-2.699219 -0.980469,-5.4375 -0.832031,-8.214844 0.238281,-4.53125 1.476562,-8.78125 3.824219,-12.6875 1.082031,-1.800781 2.445312,-3.375 3.988281,-4.800781 2.742187,-2.527344 5.863281,-4.480469 9.257812,-5.992188 3.746094,-1.667968 7.652344,-2.769531 11.707032,-3.394531 3.152343,-0.488281 6.324218,-0.671875 9.507812,-0.519531 8.632813,0.410156 16.671875,2.792969 24,7.433594 0.08203,0.05078 0.152344,0.109375 0.230469,0.167968 -0.0039,0.04297 -0.0078,0.08984 -0.01563,0.136719' id='path4177' /%3E%3Cpath style='fill:%23333f48;fill-opacity:1;fill-rule:nonzero;stroke:none' d='m 31.699219,38.75 c -0.07813,0.238281 -0.152344,0.476563 -0.238281,0.710938 -1.460938,4.074218 -2.066407,8.28125 -1.808594,12.59375 0.4375,7.304687 2.808594,13.925781 7.277344,19.753906 3.714843,4.84375 7.441406,9.671875 11.167968,14.503906 1.113282,1.441406 1.953125,3.007813 2.414063,4.777344 0.332031,1.257812 0.425781,2.539062 0.273437,3.820312 -0.214843,1.832032 -1.070312,3.34375 -2.464843,4.546875 -0.984375,0.851559 -2.113282,1.449219 -3.316407,1.925779 -1.378906,0.54297 -2.8125,0.89063 -4.273437,1.1211 -2.226563,0.35547 -4.46875,0.46093 -6.722656,0.41015 -0.589844,-0.0156 -1.046875,-0.18359 -1.433594,-0.625 -0.636719,-0.72265 -1.335938,-1.39062 -1.9375,-2.14062 C 25.574219,93.800781 22.300781,86.621094 20.84375,78.636719 20.152344,74.835938 19.917969,71 20.15625,67.128906 20.796875,56.773438 24.390625,47.574219 30.859375,39.480469 c 0.21875,-0.273438 0.453125,-0.53125 0.679688,-0.796875 0.05469,0.02344 0.109375,0.04297 0.160156,0.06641' id='path4179' /%3E%3Cpath style='fill:%23333f48;fill-opacity:1;fill-rule:nonzero;stroke:none' d='m 105.41016,101.30078 c -0.13282,-0.3125 0.0234,-0.5039 0.0977,-0.69922 1.38672,-3.749997 1.98047,-7.628904 1.89844,-11.621091 -0.14453,-6.84375 -2.08594,-13.144531 -5.73437,-18.925781 C 99.890625,67.226563 97.917969,64.53125 95.835938,61.917969 94.4375,60.160156 92.988281,58.4375 91.582031,56.6875 90.632813,55.511719 89.6875,54.335938 88.792969,53.121094 c -0.835938,-1.144531 -1.488281,-2.398438 -1.953125,-3.742188 -0.523438,-1.515625 -0.695313,-3.070312 -0.511719,-4.652343 0.21875,-1.839844 1.082031,-3.339844 2.476563,-4.542969 1.039062,-0.890625 2.230468,-1.507813 3.503906,-1.980469 1.632812,-0.609375 3.320312,-0.960937 5.046875,-1.175781 1.917969,-0.238281 3.839841,-0.269531 5.769531,-0.230469 0.52734,0.01172 0.89453,0.203125 1.23828,0.585938 5.50391,6.113281 9.26172,13.144531 11.21875,21.132812 1.11719,4.554688 1.5625,9.179688 1.30469,13.855469 -0.58203,10.625 -4.23438,20.082031 -10.96094,28.339846 -0.15625,0.1914 -0.32812,0.375 -0.51562,0.58984' id='path4181' /%3E%3Cpath style='fill:%23333f48;fill-opacity:1;fill-rule:nonzero;stroke:none' d='m 39.796875,108.63281 c -0.05859,0.0117 -0.117187,0.0234 -0.175781,0.0352 0.05469,-0.0156 0.113281,-0.0312 0.167969,-0.0469 z m 0,0' id='path4183' /%3E%3C/g%3E%3C/svg%3E)
 Play animation
 Play step-by-step
 Repeat (toggle)
 Full Screen
 Pause
Pause Stop
Stop
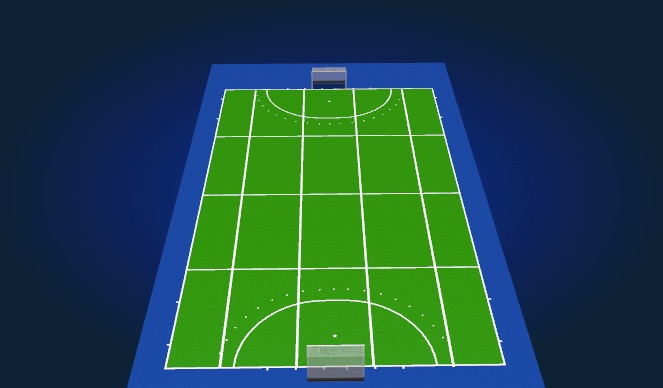
Field scheme
We have 5 lanes and 4 lines. Lanes are vertical and lines are horizontal. This scheme of the field is gonna help us understand the defensive block
In a zone system, it's key to understand that we are not convering players, we are shutting down their pass options. So we are closing windows and cutting passing lines
ALL our players must try to be in a lower line than the ball when we are on defefnse