


Football/Soccer Session (Academy Sessions): Specific Practice 1 - Breaking the Lines

FAW Coach Ed
Christopher Diaz
Profile Summary

| Name: | Christopher Diaz |
|---|---|
| City: | London |
| Country: | United Kingdom |
| Membership: | Adult Member |
| Sport: | Football/Soccer |
Description
Breaking Lines
See the guidance at the top of this page to understand why you are not seeing interactive Football/Soccer images.
See the guidance at the top of this page to understand why you are not seeing interactive Football/Soccer images.
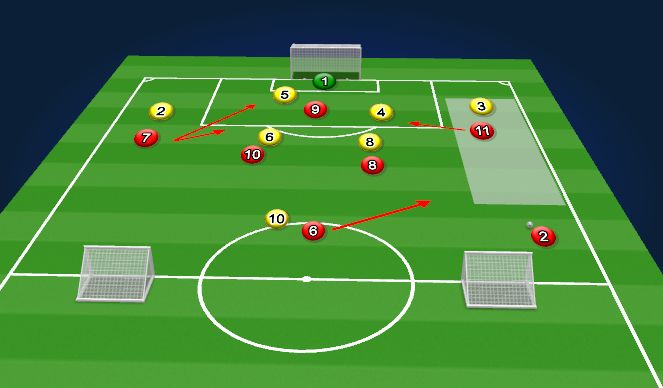
Progression 1 - A
Progression 1:
Red start with the ball in the full back position(number 2). They will aim to run with the ball into the shaded area in order to create triggers to play through the lines.
Number 11 will move aim to occupy the Yellow number 3 at first but then make a run inside in order to occupy the Yellow number 4.
We would expect the Yellow number 5 to begin to think about picking up the main striker.
Red Number 7 begins to think about either a run to the back post or a diagonal run towards the penalty spot depending on what space is available. This run should aim to neither be too slow or too quick and needs to be timed.
Red Number 6 knowing that his number 2 aims to drive the ball aims to make a supporting underlapping run once the number 2 progresses the ball.
See the guidance at the top of this page to understand why you are not seeing interactive Football/Soccer images.
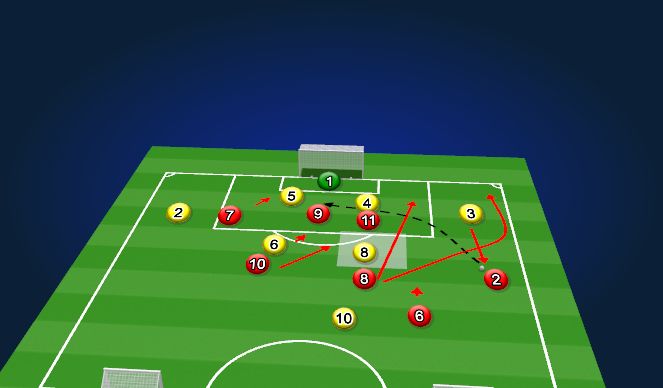
Progression 1 - B
Progression 1 - B
We would expect the Yellow Fullback number 3 to press the ball. And we would expect the Yellow CB number 4 to track his man inside.
Number 8 looks to identify the space and makes either an underlapping or overlapping run depending on how the play develops.
The Yellow 8 now has a decision to make of whether or not to track his runner (Red Number 8) or to stay and mark the space (play zonal).
If he decides to track the Red Number 8, then Red number 10 moves quickly to take the inside space right (shaded) and can either shoot or play passes from the number 10 inside space.
If Yellow number 8 plays zonal and holds the space then the ball to break the lines is played through by Red Number 2 to Red Number 8.
If Red Number 2 get stuck then Red Number 6 uses sharp movement to stay away from the number 10 and recycle the ball from the full back if necessary.
Red Number 7 still thinks about making his run towards the back posts but aims to time his run in.
Red Number 7, Red Number 9 and Red Number 11 aim to occupy spaces in front of the back post, near post and penalty spot but can use their movement and timing to overlap positions and interchange as the play is developing all whilst staying onside.
The aim is to stay in the yellows blind spot and if possible see the back of their shirt or their player number.
If at any point any player feels that a cross or breaking lines pass is even if it doesn't correspond to this exact pattern of play they are free to play it. The idea is to feel like they have a initial solution to breaking down this low block but they are also free to use their own iniatiative should an excellent attacking opportunity become available.

See the guidance at the top of this page to understand why you are not seeing interactive Football/Soccer images.
Progression 1 - B - Potential End positions
Potential end positions
Red Number 8's movement opens the space for Red Number 10 to find himself free in the right inside space, where he has 4 passing options, shooting options and a dribbling option.
'%3E%3Cpath id='path4169' d='M 11.4375,70.25 C 11.457031,38.394531 37.277344,13.242188 68.253906,13.050781 99.78125,12.855469 125.73047,38.351563 125.8125,70.078125 125.89844,101.62109 100.43359,127.14063 69.148438,127.42188 37.582031,127.70703 11.464844,102.23438 11.4375,70.25 m 6.425781,-0.08984 c 0.03516,28.421871 23.027344,50.69922 50.519532,50.82031 C 96.433594,121.10156 119.30469,98.367188 119.38281,70.359375 119.45313,42.878906 97.382813,19.714844 69.015625,19.496094 40.75,19.277344 17.964844,42.035156 17.863281,70.160156' style='clip-rule:nonzero;fill:%23333f48;fill-opacity:1;fill-rule:nonzero;stroke:none' /%3E%3Cpath style='fill:%23333f48;fill-opacity:1;fill-rule:nonzero;stroke:none' d='m 39.789063,108.62109 c 0.28125,0.14454 0.550781,0.32032 0.839843,0.4336 2.734375,1.05469 5.554688,1.78125 8.453125,2.23047 2.734375,0.42578 5.484375,0.64453 8.25,0.54297 3.988282,-0.15625 7.832032,-0.94922 11.445313,-2.69532 1.683594,-0.8164 3.246094,-1.82422 4.640625,-3.07422 3.265625,-2.92578 5.171875,-6.582027 5.796875,-10.906246 0.546875,-3.761719 0.04687,-7.425781 -1.09375,-11.019531 -1.4375,-4.523438 -3.730469,-8.582032 -6.703125,-12.265625 -1.03125,-1.277344 -2.082031,-2.535157 -3.113281,-3.808594 C 66.789063,66.1875 65.332031,64.269531 64.0625,62.21875 c -1.601562,-2.582031 -2.835937,-5.316406 -3.613281,-8.261719 -0.683594,-2.574218 -0.902344,-5.1875 -0.6875,-7.828125 0.214844,-2.617187 0.910156,-5.117187 2.152344,-7.441406 2.164062,-4.050781 5.503906,-6.710937 9.816406,-8.179687 1.890625,-0.640625 3.835937,-1.058594 5.832031,-1.195313 1.121094,-0.07813 2.242188,-0.152344 3.363281,-0.164062 4.28125,-0.02734 8.4375,0.734375 12.453125,2.175781 1.871094,0.671875 3.6875,1.496094 5.523438,2.257812 0.226562,0.09375 0.4375,0.230469 0.664062,0.351563 -0.164062,0.25 -0.371093,0.160156 -0.539062,0.164062 -2.824219,0.101563 -5.535156,0.703125 -8.132813,1.804688 -1.335937,0.570312 -2.570312,1.316406 -3.648437,2.296875 -2.527344,2.296875 -3.605469,5.15625 -3.34375,8.550781 0.140625,1.855469 0.722656,3.574219 1.550781,5.222656 0.648438,1.296875 1.414063,2.523438 2.292969,3.675782 0.953125,1.25 1.929687,2.484375 2.929687,3.699218 2.085938,2.523438 4.164063,5.054688 6.050782,7.738282 2.203125,3.136718 4.140627,6.417968 5.589847,9.980468 1.16406,2.867188 2.01562,5.820313 2.39843,8.894532 0.25,2.011718 0.30079,4.03125 0.11719,6.058593 -0.24219,2.640625 -0.79297,5.195313 -1.74609,7.667969 -1.29688,3.36328 -3.300784,6.22656 -5.972659,8.63281 -2.429687,2.19141 -5.171875,3.90625 -8.109375,5.3125 -2.695312,1.29297 -5.464843,2.40235 -8.34375,3.20313 -1.953125,0.54687 -3.945312,0.8789 -5.949218,1.15625 -3.035157,0.41797 -6.085938,0.48828 -9.132813,0.3125 -5.328125,-0.3125 -10.476562,-1.46094 -15.410156,-3.52344 -3.449219,-1.44141 -6.691406,-3.25781 -9.757813,-5.39453 -0.183593,-0.12891 -0.378906,-0.25 -0.53125,-0.41016 -0.07031,-0.0703 -0.05859,-0.22656 -0.08203,-0.34375 z m 0,0' id='path4175' /%3E%3Cpath style='fill:%23333f48;fill-opacity:1;fill-rule:nonzero;stroke:none' d='M 94.699219,29.390625 C 94.089844,29.21875 93.476563,29.054688 92.867188,28.875 90.183594,28.085938 87.46875,27.441406 84.703125,27.046875 c -3.976562,-0.566406 -7.945312,-0.59375 -11.863281,0.402344 -7.535156,1.914062 -12.386719,6.71875 -14.878906,13.996094 -0.894532,2.617187 -1.179688,5.328125 -0.953125,8.078125 0.203125,2.484375 0.867187,4.859375 1.816406,7.160156 0.933594,2.261719 2.117187,4.390625 3.4375,6.449219 1.4375,2.25 3.050781,4.371093 4.640625,6.511718 1.4375,1.933594 2.867187,3.871094 4.261719,5.835938 1.230468,1.730469 2.316406,3.546875 3.273437,5.445312 1.324219,2.625 2.265625,5.378907 2.703125,8.292969 0.433594,2.902344 0.292969,5.765625 -0.660156,8.5625 -0.9375,2.74609 -2.574219,5.00781 -4.777344,6.875 -2.417969,2.04688 -5.203125,3.39844 -8.246094,4.22266 -1.835937,0.5 -3.703125,0.75781 -5.609375,0.82031 -3.886718,0.13281 -7.679687,-0.47266 -11.421875,-1.46094 -2.261718,-0.59765 -4.488281,-1.33203 -6.695312,-2.11328 -0.207031,-0.0742 -0.40625,-0.16797 -0.597656,-0.25 -0.02344,-0.24609 0.148437,-0.19141 0.25,-0.20703 1.96875,-0.30469 3.921875,-0.67969 5.804687,-1.34766 1.367188,-0.48437 2.671875,-1.10156 3.855469,-1.94922 2.25,-1.61328 3.65625,-3.765621 4.0625,-6.515621 0.273437,-1.867188 0.09375,-3.710938 -0.429688,-5.527344 -0.472656,-1.648437 -1.171875,-3.199219 -2.109375,-4.628906 -0.792968,-1.207031 -1.636718,-2.382813 -2.523437,-3.519531 -0.921875,-1.195313 -1.921875,-2.328125 -2.890625,-3.484375 -2.753906,-3.273438 -5.351563,-6.660157 -7.523438,-10.355469 -2.042968,-3.480469 -3.667968,-7.136719 -4.597656,-11.078125 -0.640625,-2.699219 -0.980469,-5.4375 -0.832031,-8.214844 0.238281,-4.53125 1.476562,-8.78125 3.824219,-12.6875 1.082031,-1.800781 2.445312,-3.375 3.988281,-4.800781 2.742187,-2.527344 5.863281,-4.480469 9.257812,-5.992188 3.746094,-1.667968 7.652344,-2.769531 11.707032,-3.394531 3.152343,-0.488281 6.324218,-0.671875 9.507812,-0.519531 8.632813,0.410156 16.671875,2.792969 24,7.433594 0.08203,0.05078 0.152344,0.109375 0.230469,0.167968 -0.0039,0.04297 -0.0078,0.08984 -0.01563,0.136719' id='path4177' /%3E%3Cpath style='fill:%23333f48;fill-opacity:1;fill-rule:nonzero;stroke:none' d='m 31.699219,38.75 c -0.07813,0.238281 -0.152344,0.476563 -0.238281,0.710938 -1.460938,4.074218 -2.066407,8.28125 -1.808594,12.59375 0.4375,7.304687 2.808594,13.925781 7.277344,19.753906 3.714843,4.84375 7.441406,9.671875 11.167968,14.503906 1.113282,1.441406 1.953125,3.007813 2.414063,4.777344 0.332031,1.257812 0.425781,2.539062 0.273437,3.820312 -0.214843,1.832032 -1.070312,3.34375 -2.464843,4.546875 -0.984375,0.851559 -2.113282,1.449219 -3.316407,1.925779 -1.378906,0.54297 -2.8125,0.89063 -4.273437,1.1211 -2.226563,0.35547 -4.46875,0.46093 -6.722656,0.41015 -0.589844,-0.0156 -1.046875,-0.18359 -1.433594,-0.625 -0.636719,-0.72265 -1.335938,-1.39062 -1.9375,-2.14062 C 25.574219,93.800781 22.300781,86.621094 20.84375,78.636719 20.152344,74.835938 19.917969,71 20.15625,67.128906 20.796875,56.773438 24.390625,47.574219 30.859375,39.480469 c 0.21875,-0.273438 0.453125,-0.53125 0.679688,-0.796875 0.05469,0.02344 0.109375,0.04297 0.160156,0.06641' id='path4179' /%3E%3Cpath style='fill:%23333f48;fill-opacity:1;fill-rule:nonzero;stroke:none' d='m 105.41016,101.30078 c -0.13282,-0.3125 0.0234,-0.5039 0.0977,-0.69922 1.38672,-3.749997 1.98047,-7.628904 1.89844,-11.621091 -0.14453,-6.84375 -2.08594,-13.144531 -5.73437,-18.925781 C 99.890625,67.226563 97.917969,64.53125 95.835938,61.917969 94.4375,60.160156 92.988281,58.4375 91.582031,56.6875 90.632813,55.511719 89.6875,54.335938 88.792969,53.121094 c -0.835938,-1.144531 -1.488281,-2.398438 -1.953125,-3.742188 -0.523438,-1.515625 -0.695313,-3.070312 -0.511719,-4.652343 0.21875,-1.839844 1.082031,-3.339844 2.476563,-4.542969 1.039062,-0.890625 2.230468,-1.507813 3.503906,-1.980469 1.632812,-0.609375 3.320312,-0.960937 5.046875,-1.175781 1.917969,-0.238281 3.839841,-0.269531 5.769531,-0.230469 0.52734,0.01172 0.89453,0.203125 1.23828,0.585938 5.50391,6.113281 9.26172,13.144531 11.21875,21.132812 1.11719,4.554688 1.5625,9.179688 1.30469,13.855469 -0.58203,10.625 -4.23438,20.082031 -10.96094,28.339846 -0.15625,0.1914 -0.32812,0.375 -0.51562,0.58984' id='path4181' /%3E%3Cpath style='fill:%23333f48;fill-opacity:1;fill-rule:nonzero;stroke:none' d='m 39.796875,108.63281 c -0.05859,0.0117 -0.117187,0.0234 -0.175781,0.0352 0.05469,-0.0156 0.113281,-0.0312 0.167969,-0.0469 z m 0,0' id='path4183' /%3E%3C/g%3E%3C/svg%3E)
 Play animation
 Play step-by-step
 Repeat (toggle)
 Full Screen
 Pause
Pause Stop
Stop
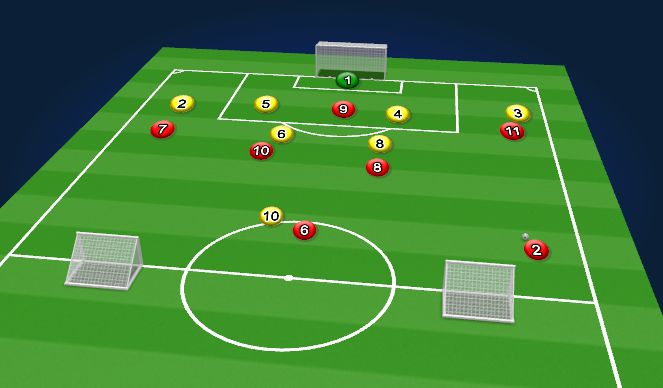
Initial Set up
Situation:
Red team have regained the ball after an attack by the yellow team with the full back, Number 2 taking the ball up the pitch.
Yellows are in a fairly decent shape and have enough players back to deal with the red's attack.
If at any point during the drill yellows win it back they can score into the two mini goals to simulate playing the ball out to one of their attacking players.
My aim will be to coach reds to find options of playing through the lines or switching the play to find goal scoring opportunities