Football/Soccer Session (Academy Sessions): 4231 Pattern of Play - Building the Attack

FAW Coach Ed
Jonathan Hill-Dunt
Description
Organisation (Practice Layout & Transition)
See the guidance at the top of this page to understand why you are not seeing interactive Football/Soccer images.
See the guidance at the top of this page to understand why you are not seeing interactive Football/Soccer images.
10 mins
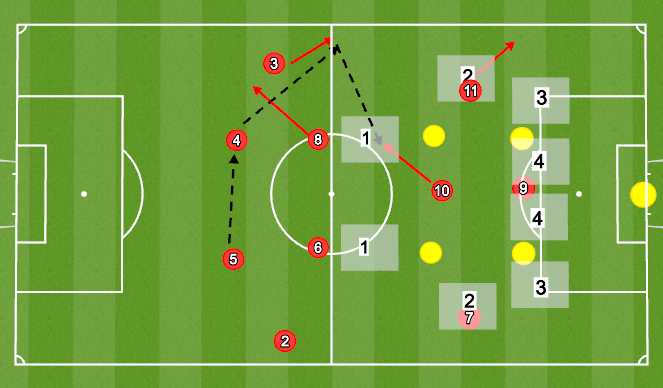
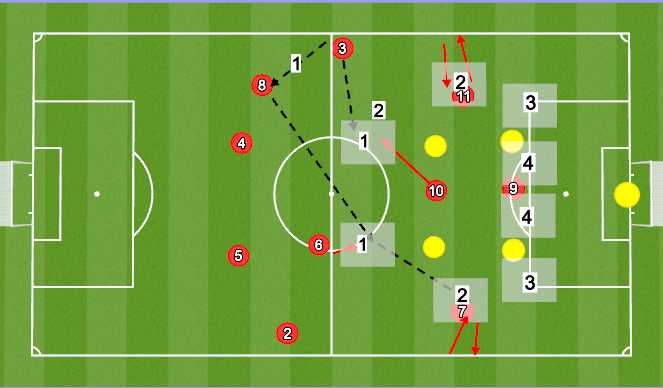
Pattern of PlayDEF CB's play as if you have a back 4, play in relation to the ball and your position, play against the 9/10
- Each pattern starts with a pass between the ATT CB's, do one each side as a demo first
- Once the CB gets the ball the ball side FB moves wider to receive the ball
- The next pass then goes to the ball side FB
- Mimicking the 11 not being able to get the ball, the 10 will then drop into Z1
- As the 10 drops into Z1, the ball side CM (8) drops in as a 'false FB' to help incase of a breakdown
- the 11 moves wider as he is marked.
Observation Points:
- 8 is giving you depth for the 10 to bounce the ball into and also helping defensively
- 11 is giving added width
- 10 is helping to create an overload centrally
- 10 has the options of bouncing back into CM or turning and feeding the 11 - the aim is to get the 11/3 on the ball.
- Boxes are there to create passing angles to discourage straight passes
Coaching Points:
- Wide players are to get to the touch line as quick as possible.
- Stop and step in to explain why the pass cant go to the 10/7/11, explain they are marked and why we are going into the 10
See the guidance at the top of this page to understand why you are not seeing interactive Football/Soccer images.
10 mins
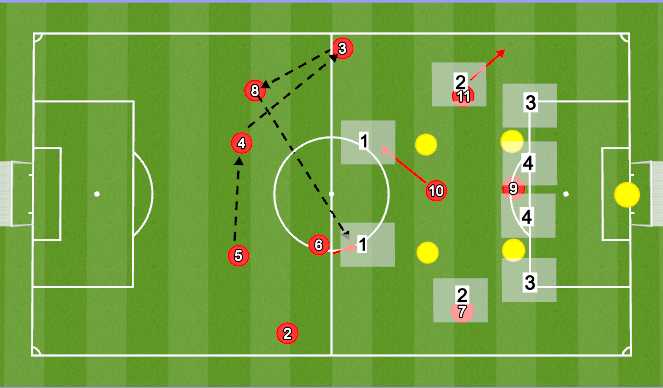
This time, instead of passing into the 10 dropping into Z1, the FB is passing to the CM who has dropped in - mimicking the 10/11 not being able to get on the ball- the CM once on the ball is aiming to get the ball into the opposite Z1, and get the other CM on the ball.
- The 6's trigger to step towards Z1 is when the ball is bounced back by the FB
- Wide players still aiming to get wide ASAP
- 10 is still dropping in to show for the ball
Observation Points:
This pattern is giving players an option to play out by switching possession through the passing line provided bt the ball side CM
Coaching Points :
- If the wide player is on the touchline the far side FB can step in as a CM
Stop and step in to explain why the pass cant go to the 10/7/11, explain they are marked and why we are going backwards
See the guidance at the top of this page to understand why you are not seeing interactive Football/Soccer images.
10 mins
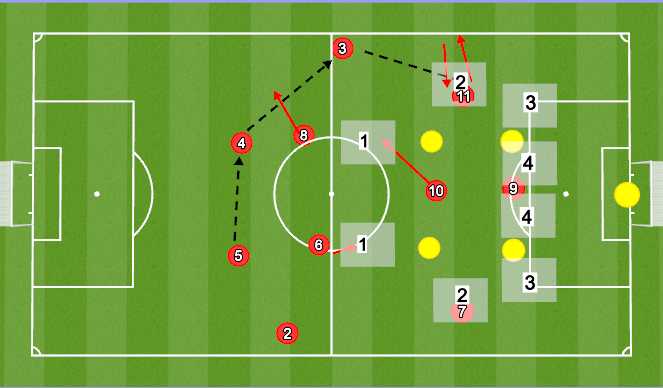
Aim of this pattern is to get the 11/7/10 on the ball in Z2
Movement of the 7/11 is out to in - starting in the box once the ball is passed to the FB, that is the trigger for the 7/11 to move back into Z2
Coaching Point:
- 7/11 double movement - start narrow, once the ball is passed to the FB get out to the touch line. With the aim of getting on the ball in Z2
- FB - has the option now of passing into the 10 or the wide man
- FB pass the ball inside of the wide men
- If the ball goes into the 10 he's playing round the corner into Z2
- Once the ball is in Z2 it's a free attack
- Every time the ball is passed forward we get up the pitch
See the guidance at the top of this page to understand why you are not seeing interactive Football/Soccer images.
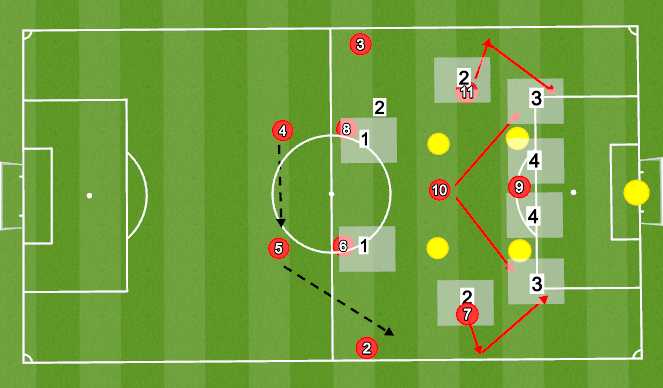
10 mins
The aim of this pattern is for the CM to be able to switch the play and get the 7/11 on the ball in the opposite zone 2
Doing this by passing through Z1
The FB has 2 passing options - either playing in the CM who has dropped in as the false full back or the 10 who is in Z1 (Pass 1 or 2)
Working the opp side - near man isnt on!
OPP CM
Once the ball gets to Z2 it's a free attack - Encourage the angled pass into the 9's path if the CB leaves room for the pass
See the guidance at the top of this page to understand why you are not seeing interactive Football/Soccer images.
10 mins
FB's start high - Once on the ball, their aim is to get the 7/10/11 on the ball in Z3
This pattern is mimicking the wide men getting behind the DEF FB
Start higher as we have built the play by this point
- 10 has the option of going into Z3 if the 7/11 have stayed wide
- 7/11 use the double movement to create space, or drive the ball into the box
- Once the FB plays the ball he can overlap
- Squeeze the play with each pass
No straight passes, harder to defend and cut out
See the guidance at the top of this page to understand why you are not seeing interactive Football/Soccer images.
RED playing a 4-2-3-1 with no GK
YELLOW playing 2-2-3 with GK
YELLOW front 3 press the pass to the CB once the ball is live
Encourage RED to use the patterns that have been worked on

 Play animation
 Play step-by-step
 Repeat (toggle)
 Full Screen
 Pause
Pause Stop
Stop
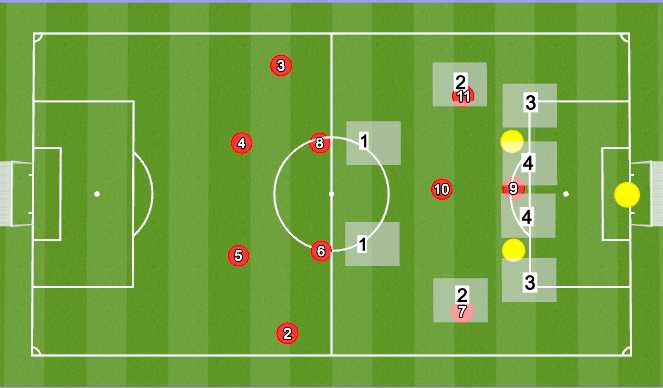
ATT team set up in a 4-2-3-1
DEF have 2 CB's and a GK in initially
(13 Players)
Add 2 DEF CM's to add more match realism as and when it's needed
The pitch is set up into 4 Zones
Zone:
Explain the boxes and that it is unopposed to begin with so you can understand what's being asked, players will be added to add realism
Zone 1
Zone 2 Half space, picking the ball up in the pocket between the DEF lines these spaces are mainly for the 7/10/11
Zone 3 - Aiming to get on the ball between the OPP FB/CB and force the CB to come over to the ball, ATT FB getting high in this area is key to free up the 7 to roam into the half space.
Zone 4 - 9/10 Receiving the ball between the OPP CB's running in on goal has to be an ANGLED pass can't be straight
Coaching Points:
- FB's get high
- 7/10/11 getting on the ball in Zone 2, feeding the ball into the 9 in Zone 4
- Zone 1 is vital - if we can control this area we control the game.
- Once the ball is passed forward we get up the pitch, to win the ball back higher
- Make sure the quality is good - have 2 touches asif it was a game to keep the quality
If theres more than 1 coach, each coach takes a Unit to coach through the sessionUnits are 2/3/7/10/11 - aim is to get the FB's forward, 7/10/11 into zones 2 and 36/8 - control zone 1, ensure players are receiving the ball in the zones 9 - control zone 4, move into space